
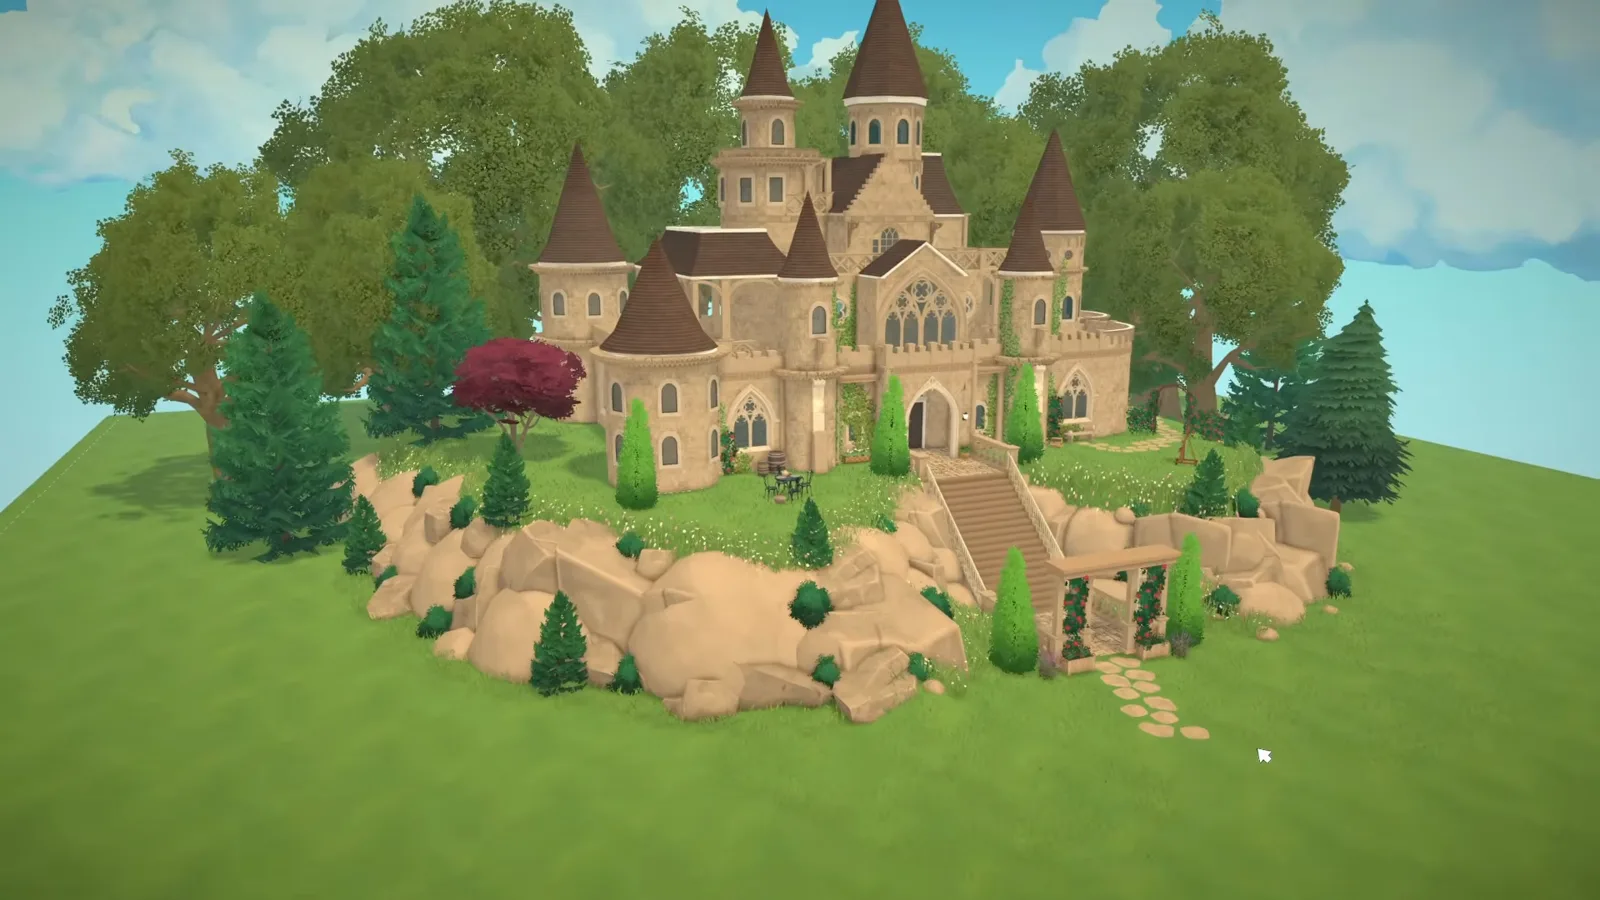
The short version
A Paralives castle is a curtain wall, a set of round drums built from curved wall sections, and cone caps — all base-game items, no mods. The hard parts are the ones the game admits to: curved walls take no windows, roof blocks do not fit round plans, and stairs will not snap to a slope.
- Round towers are four curved wall sections — they close a circle but stay slightly squared off at the joints.
- No windows or doors on curved walls yet: use the miscellaneous decorative windows, and a curved half wall where you want a fence.
- There are no castle doors. A large wooden door, an extended archway in front of it and an arched window above make the gate.
- Crenellations are fence and half-wall pieces run along the crest of the wall, not a battlement item.
- Build on flat ground, then zoom out, lift the whole castle with Lot Placement and pile terrain under it.
- Match one sandstone tone by copying a colour code into the Style Creation wheel — recolouring rescues wooden-looking pieces.
Shell & crest
Ring the curtain wall
Castles are won or lost on the base ring, and in Paralives that means straight wall runs between round drums built from curved sections. Nothing here is a castle item: the towers are wall pieces, the battlement is fencing, and the gate is a wooden door wearing an archway.
- 1
Turn four curved sections into a tower
Round towers are built from the curved wall sections in the wall category, not from a tower item. The builder's note: each section is a quarter turn, so four close the circle — but they still read slightly squared off at the joints, and the placement HUD shows the angle you are joining at (135° here) next to the run length. Lay the drum on the grid first, then run straight curtain wall between the drums.
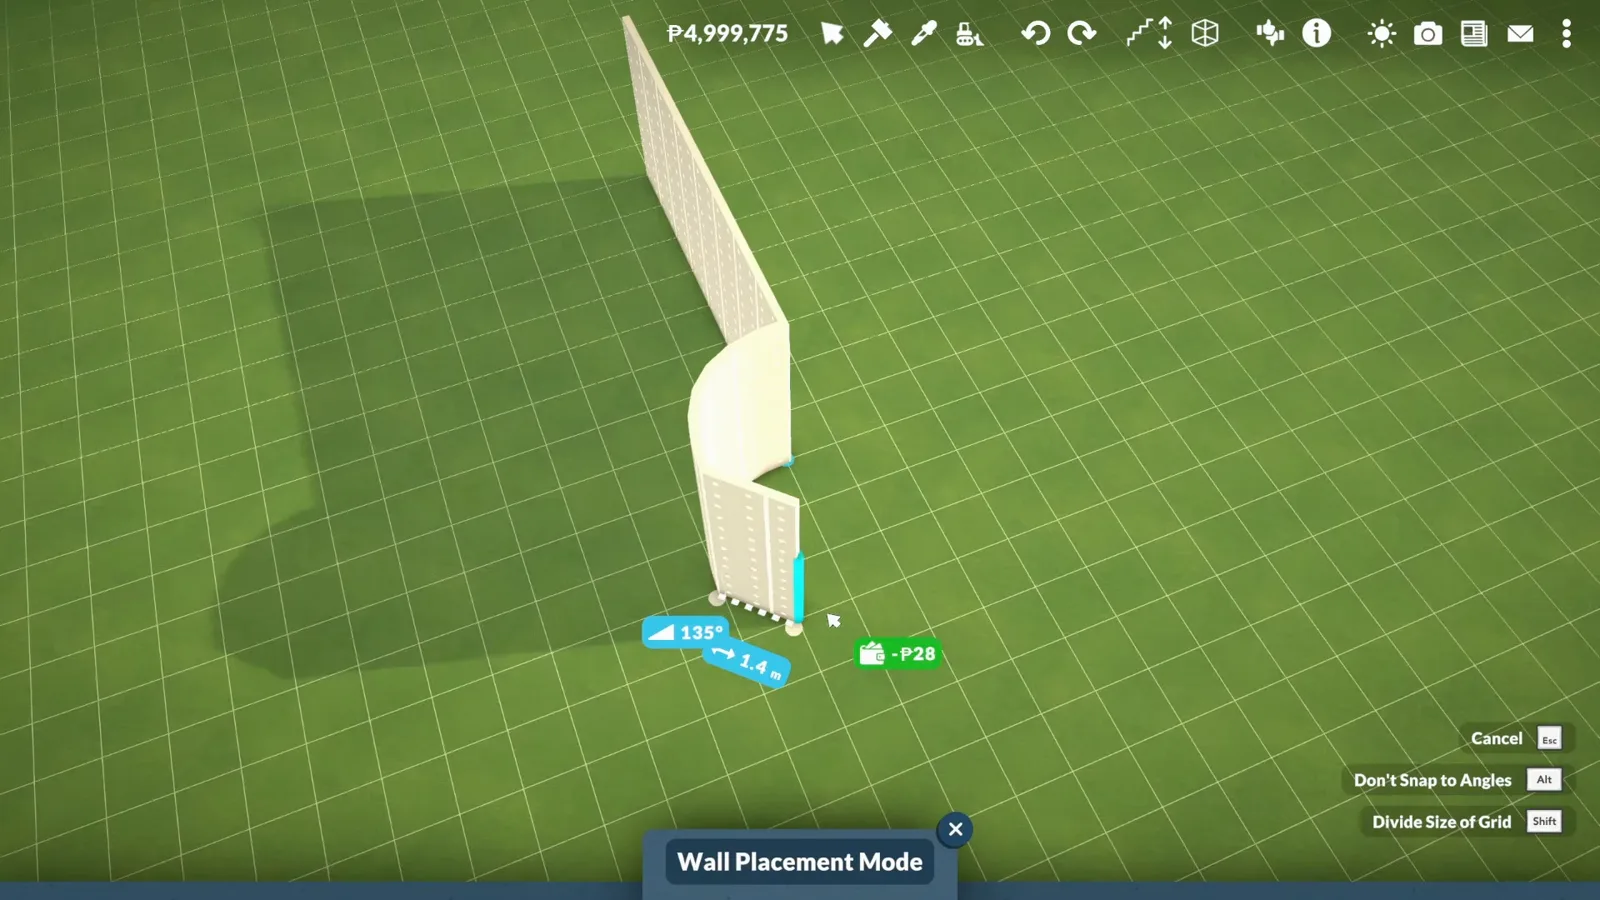
Four curved sections close a circle; the angle readout tells you where the joint lands.Watch at 0:30 - 2
Set the curtain wall and the drums first
Nothing is decorated yet: this is the whole footprint — four round drums and the straight wall runs between them, all at one height. Getting that base ring right is what makes the finished silhouette read as a castle rather than a house with cones on it, and the builder's advice is to vary the shapes. She mixed square, hexagonal, round and semi-circular rooms in the same keep.
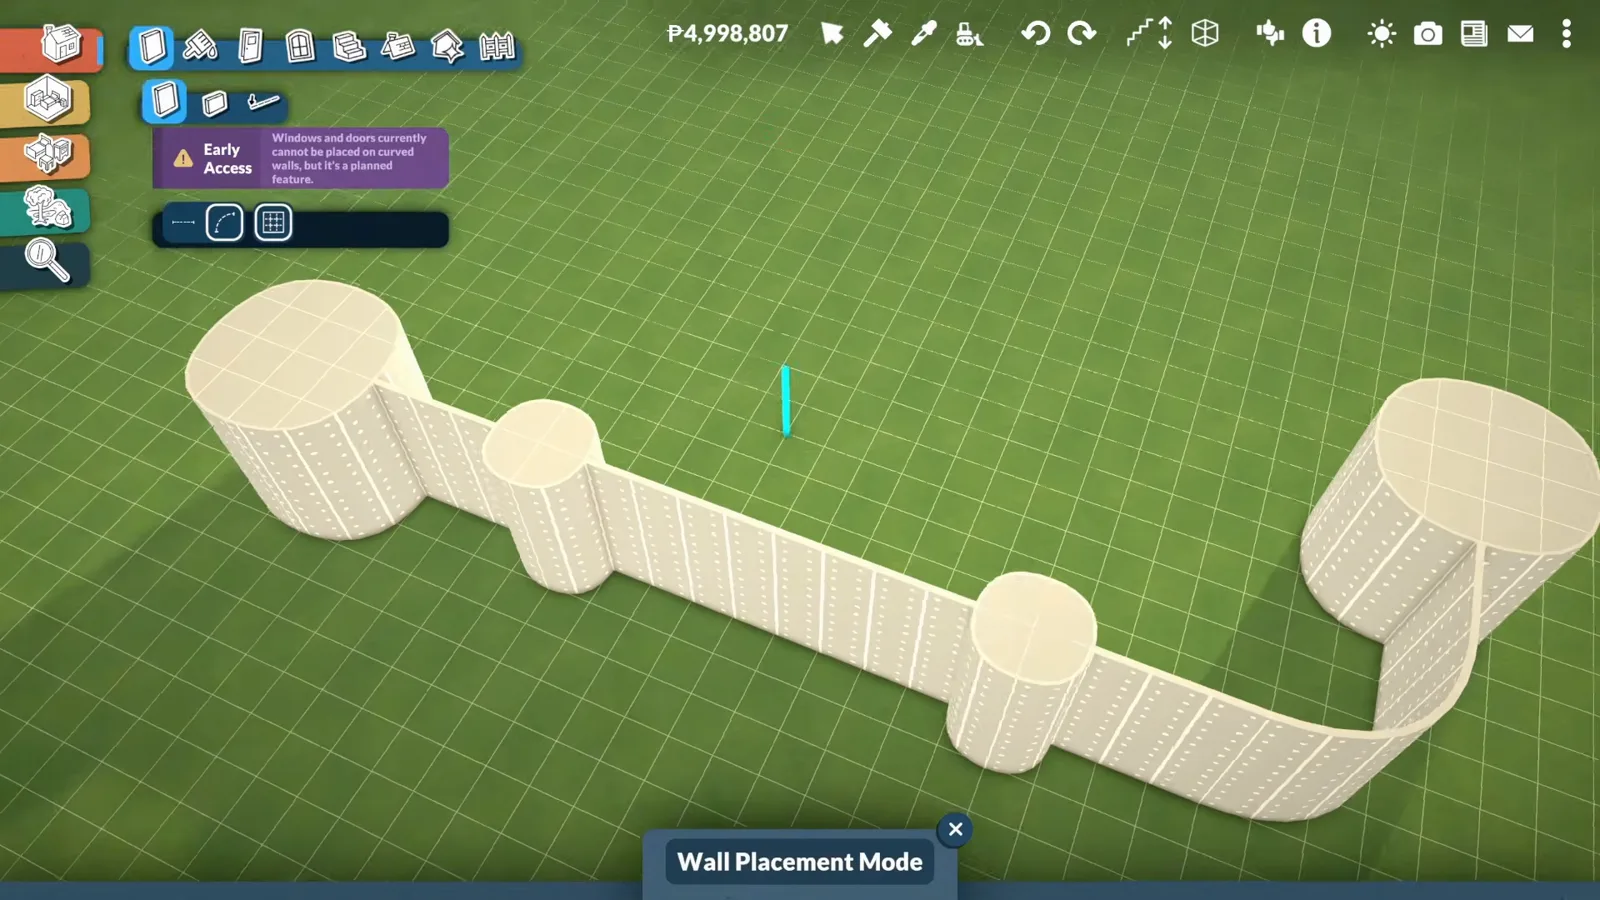
The base ring before any height: drums at the corners, straight runs between them.Watch at 0:48 - 3
Fake the gatehouse with a big door and an archway
There are no castle-specific doors — the builder says so plainly — so the gate is assembled: a large wooden door, an extended archway set a step in front of it so the opening has depth, and an arched window over the top to stretch the doorway taller than any single door piece goes. Wall Painting Mode is where the sandstone tone goes on. The archway resizes; this door does not.
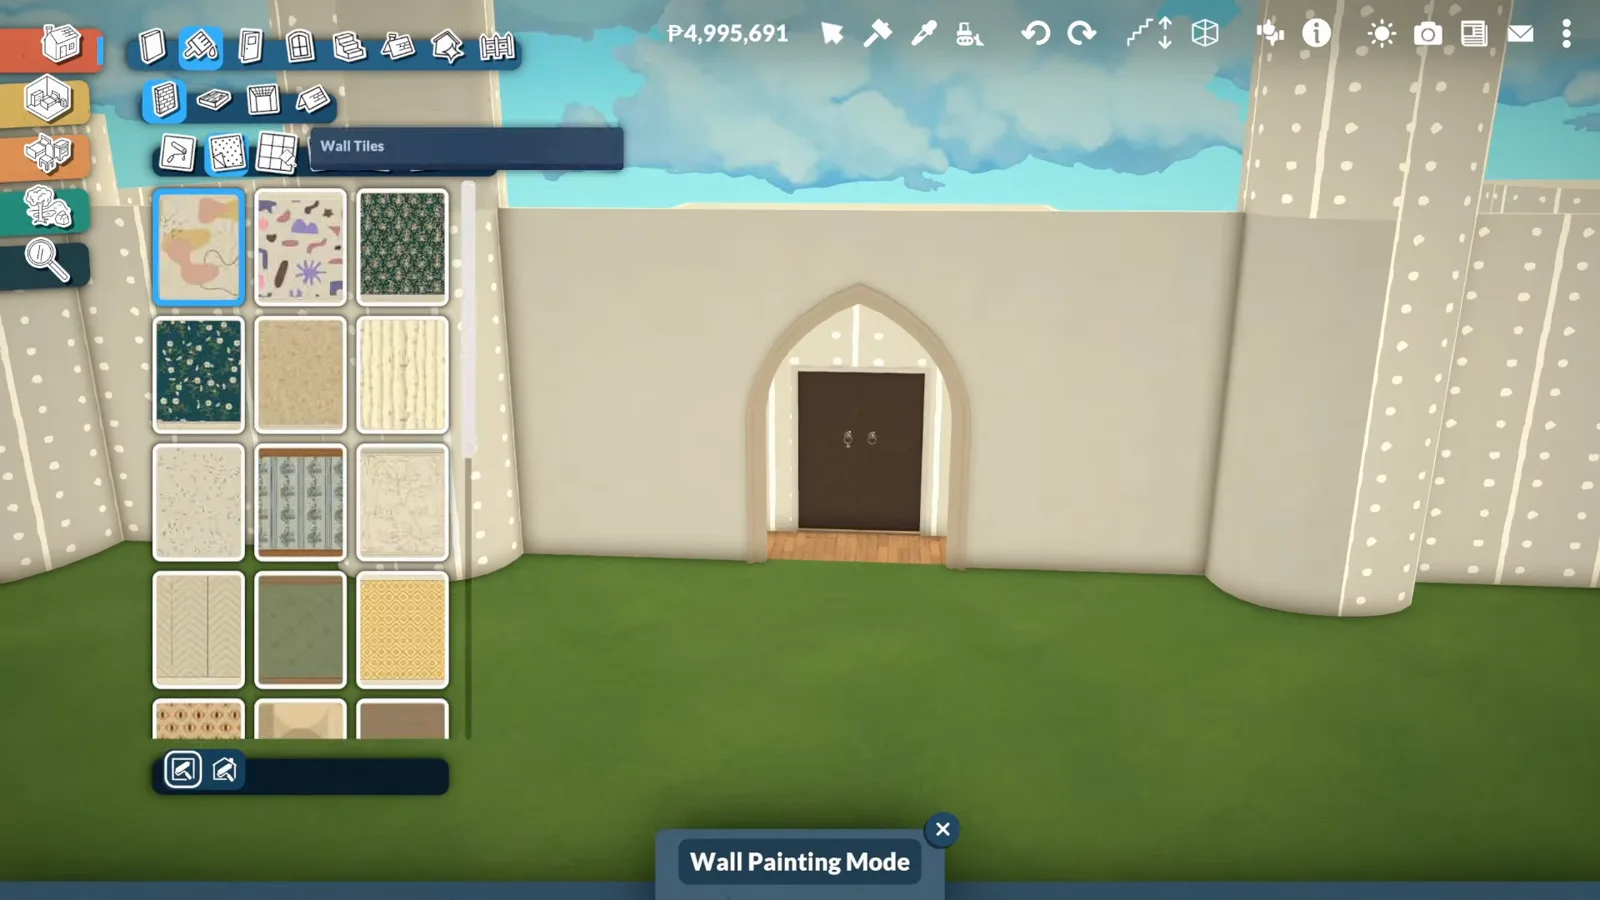
Door behind an extended archway, arched window above: three items, one gatehouse.Watch at 1:12 - 4
Crenellate the wall walk
The notched crest is not one item — it is fence and half-wall pieces run along the top of the wall, which is also how the builder varies her towers: some get a full wall, some a half wall, some just a fence. The walkway on top reads as paved stone, laid like a floor rather than as another wall piece. Keep the Color Swatches panel open while you work; the colours you last used stay pinned at the top of every picker.
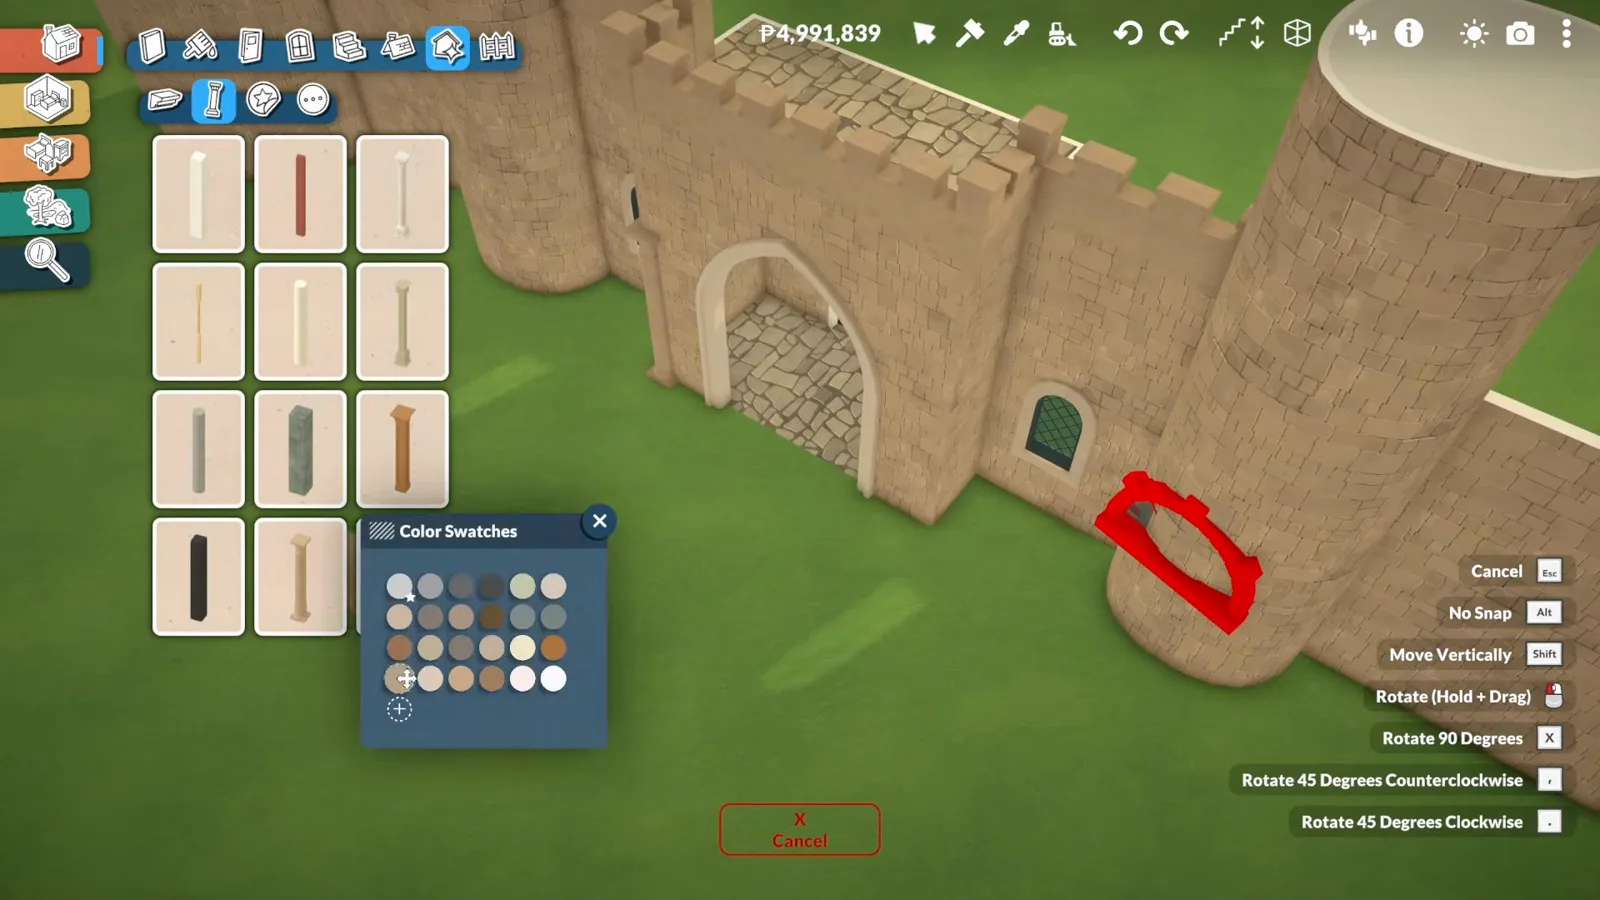
Battlements come from fence and half-wall pieces on the crest, not a castle set.Watch at 1:54
Cones & curves
Cap the towers and work around the curved walls
This is the layer that says castle — the pointy roofs — and also where Early Access pushes back hardest. The game itself prints the warnings: roof blocks do not fit round plans yet, and curved walls take no windows. Both builders worked around them with items that already exist.
- 5
Cap the towers with cone roofs
The caps come out of the roof category, and the builder is blunt about which one you are chasing: the pointy roofs are what make it. Two things fight you. Roof pieces are cut for square plans, and the game admits it — the Early Access notice in this screenshot reads: "When building without a grid, it might be hard to place roof blocks to fit the shape of your floor plan. We are planning to add more flexible roof tools." So build the drum with the grid on, then drop the cone in and resize it.
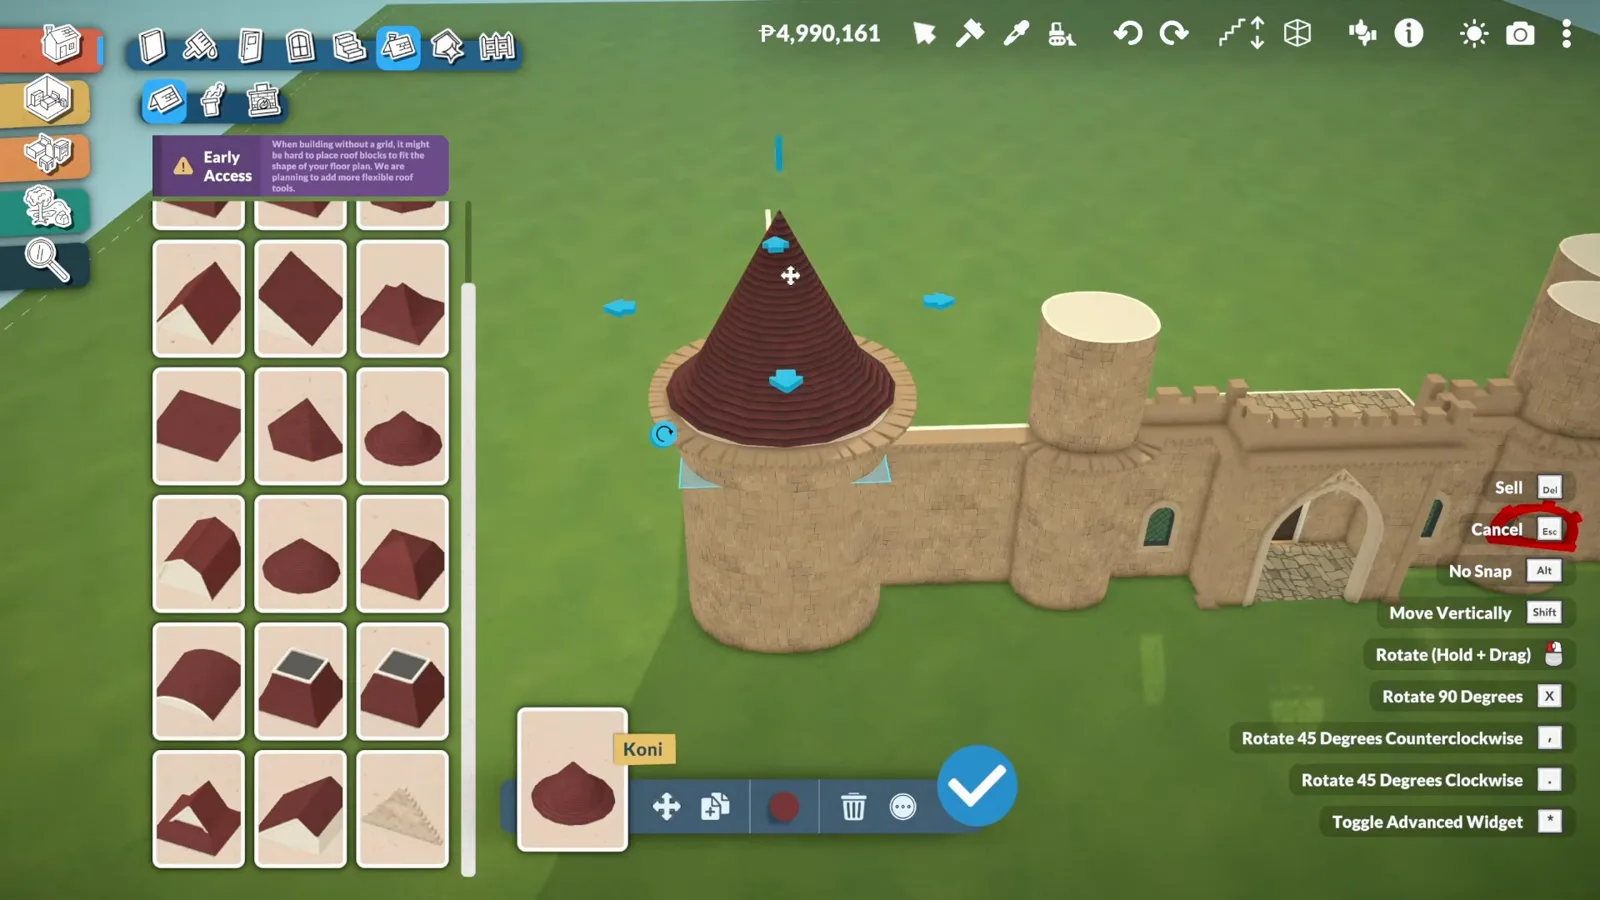
The game warns you: roof blocks and round floor plans do not cooperate yet.Watch at 2:24 - 6
Work around the curved-wall limits
Windows and doors cannot go into a curved wall — the Early Access banner in this frame says it in the game's own words: "Windows and doors currently cannot be placed on curved walls, but it's a planned feature." The builder's two workarounds: decorative windows from the miscellaneous section, which sit on the surface and read as glazed, and a curved half wall wherever she wanted a fence, because fences will not follow a curve either.
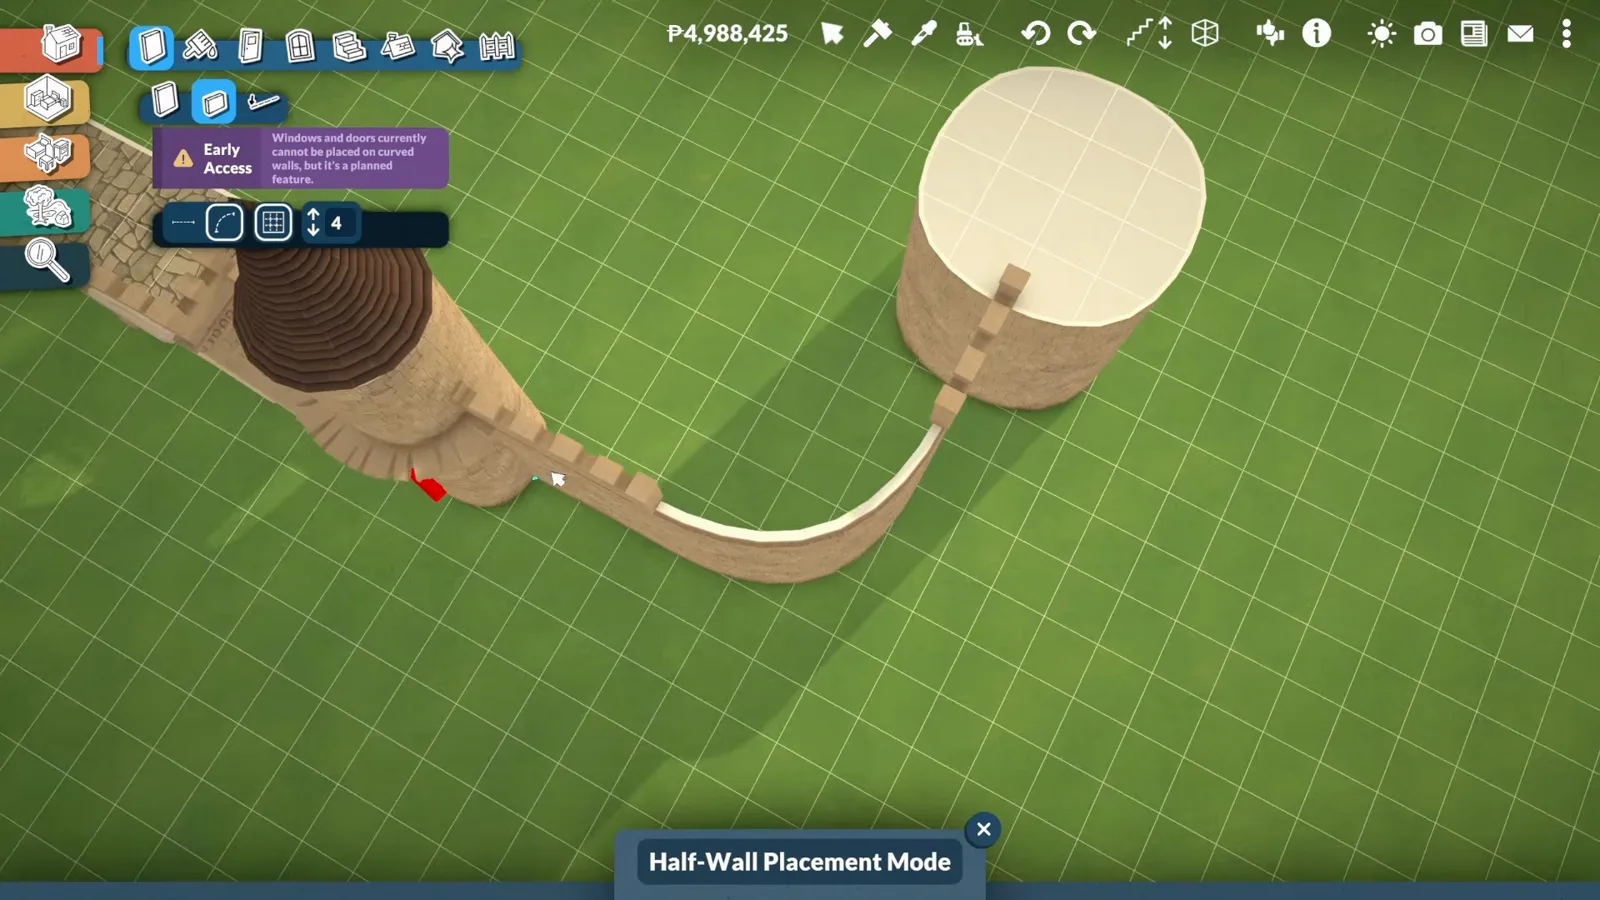
No fence on a curve: a curved half wall does the same job on top of a tower.Watch at 3:06 - 7
Lock one sandstone tone with a hex code
Most of the shell is a single preselected sandy swatch, but not every piece carries it. When an item is missing the colour, the builder copies the colour code off something already painted and pastes it into the Style Creation wheel — the hex field is top right in this frame. Recolouring also rescues pieces: something that reads as wood goes stone-grey and disappears into the wall.
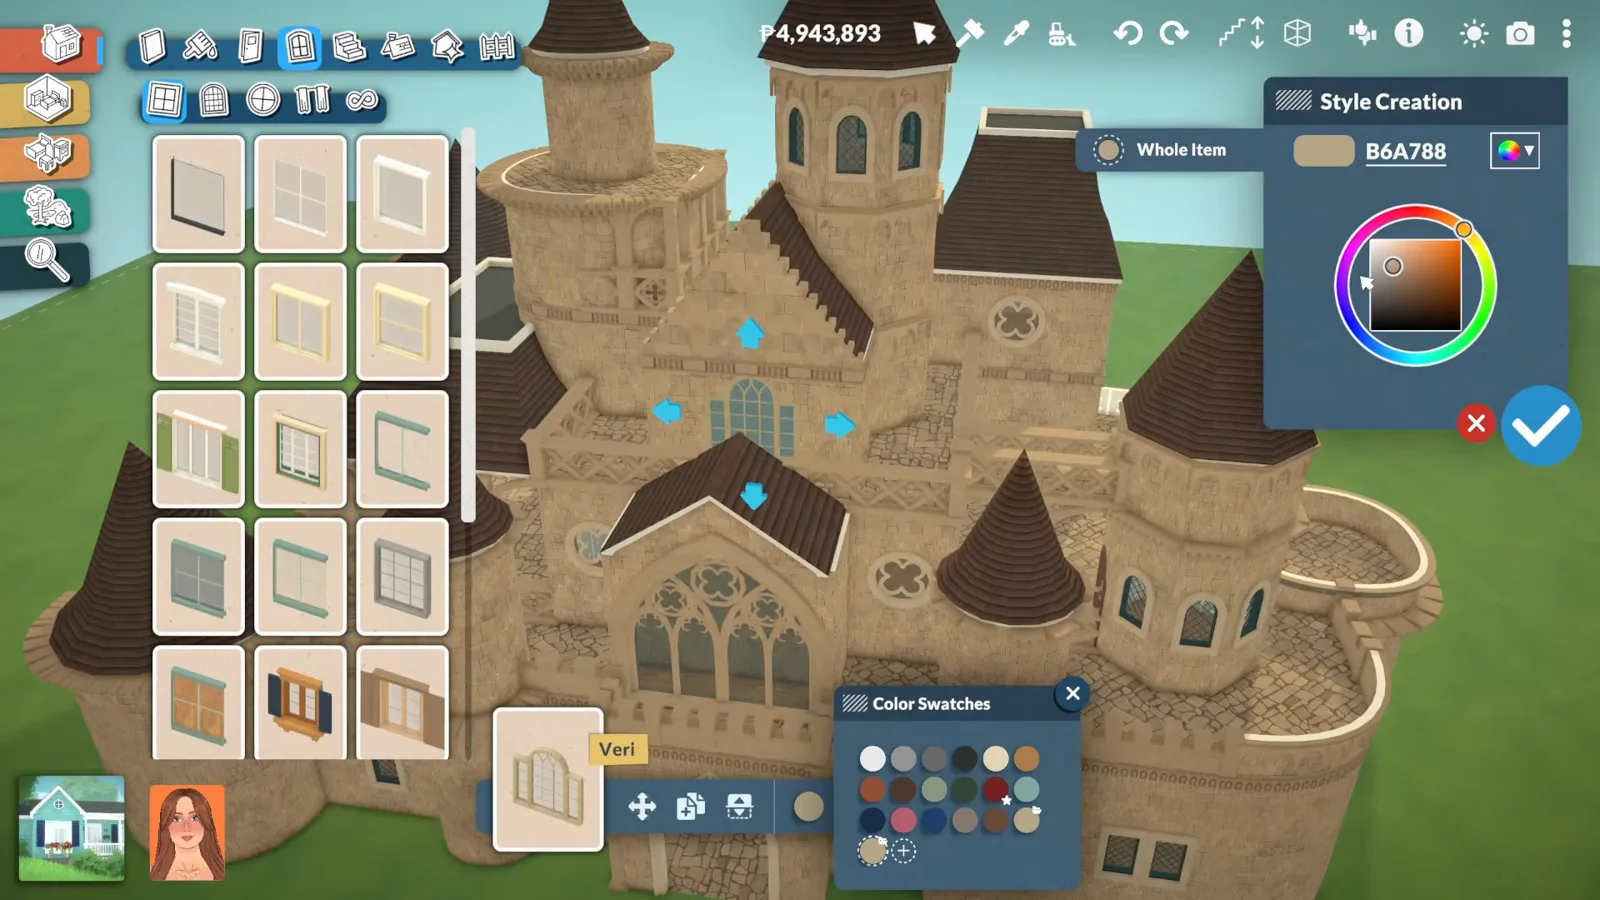
Copy the code off a painted piece, paste it into the wheel, and the keep matches.Watch at 6:50 - 8
Break the symmetry before you go up
From above the keep is deliberately uneven: cones, steep gables, flat caps and half-height turrets in one roofline. The builder's rule of thumb for castles is to go smaller as you go up — the turrets do most of the shape work — and to mix as many room shapes as you can carry. This is also where she added doorways into wall sections that needed a route round. The interior was left unfurnished and unwalked, so treat those doors as decoration until a live Para tests them.
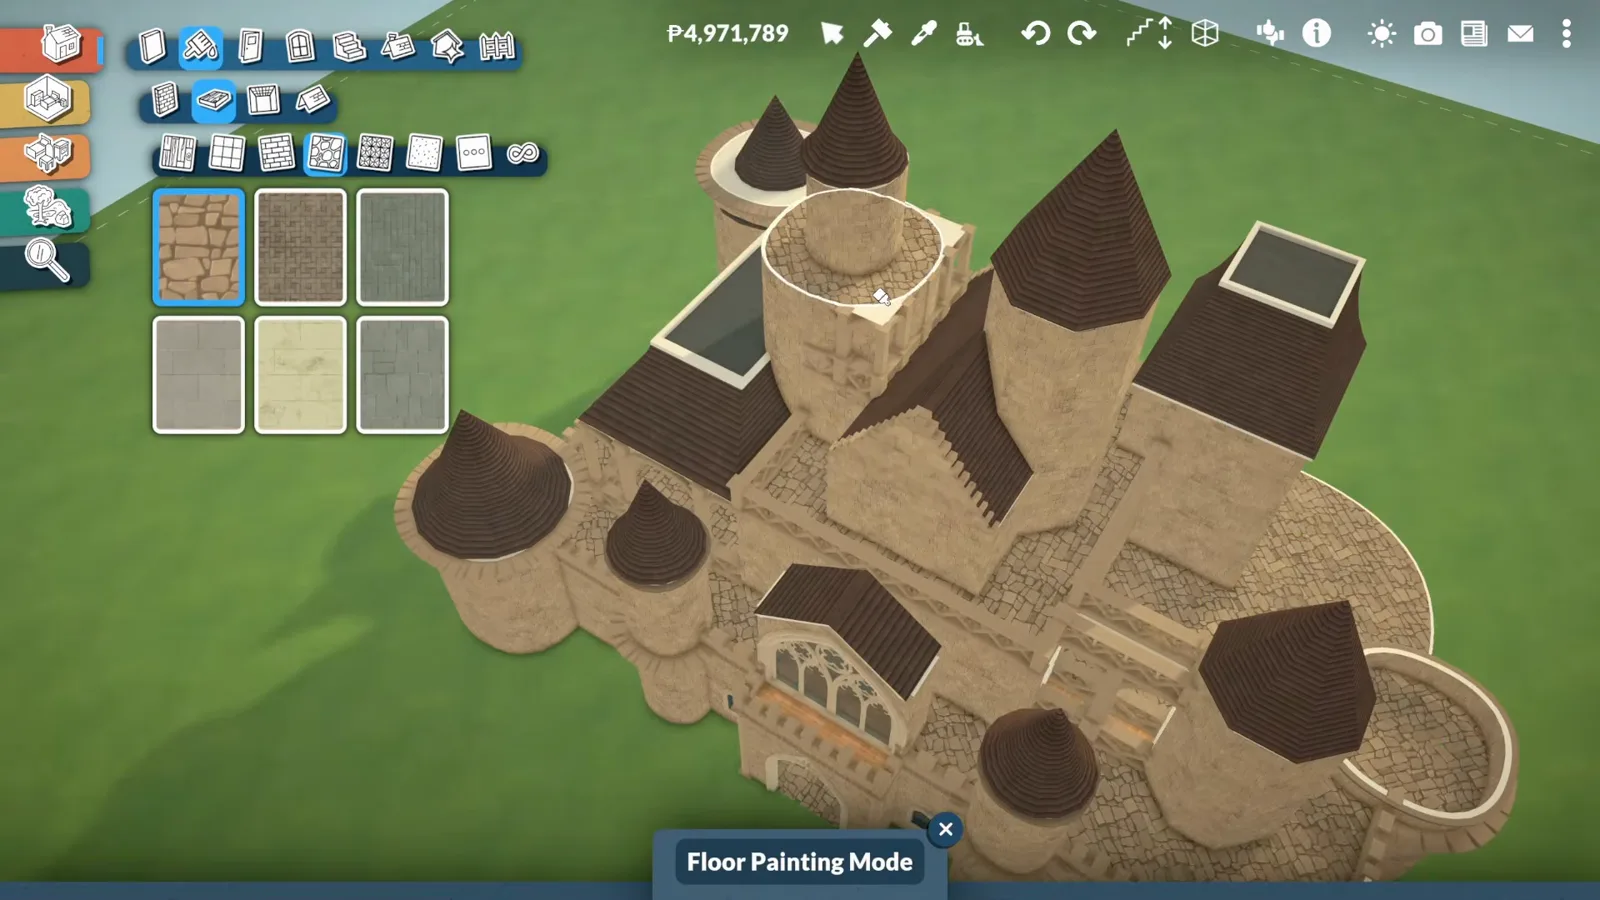
Smaller as you go up, and no two towers quite the same shape.Watch at 5:14
Site & approach
Put the whole thing on a rock
The sandstone castle started on a flat field and ended on a cliff. Lot Placement lifts the finished build, terrain builds the hill under it, an oversized flight of stairs makes the approach, and a ring of over-scaled boulders hides the seam between the two.
- 9
Lift the whole castle later
This build started on flat ground and only became a hilltop fortress at the end. Zoom right out and a control appears in the middle of the screen: the Lot Placement bar, with its move arrows, Cancel button and confirm tick, plus a rotation handle under the building. Raising the lot is cheaper than rebuilding on a slope. Neither builder documents a wall-height limit — the way up here is the lot, not the wall. The hotkey list on the right is the same one you use on any object — vertical move, no-snap and drag-to-rotate are all in our controls guide.
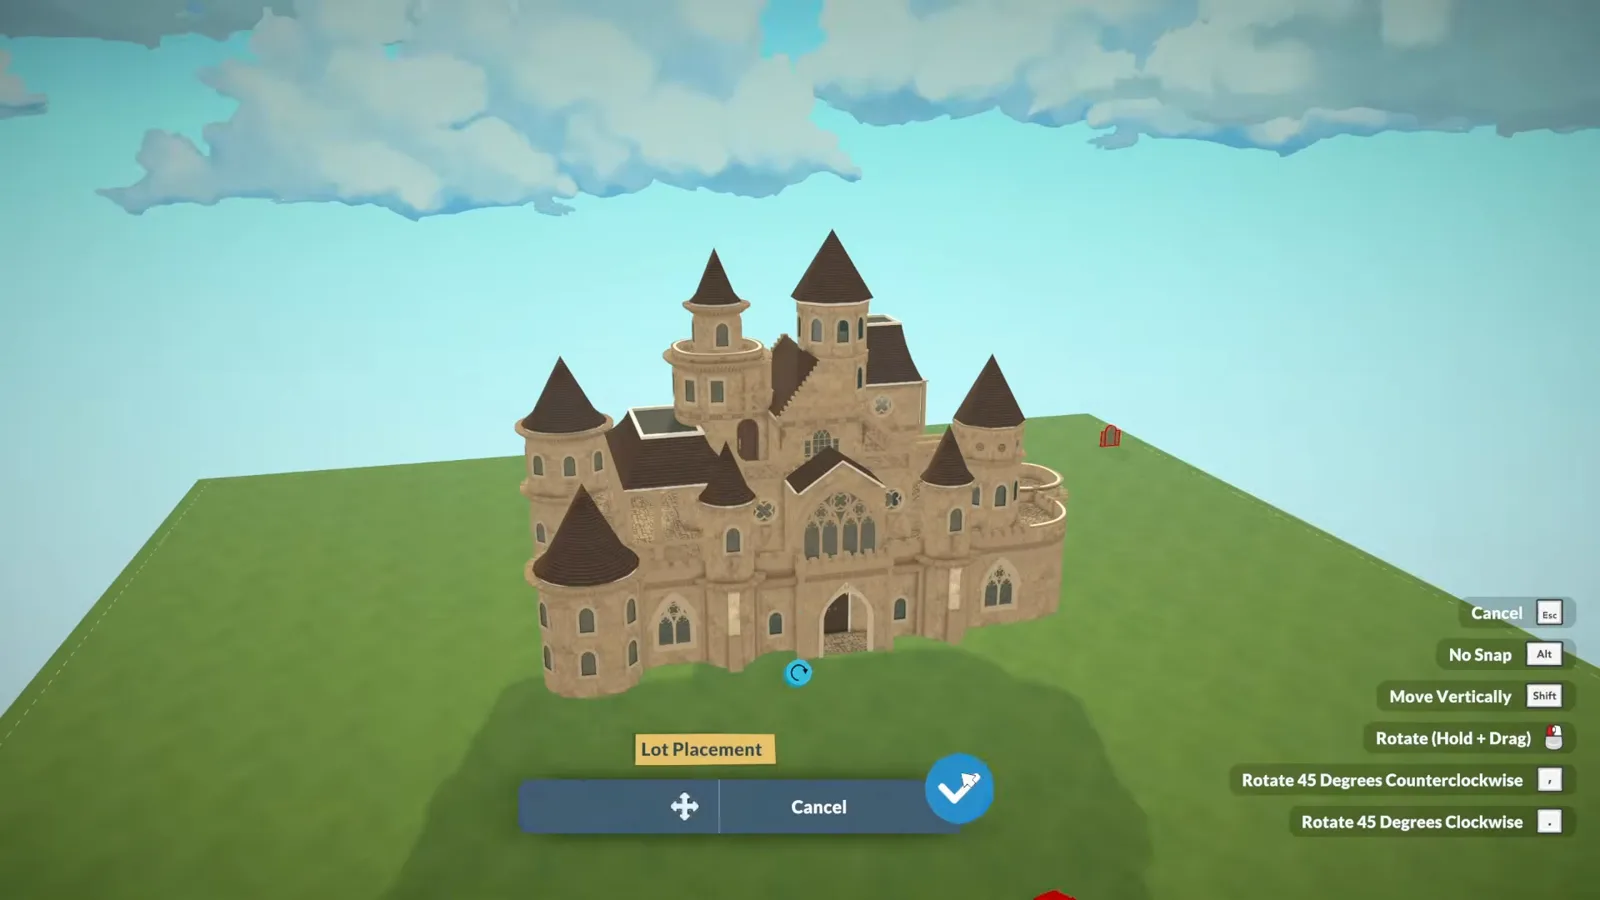
Zoom out and the whole build becomes one object you can move, rotate and raise.Watch at 9:04 - 10
Sculpt the mound under it
Once the lot is up, the ground has to meet it. Terrain Height Elevate Mode piles grass against the walls — the white outline is the brush footprint and the contour rings show where the height is landing — and Flatten Mode, which the builder calls her favourite tool, levels the plateau the castle stands on. Her verdict on terrain is the honest one: it is fiddly in every game, and this one is easier than most.
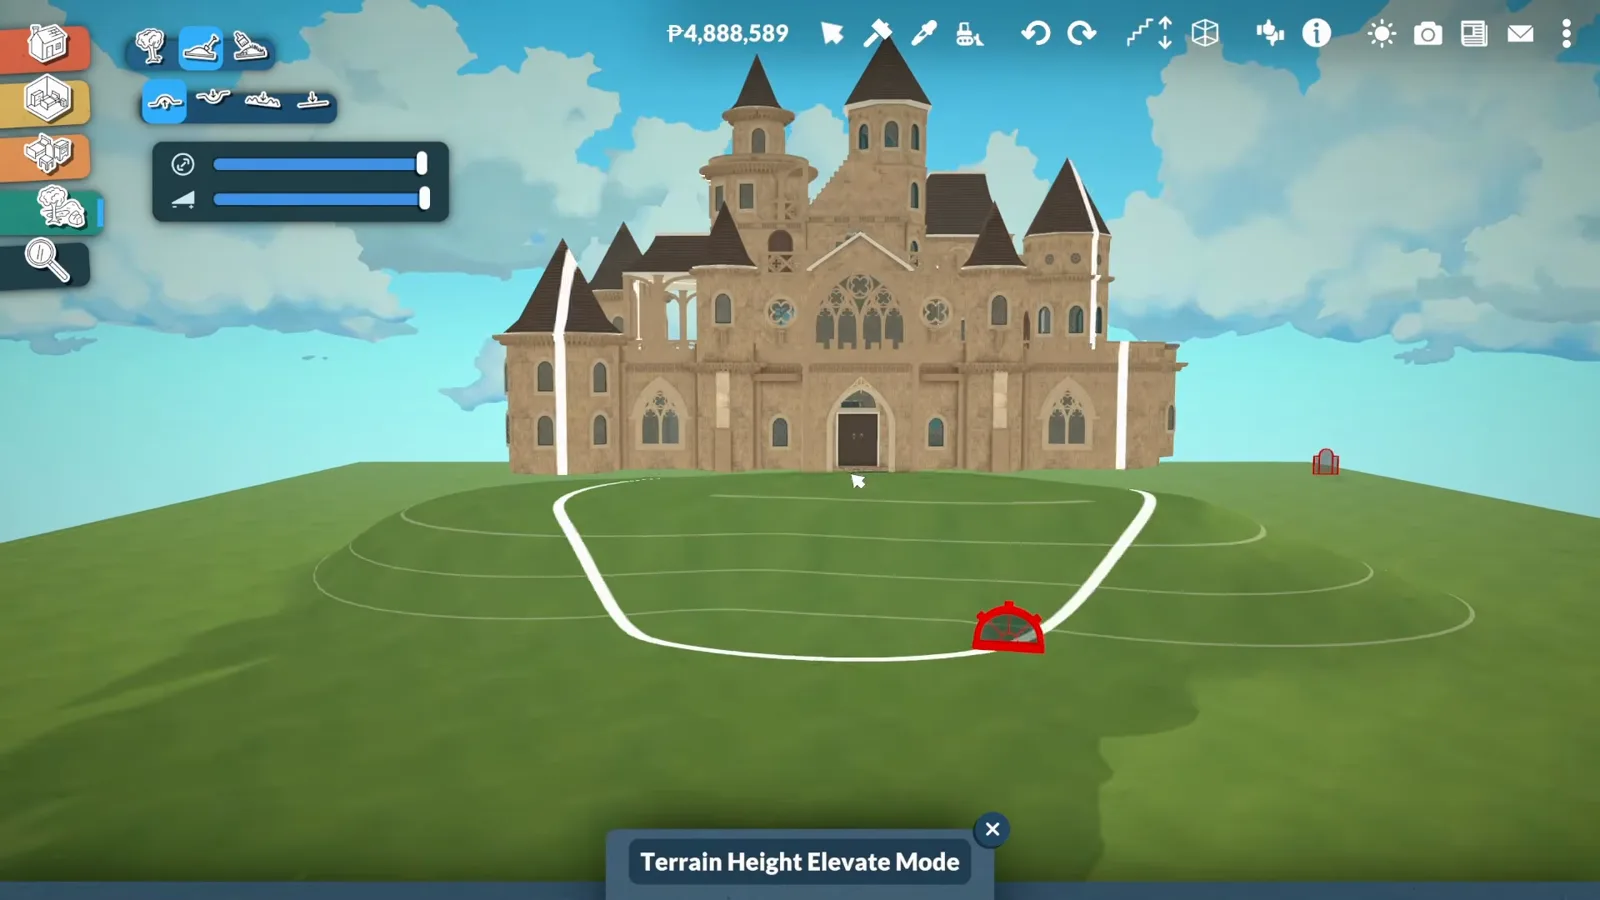
Elevate builds the hill, Flatten gives the keep somewhere to stand.Watch at 9:12 - 11
Make stairs meet a slope
The builder expected the approach steps to be impossible. They are not, but they do not snap to terrain the way they snap to floors: she angled the ground to the pitch she wanted, placed an oversized flight, dragged it down into the slope and cut a small pocket for its foot. She had not tested whether a Para can walk up them when the video was cut, and says so — check before you make the stairs the only way in.
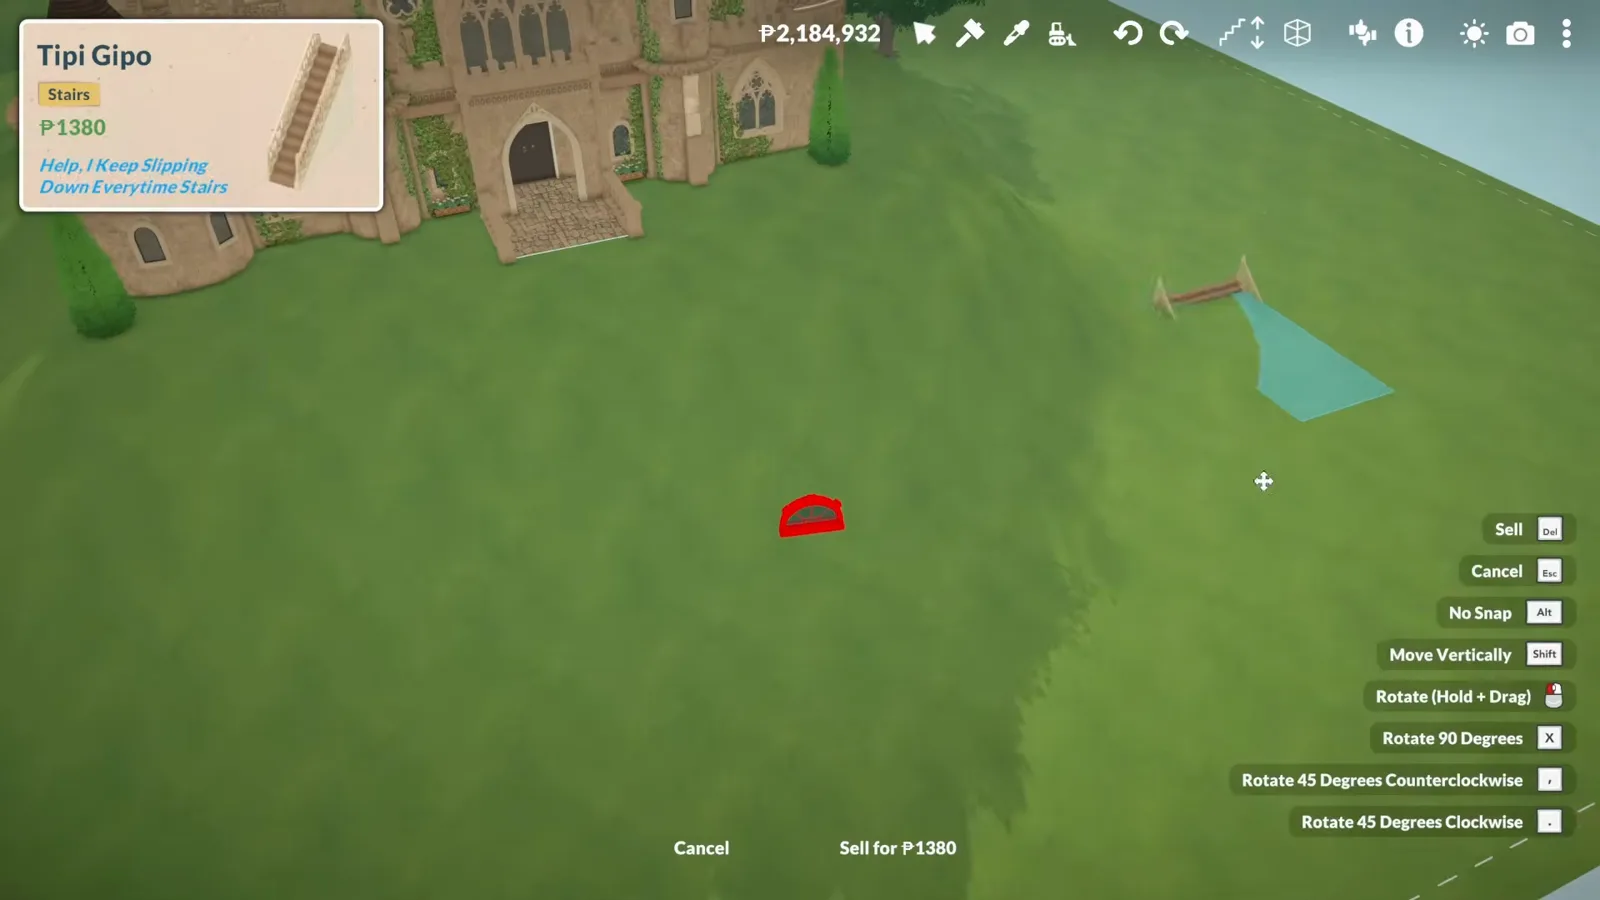
The flight will not snap to terrain: place it long, then drag it down into the slope.Watch at 10:26 - 12
Ring the base with over-scaled boulders
There are only a handful of rock shapes, which stops mattering once you resize them: pick a boulder, drag the yellow handle to blow it up, then sink it into the ground until the pile reads as one cliff. Rotate each one differently and the repetition disappears. She did the front and the visible sides only. Trees, not rocks, are what emptied her budget — close to a million each.
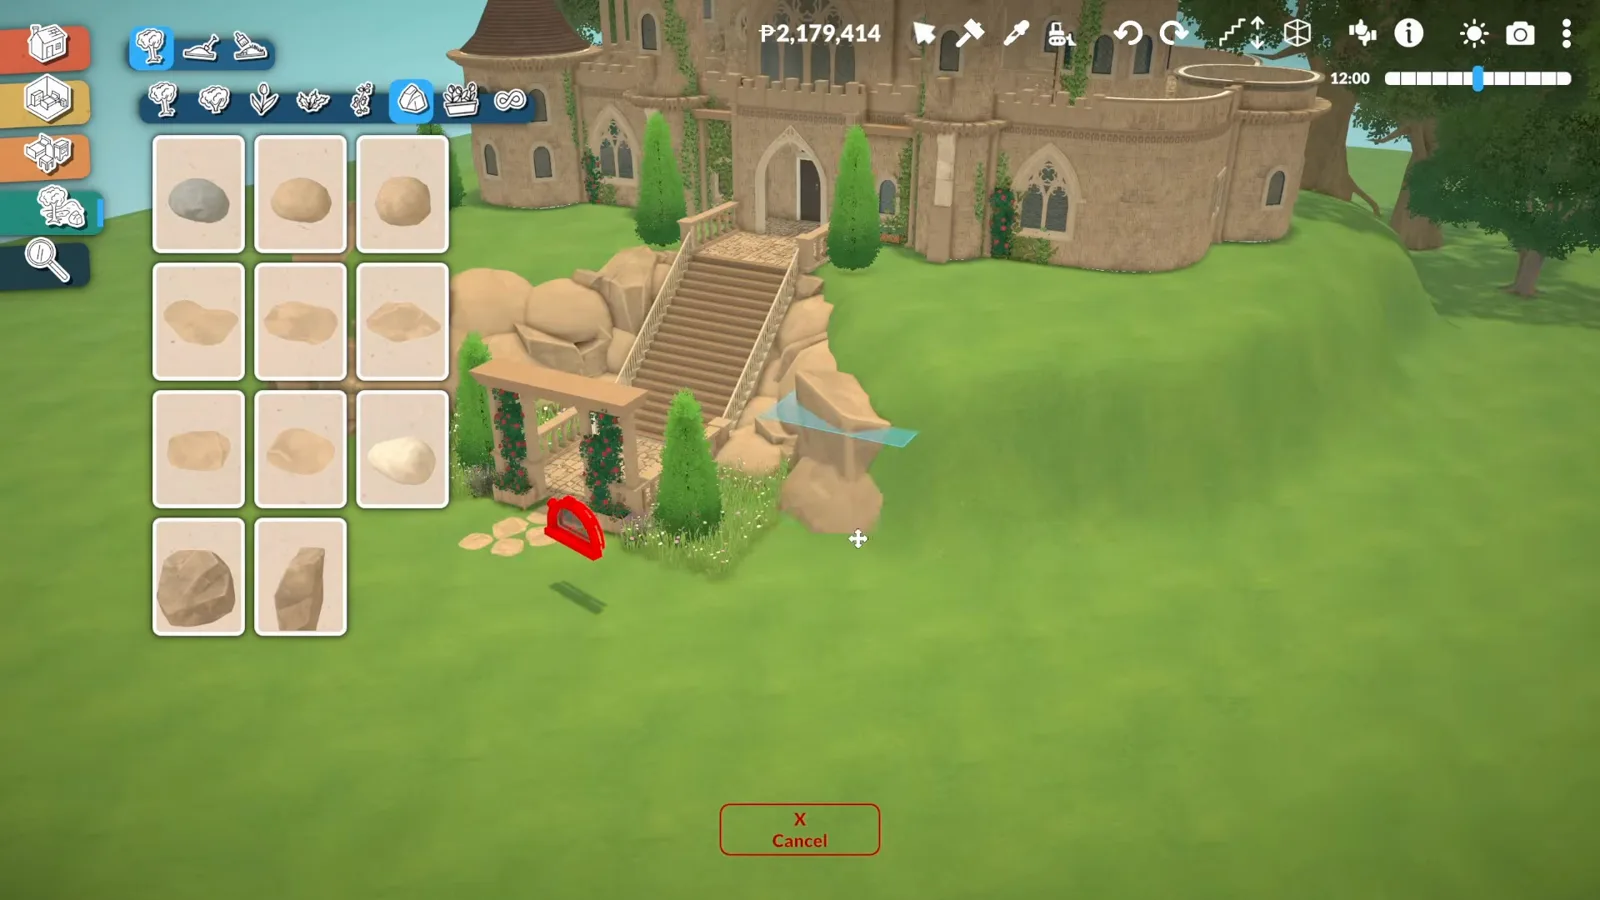
Few rock shapes, unlimited sizes: scale, sink and rotate until it reads as a cliff.Watch at 12:04
Plan, moat & greenery
The grounds do the rest
Two builders, two finishing passes. DejanDeoBuilds plans the keep from above and cuts a water-filled moat round it with the terrain tools; StormDesign ages the walls with ivy, spills bushes over the battlements and paints grass across the rock.
- 13
Plan the keep from above
The second castle in this guide is a study in layout: seen from above, DejanDeoBuilds' Eldenvale keep is a ring of labelled rooms — this frame reads a central hall and a great hall — with a spiral staircase packed into each round corner tower. Round towers are the easy place to hide a stair, and the top-down view is how you check a plan like this before you roof it over.
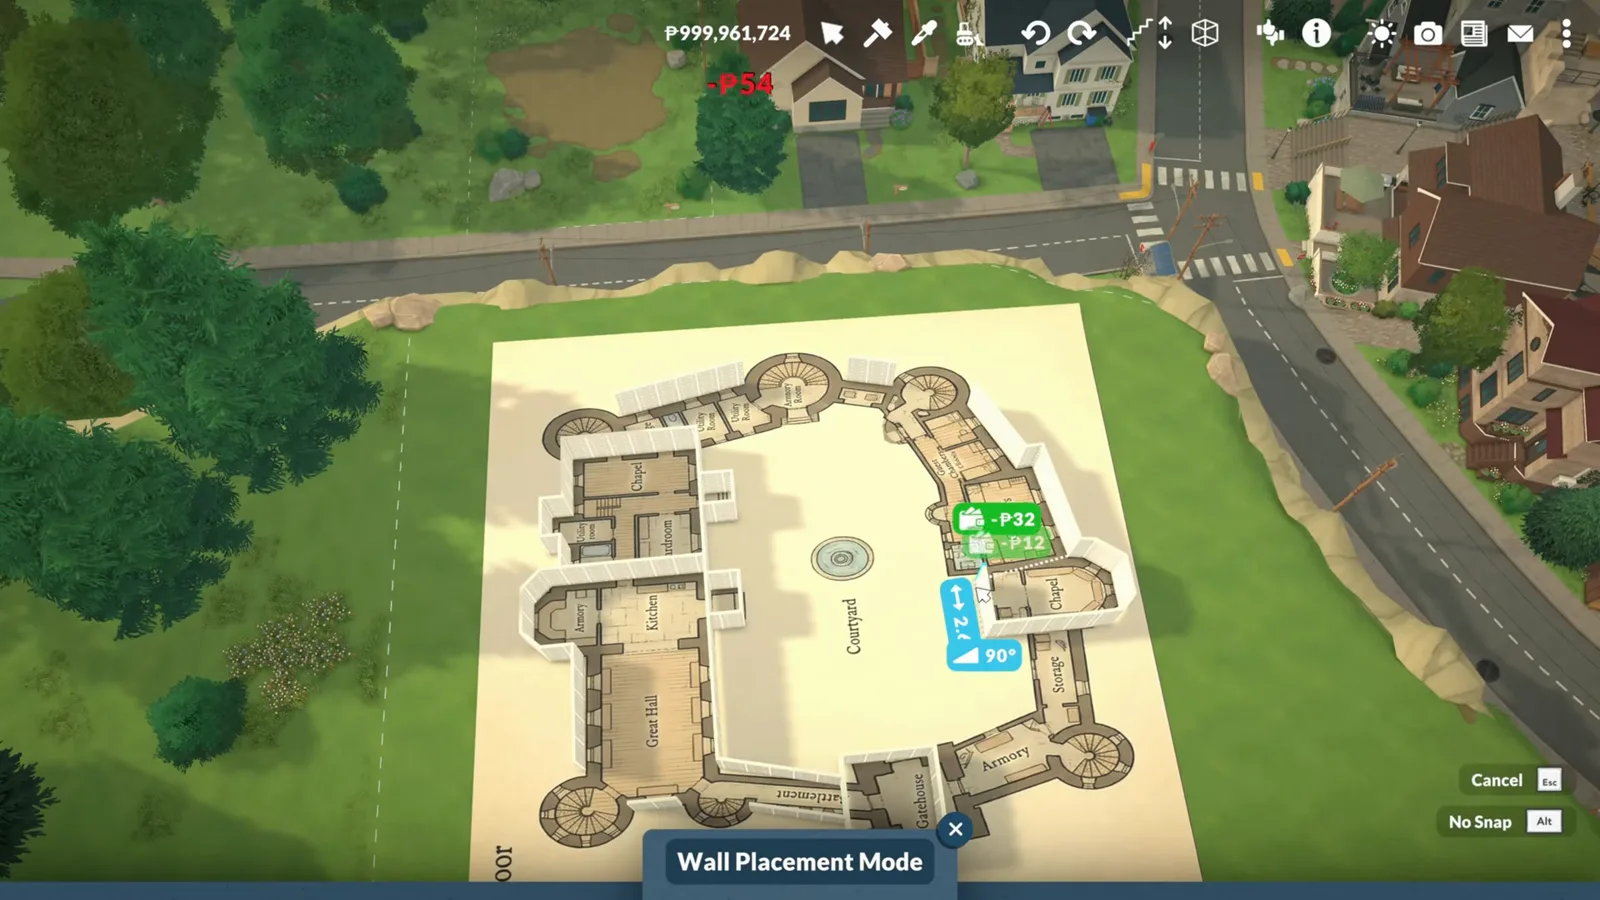
A ring of labelled rooms and a spiral stair in every corner tower.Watch at 1:20 - 14
Cut the moat with terrain tools
Eldenvale's defences are all terrain work. The terrain tools are not only for grass: lowered to the right depth they cut a channel all the way round the curtain wall, and you leave a strip of untouched ground where the causeway will run. No mod is involved — it is the same height and paint set the sandstone castle used for its hill.
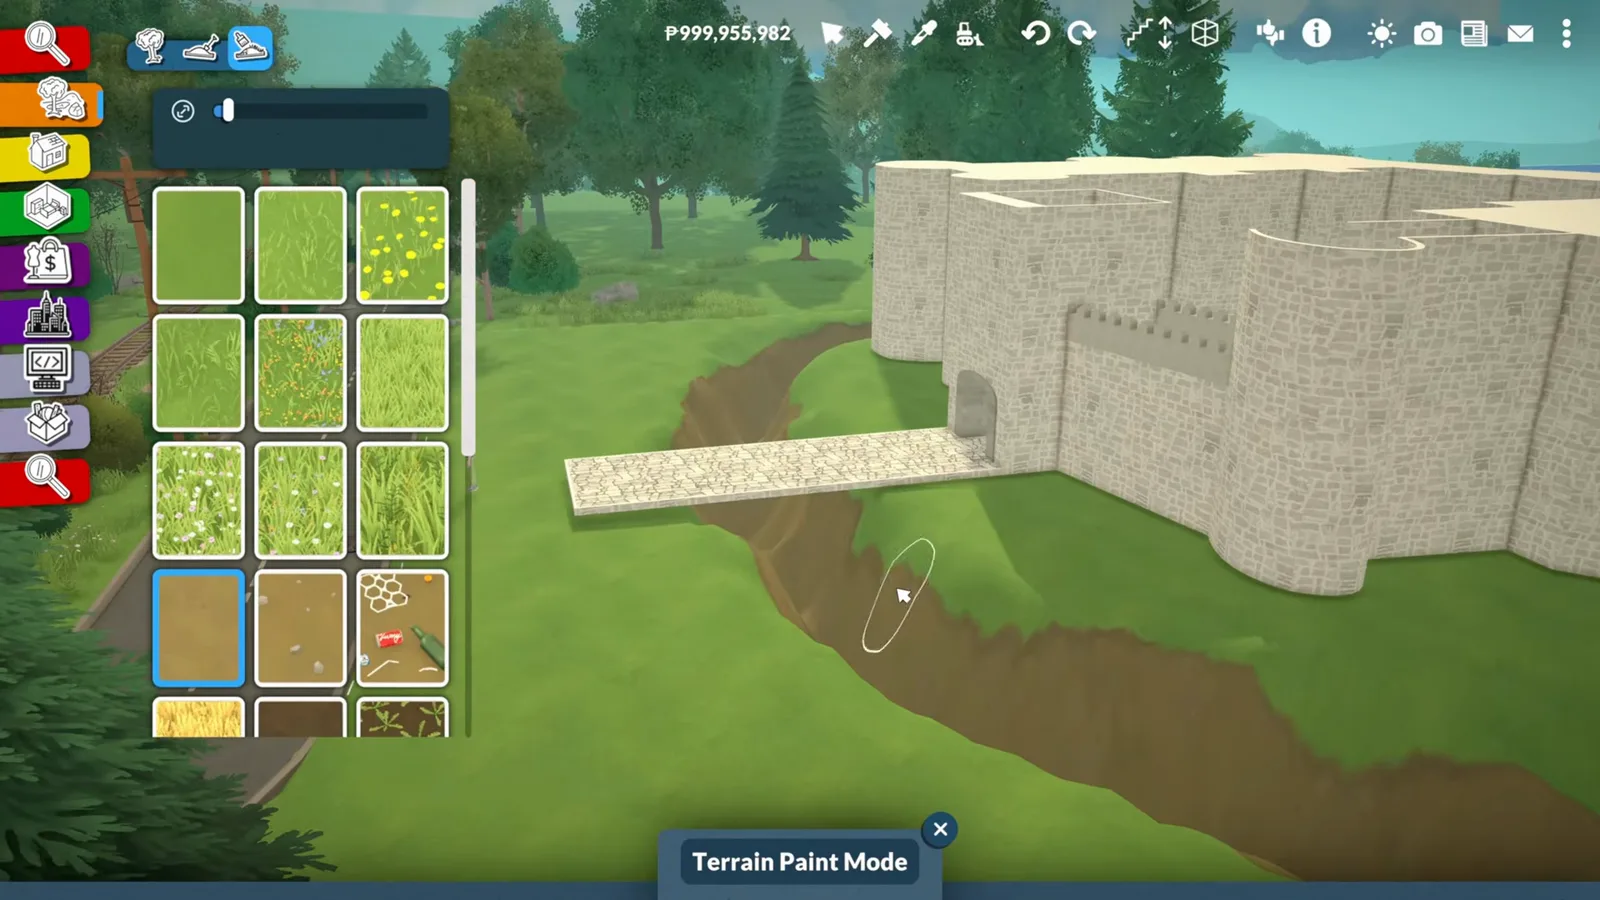
The trench is terrain, not a water item: cut the ring and leave the causeway.Watch at 6:00 - 15
Fill it and bridge it
Once the channel holds water, the rocks catalogue does the rest: boulders dropped into the shallows break up the straight edges, and a flat stone crossing becomes the only way in. It is the most castle thing on this page and it needs no special items, because it is built entirely from tools every player already has.
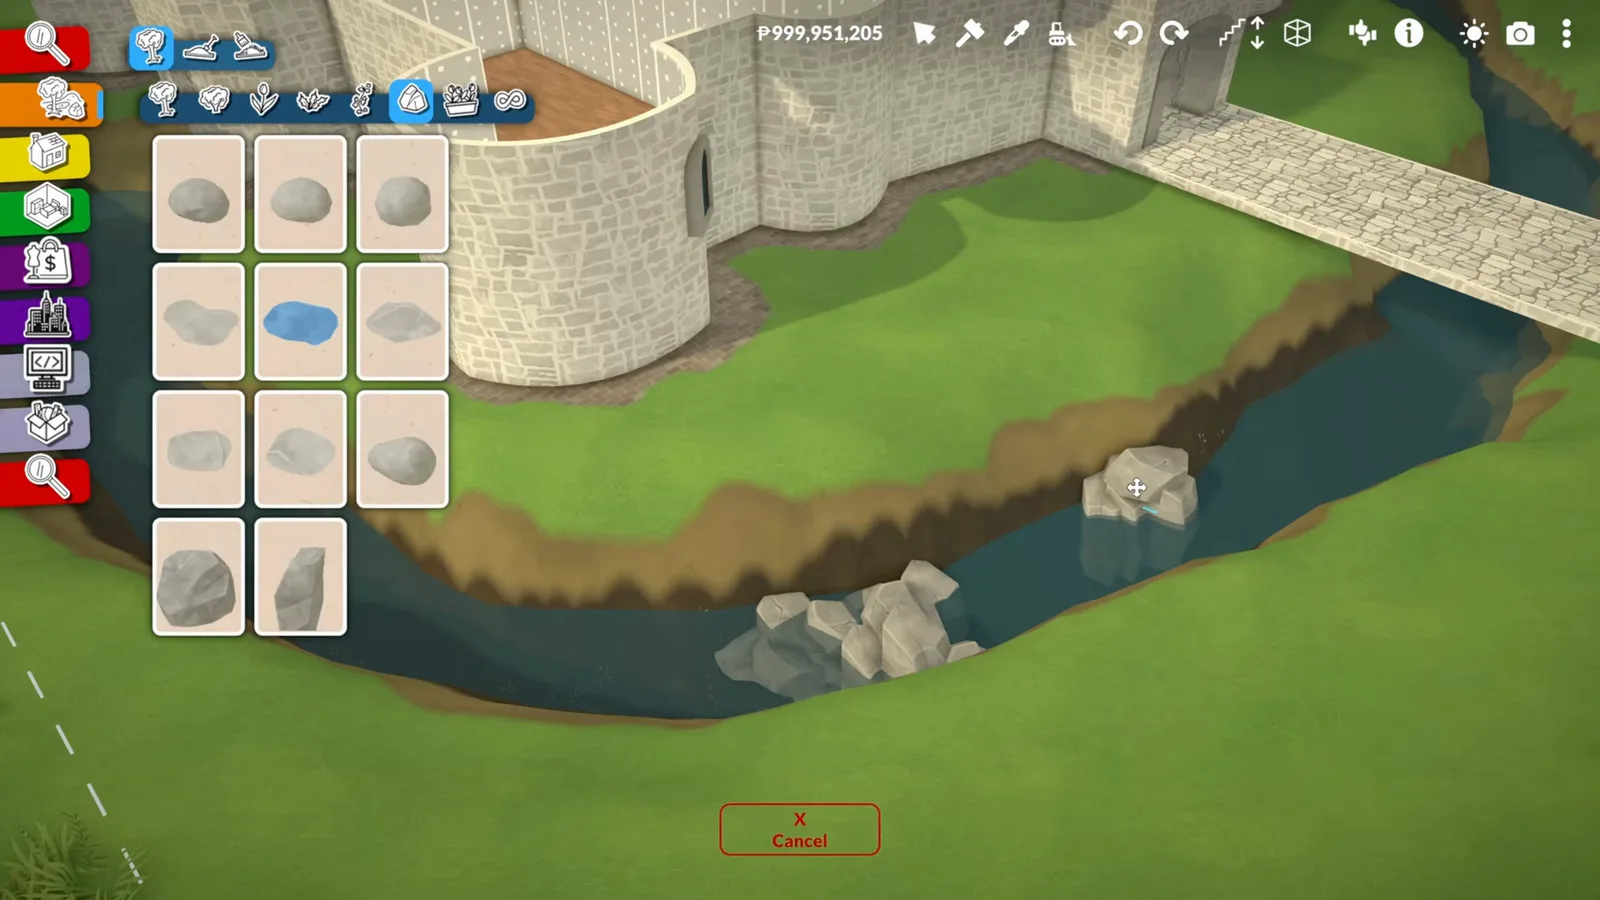
Water, a few boulders in the shallows, one bridge: the castle reads instantly.Watch at 10:00 - 16
Age the walls and soften the rock
The last pass is planting. Climbing ivy goes straight onto the wall faces around the entrance, ordinary bushes sized down make greenery spill over the battlements, and terrain paint lays longer grass and flowers over the outcrop. A garden table, a bench and an easel finish the front court. Her warning on the greenery: trees are ruinously expensive, and she spent her fortune on them.
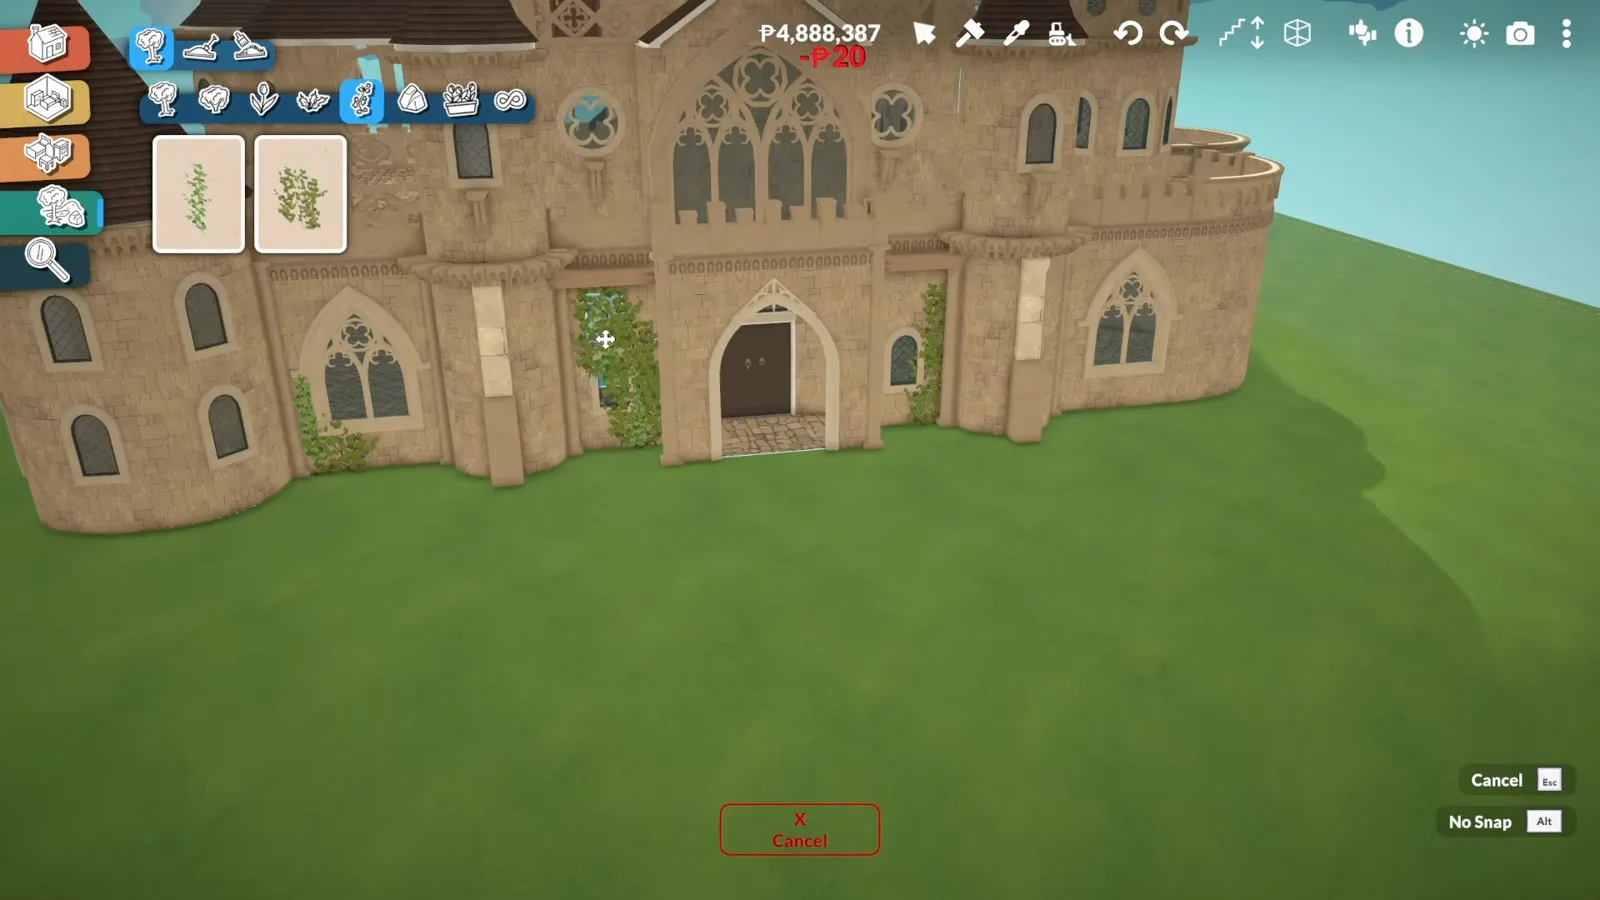
Ivy on the walls, downsized bushes on the battlements, longer grass on the rock.Watch at 9:34
Castle build questions
- How do you build round towers in Paralives?
- From curved wall sections in the wall category — four of them close a circle, which is why the builder calls each one a quarter turn. They still read slightly squared off at the joints, and windows and doors cannot be placed in curved walls yet, which the game flags as a planned feature. The workaround both builds use is the decorative window set from the miscellaneous section, which sits on the surface and reads as glazed.
- How do you get crenellations on a Paralives castle?
- There is no battlement item. The notched crest is fence and half-wall pieces run along the top of the wall, which is also how you get uneven heights across a group of towers: full wall on some, half wall on others, a plain fence on the rest. Paint a floor material onto the walkway between them and it reads as a proper wall head.
- Do you need mods or DLC to build a castle?
- No. Both castles in this guide are base-game builds — the StormDesign speedbuild is described by its creator as base game with no DLC, and Paralives' Early Access plan is free updates. What you need is substitutes: there are no castle doors, so a large wooden door plus an extended archway becomes the gate, and a stone wall texture does the rest.
- Why won't my roof sit on a round tower?
- Because roof pieces are cut for square plans, and the game says so — the Early Access notice on the roof category reads: "When building without a grid, it might be hard to place roof blocks to fit the shape of your floor plan. We are planning to add more flexible roof tools." Build the drum with the grid on, then place the cone and resize it. The same builder also hit roofs that would not delete in Sledgehammer Mode, and found that redrawing the wall underneath made the room register again.
- Can you build a secret passage in a castle?
- Not as a build-mode object. The only secret passages in Paralives are pre-built: the fireplace on the second floor of the Town Hall and library opens a chain of hidden rooms that ends at a chest in the castle tower, and that route is walked step by step on our secrets page. Neither builder here shows a craftable passage, so nothing on this page should be read as saying one exists.
Go deeper
Paralives house ideas
Every house type on the site in one place — pick the concept before you commit a weekend to a curtain wall.
Paralives curved walls guide
The mechanic a castle leans on: how the sections join, what will not go in them, and the workarounds that do.
Paralives gothic house build
Stone, steep roofs and pointed glass — the closest relative of a castle already on this site.
Related builds
Paralives terrain guide
Height, flatten, smooth and paint: the four tools that turn a flat lot into a rock.
Paralives spiral staircase guide
How to get a stair inside a round tower without fighting the floor plan.
Paralives half walls guide
The piece behind every battlement, parapet and balcony in these two builds.
Paralives mansion build guide
Big house, no towers: the other way to spend a weekend in build mode.
Paralives secrets and easter eggs
The game's real secret passages — in the Town Hall, not in the catalogue.