
The short version
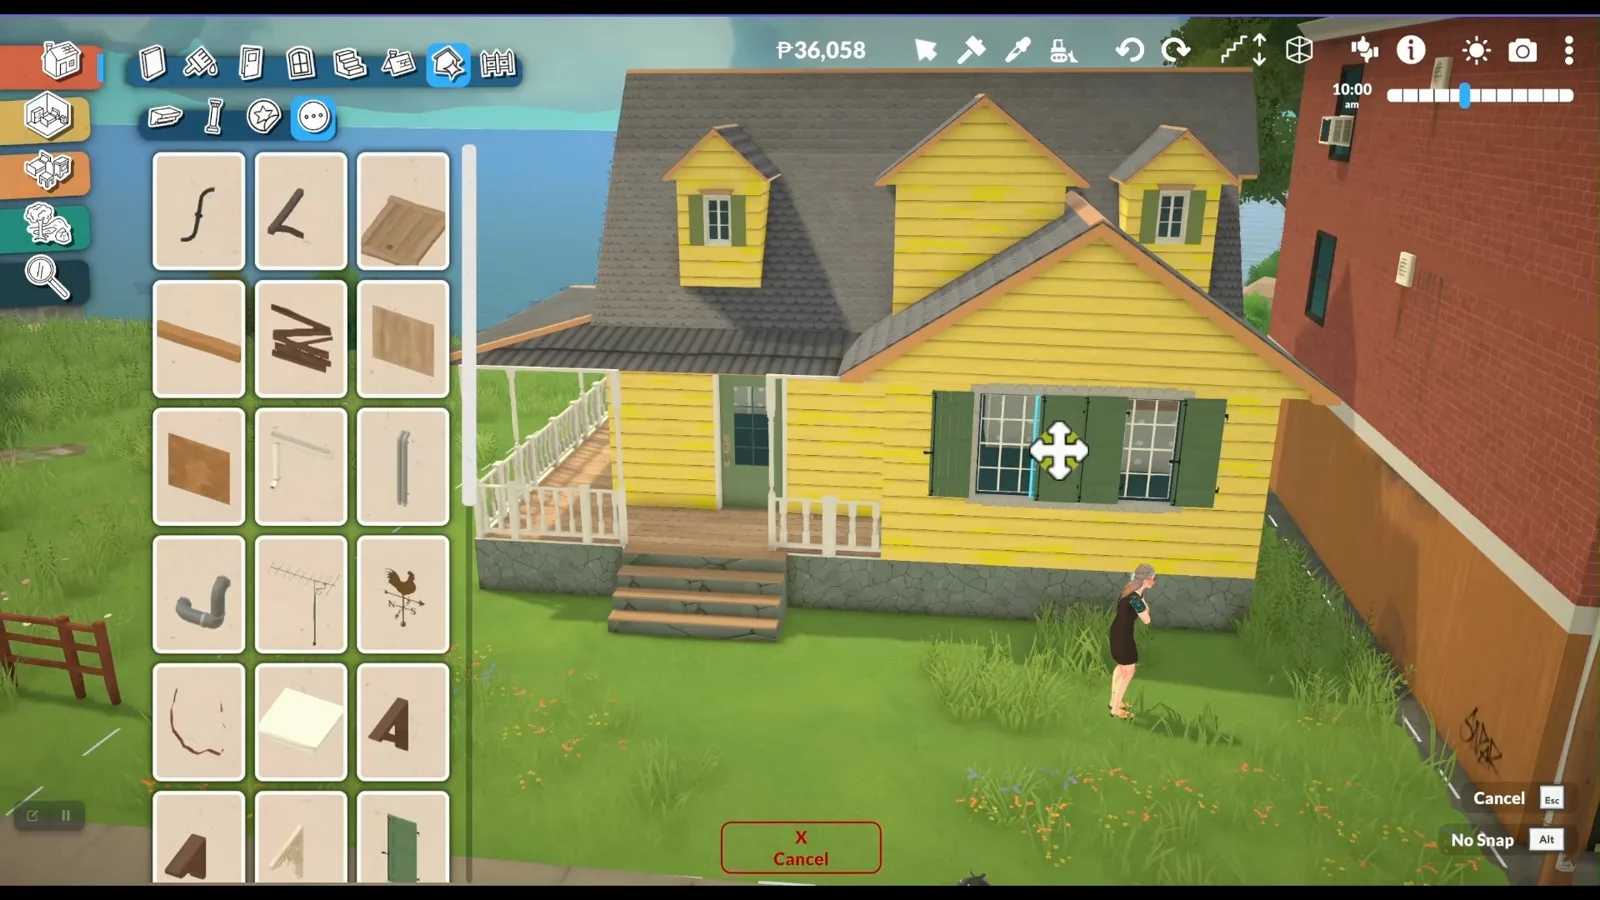
An attic in Paralives is not a room type — it is ordinary walls under a roof, and the roof is what breaks it. The fix this guide is built around: place the roof on the building's highest floor, then drag it down with the advanced build widget, so the game keeps treating it as a top-floor piece and never lets it cut into the attic. Around that one move: walls drawn first as the roof's guide, stairs built while the shell is still open, and a dormer centered once it all stands.
- No attic tool exists — an attic is ordinary walls with a roof that stays off them
- The fix: place the roof on the highest floor, then drag it down with the advanced widget
- Never place a roof directly on a floor a Para walks on — that spot stops working
- Build the stairs first: leaving them until last can ruin the build, the creator warns
- No U-shaped staircase ships yet — one landing platform plus two flights improvises it
- No verified cost or build time: nothing in either video prints one
The attic shell
Walls first — they double as the roof's guide
The attic is decided on the second floor, long before a roof appears. These three steps cover the foundation and veranda the shell stands on, the wall layout that later steers every roof piece, the little windows reserved in the gables — and the plainest version of the same plan from the second build.
- 1
Draw the wall layout before any roof exists
The shell opens from the ground up — a foundation the creator calls a strong base, with a veranda wrapped around one corner and, later, a brick texture that makes it read as grounded. The attic lives on the second floor, so that is where the walls go first. As he explains it, making the wall layout first gives you a guide for placing the roof later: the pieces size themselves against real walls instead of guesswork.
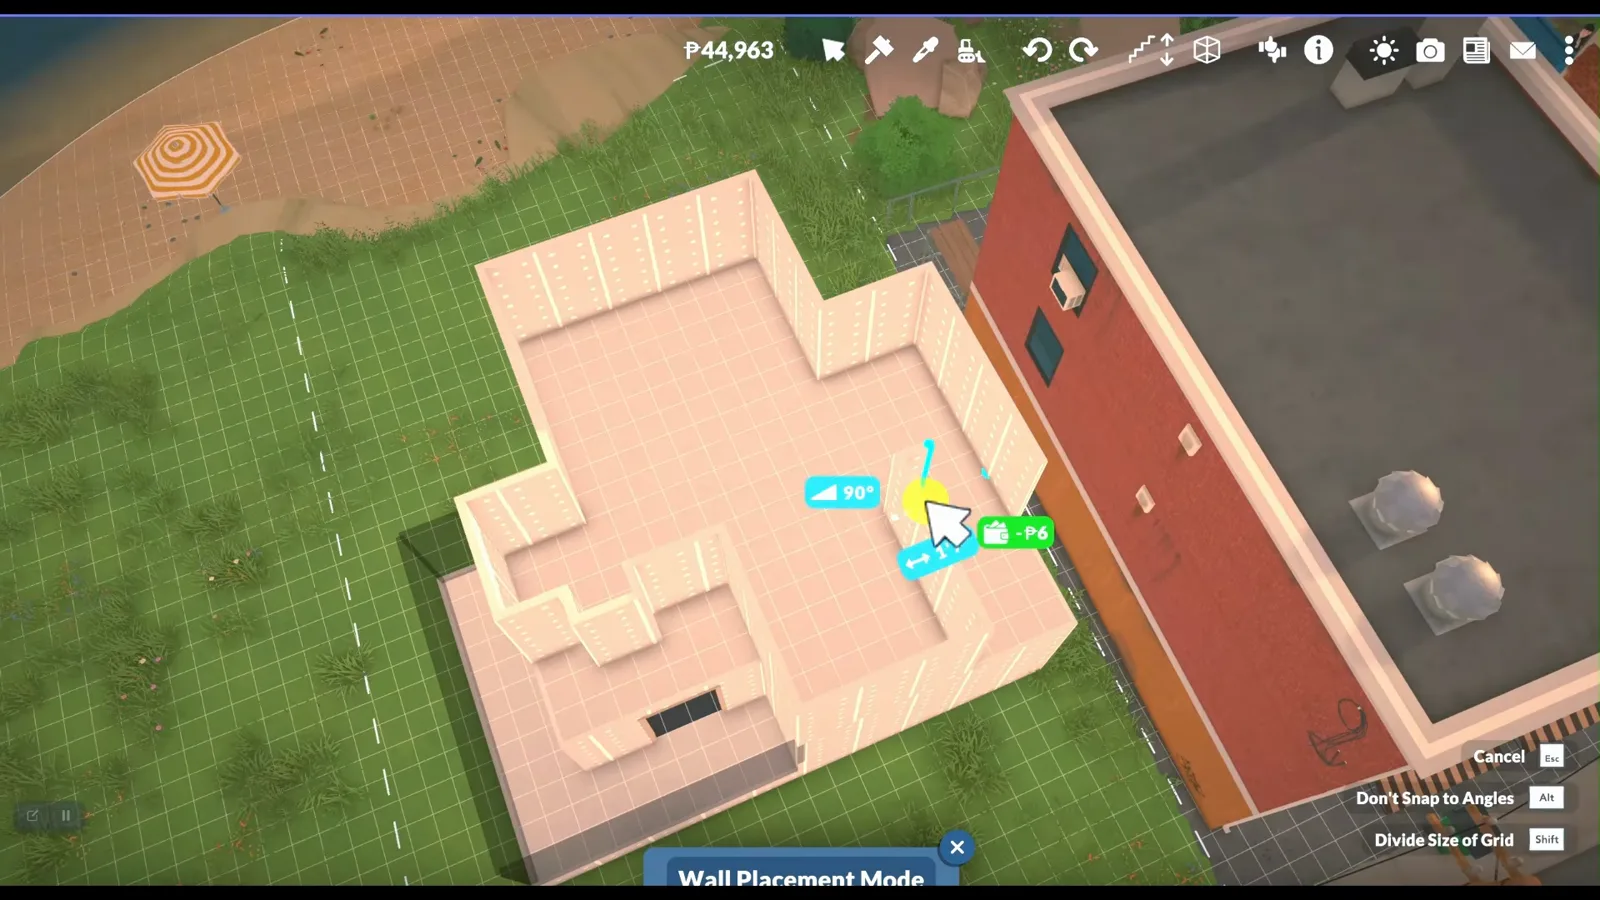
The wall layout is the roof's placement guide.Watch at 1:18 - 2
Reserve the little attic windows in the gables
Before the roof closes everything in, the small gable windows go in — the ones the creator says always complete the attic vibe. Placing them while the walls are bare is easy; after the roof-drop trick the game considers the roof a top-floor piece, so planning the openings early keeps them exactly where you want them.
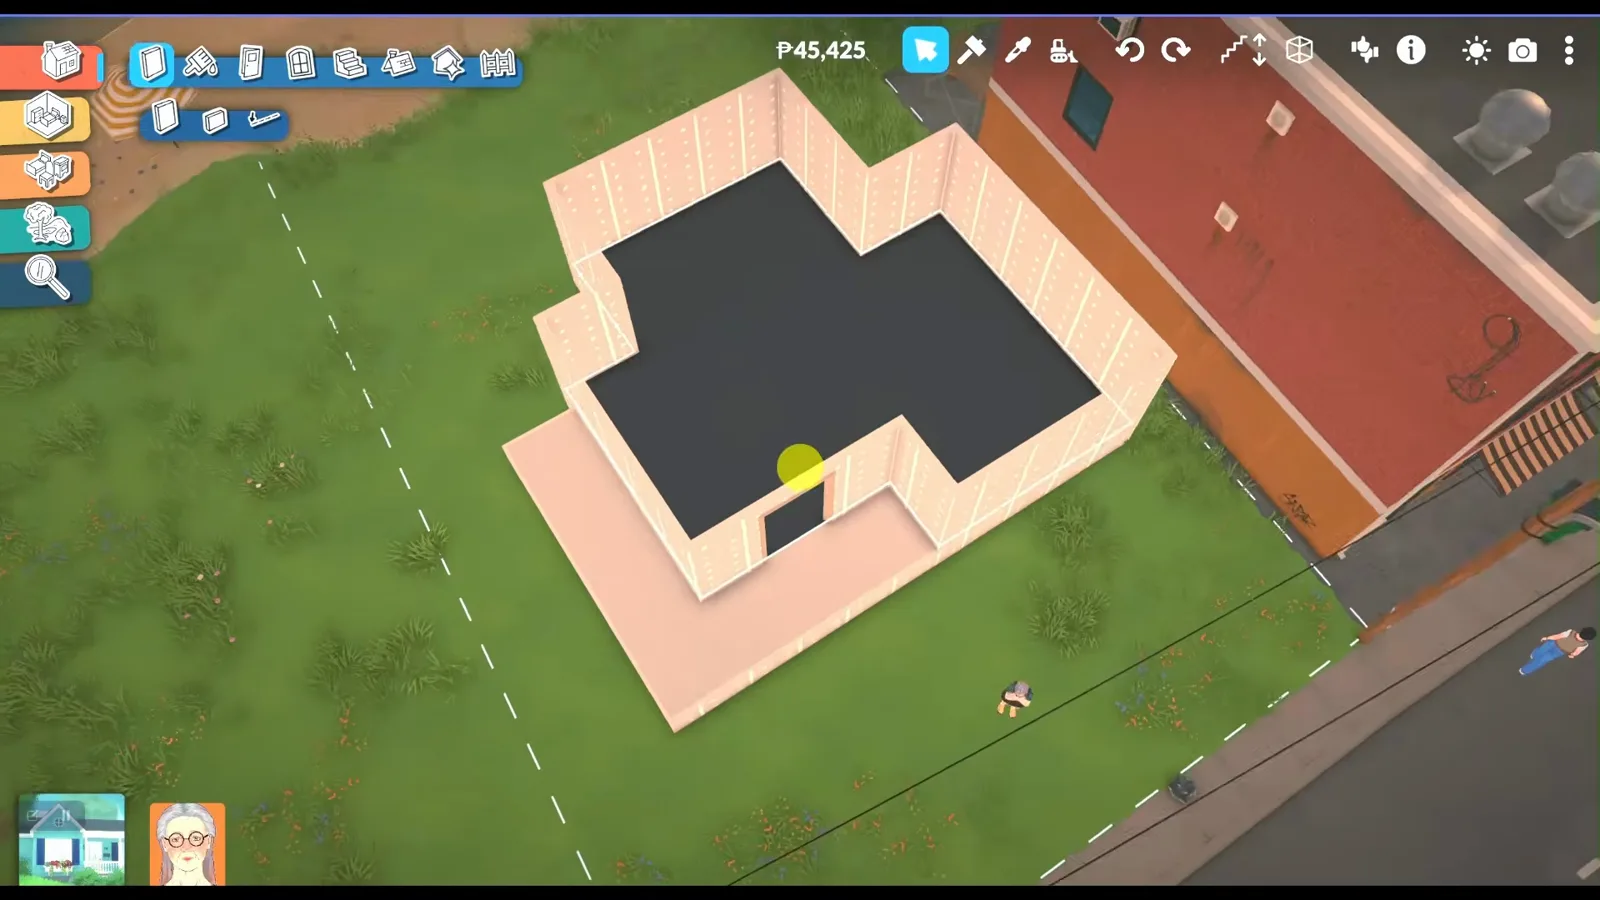
Small arched windows first — the roof comes to them.Watch at 1:35 - 3
Or start smaller: the plain-walls attic
The second build in this guide is the same idea with none of the dressing: a small shell of plain walls and half walls on a bare lot, read straight off the frame. Nothing here needs the suburban house's veranda or brick base — a room under a roof starts with exactly this much.
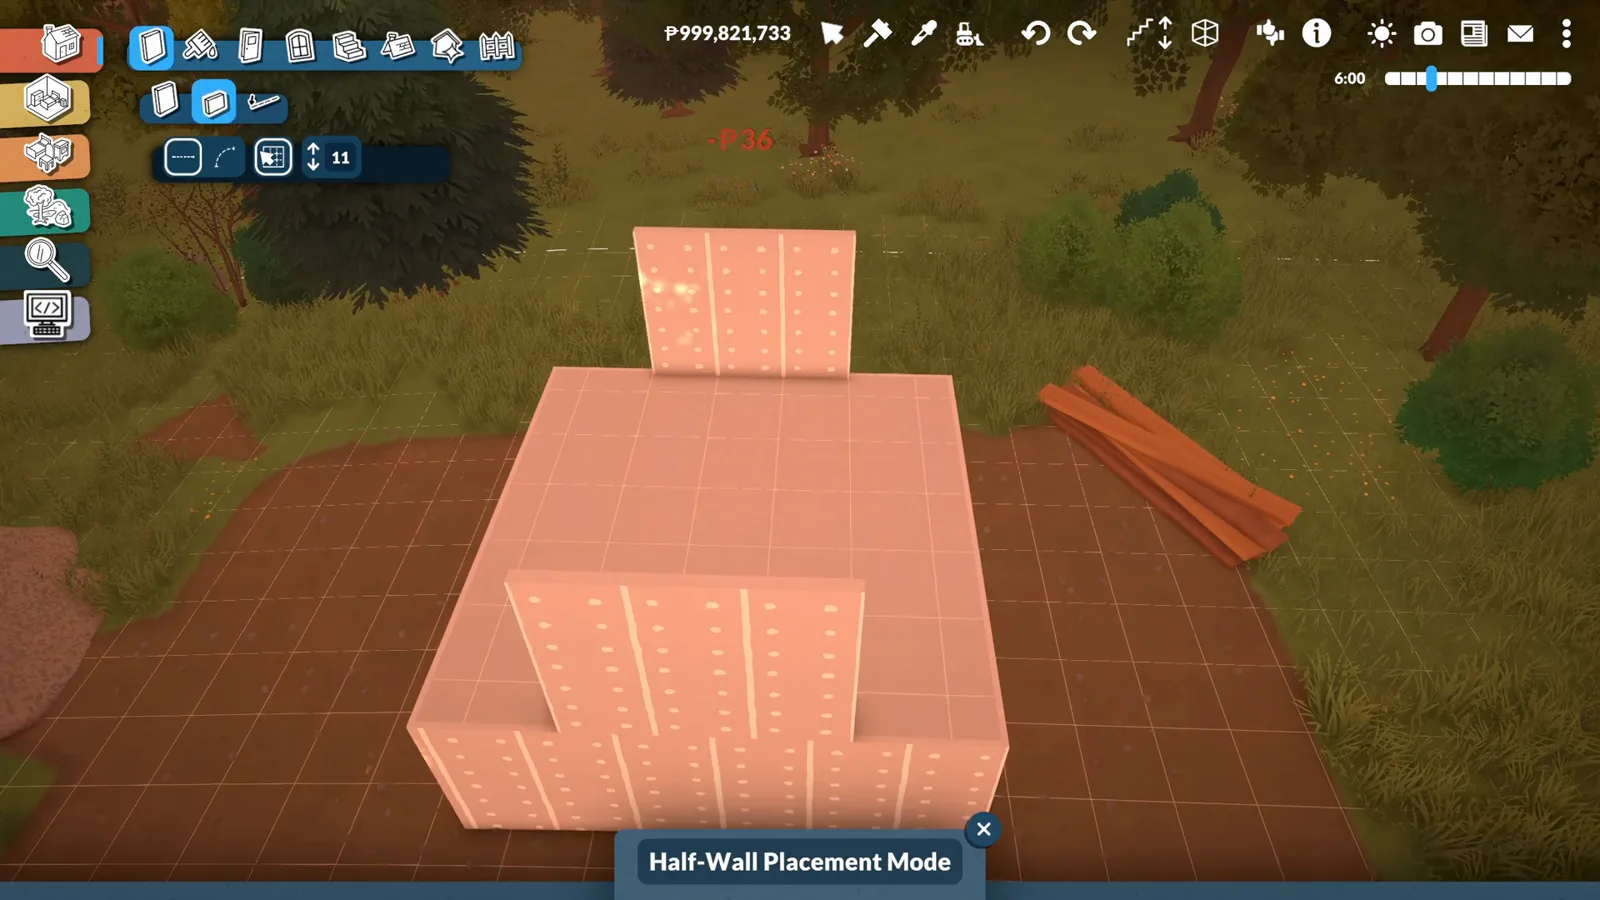
The simplest attic is walls, half walls, and patience.Watch at 0:22
Stairs before the roof
Build the stairs while the shell is still open
The creator's hard-learned rule: leave the stairs until the end and they can ruin the whole build. Paralives has no U-shaped staircase, so this one is improvised on camera — a landing platform, a flight onto it, an opening cut through floor and ceiling, and a second flight to close the U.
- 4
Build the stairs before the roof — on purpose
"I've learned that leaving the stairs until the end can sometimes ruin the entire build," the creator says, so the staircase goes in while the shell is still open. First piece: a small platform for the landing, set on the bare attic floor. Paralives has no U-shaped staircase yet — as of 0.1.8b it simply isn't in the catalogue — so this platform is what the custom one hangs from.
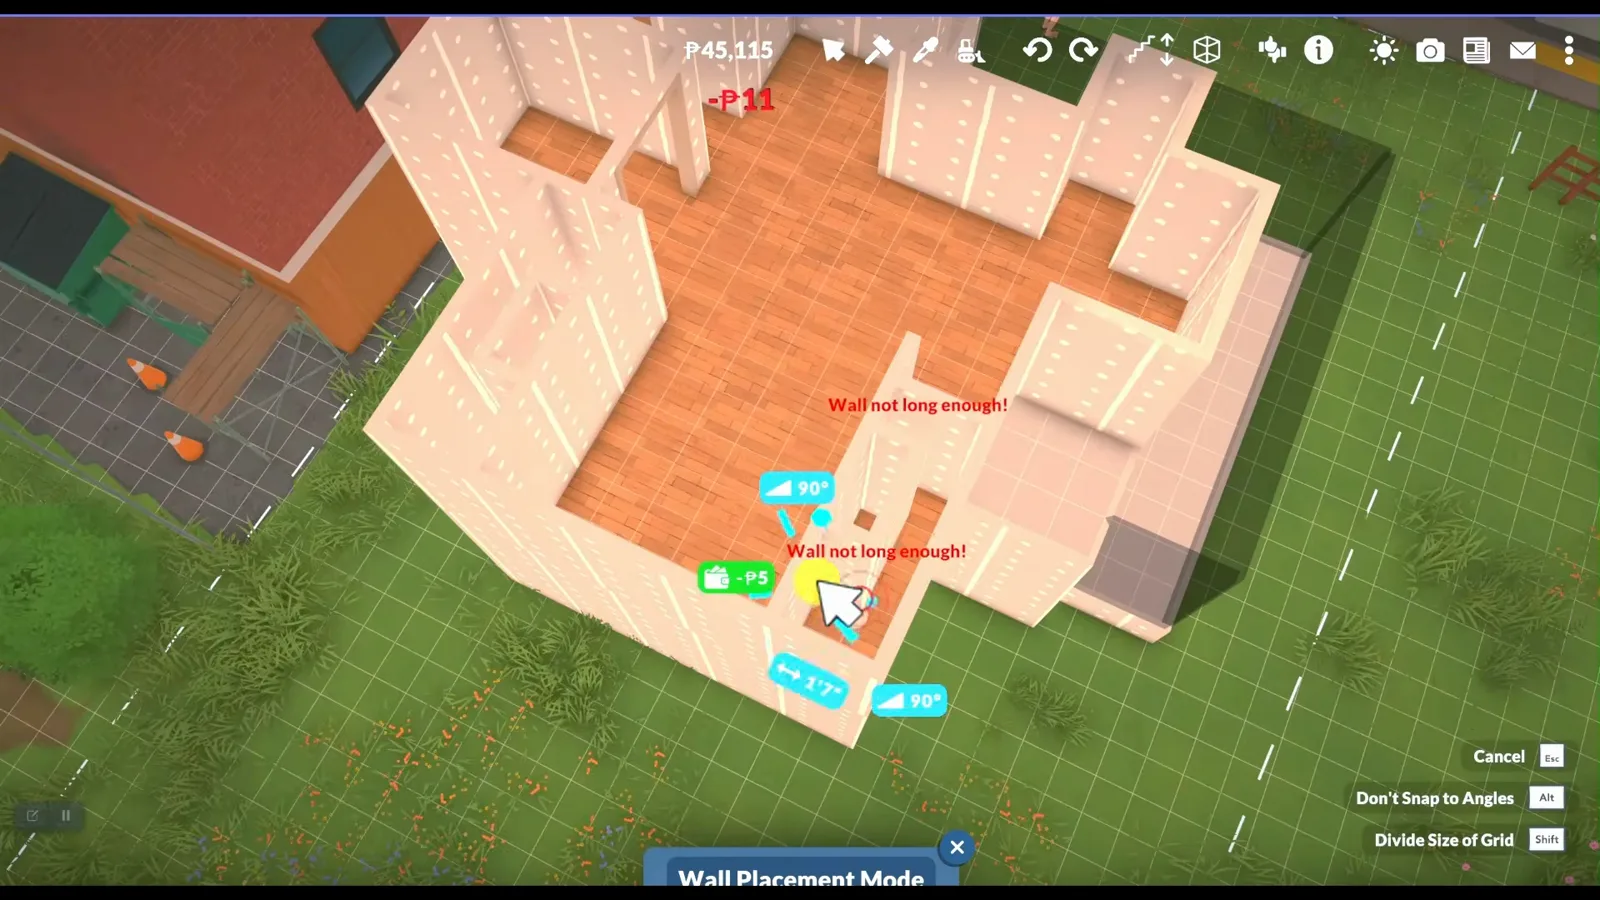
The landing platform — first piece of a staircase the game doesn't sell.Watch at 1:54 - 5
Run the first flight up to the landing
One flight of stairs connects the floor below to the platform. Placement is the fiddly part — a flight accepts one exact spot against its landing — but with the roof still absent there is nothing to fight: no ceiling above to clip, no walls in the way. That is half of why the creator builds stairs first.
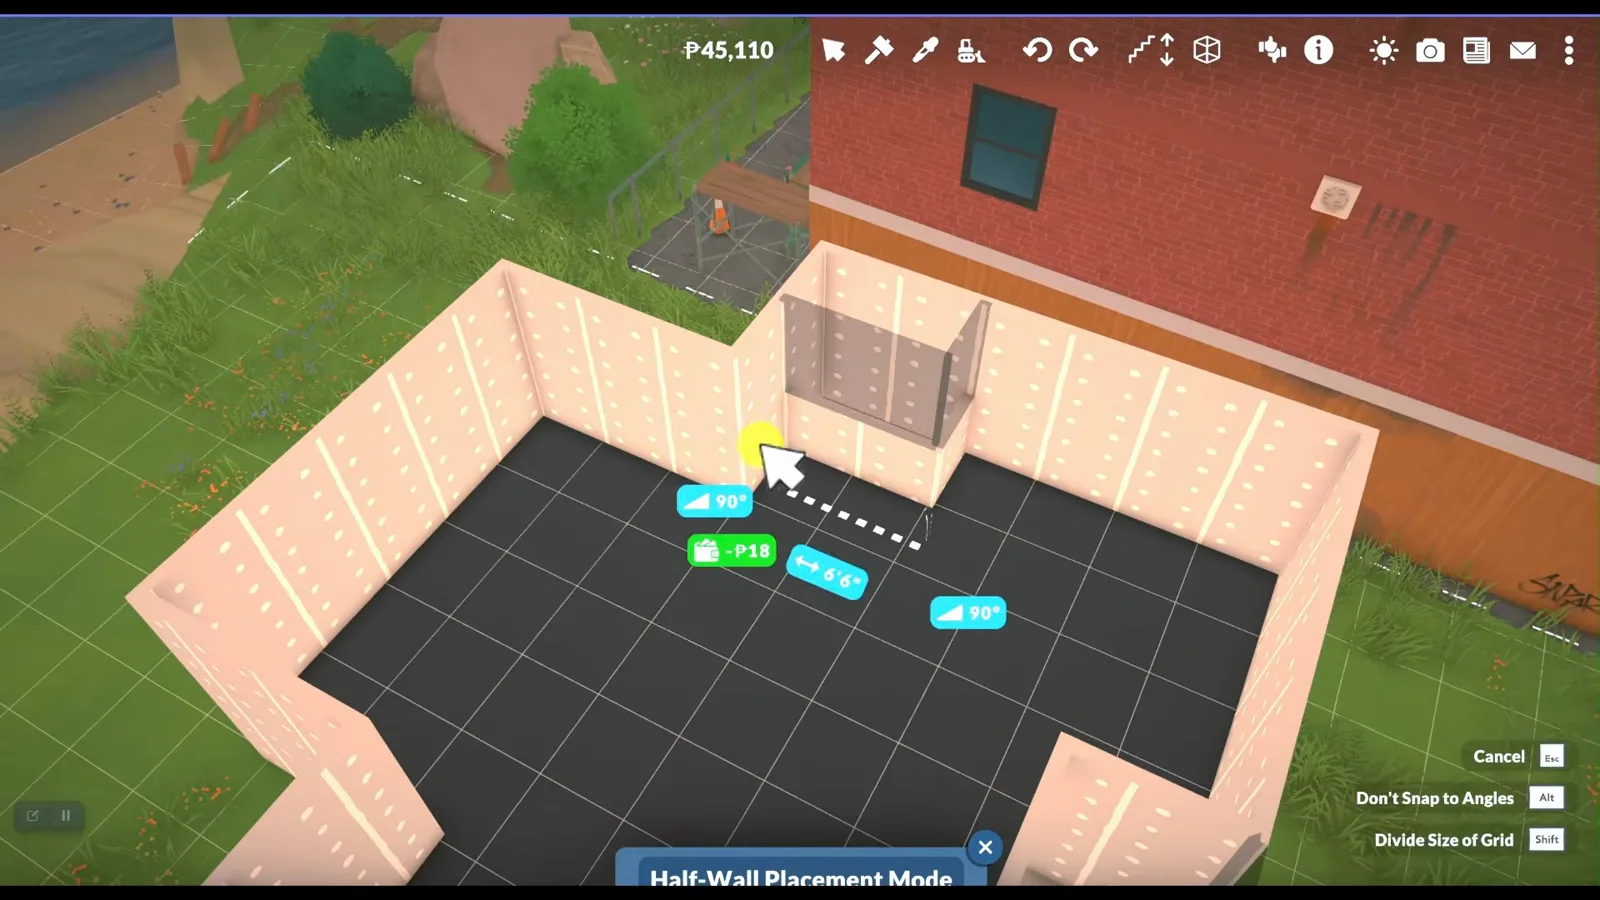
First flight meets the landing — no roof in the way yet.Watch at 2:00 - 6
Cut the opening through floor and ceiling
A U-shaped staircase needs somewhere to climb, so the creator cuts an opening through both the floor and the ceiling above it — his own description of the move. The stairwell is what the second flight rises through, and cutting it now, before any roof exists, keeps the hole exactly where the stairs want it.
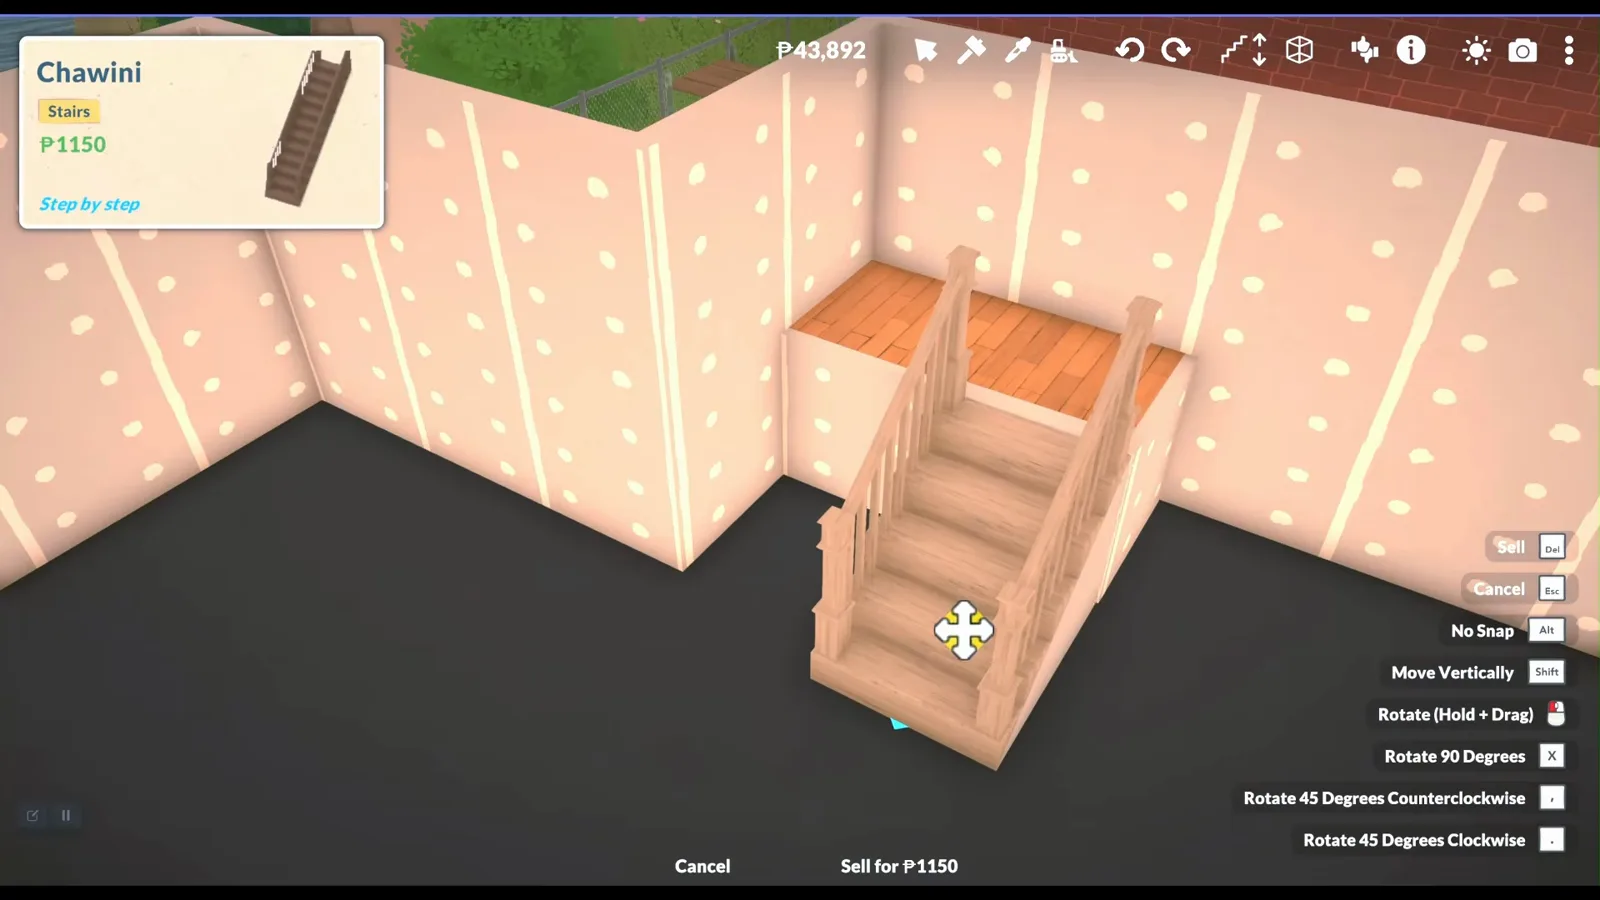
The opening goes through floor and ceiling in one plan.Watch at 2:07 - 7
Top it with the second flight, then play-test
The second flight of stairs lands on the platform extension, closing the U. The creator play-tests it and reports it works perfectly — a fully functional custom U-shaped staircase assembled from pieces the game ships separately. With access solved, the roof can finally come.
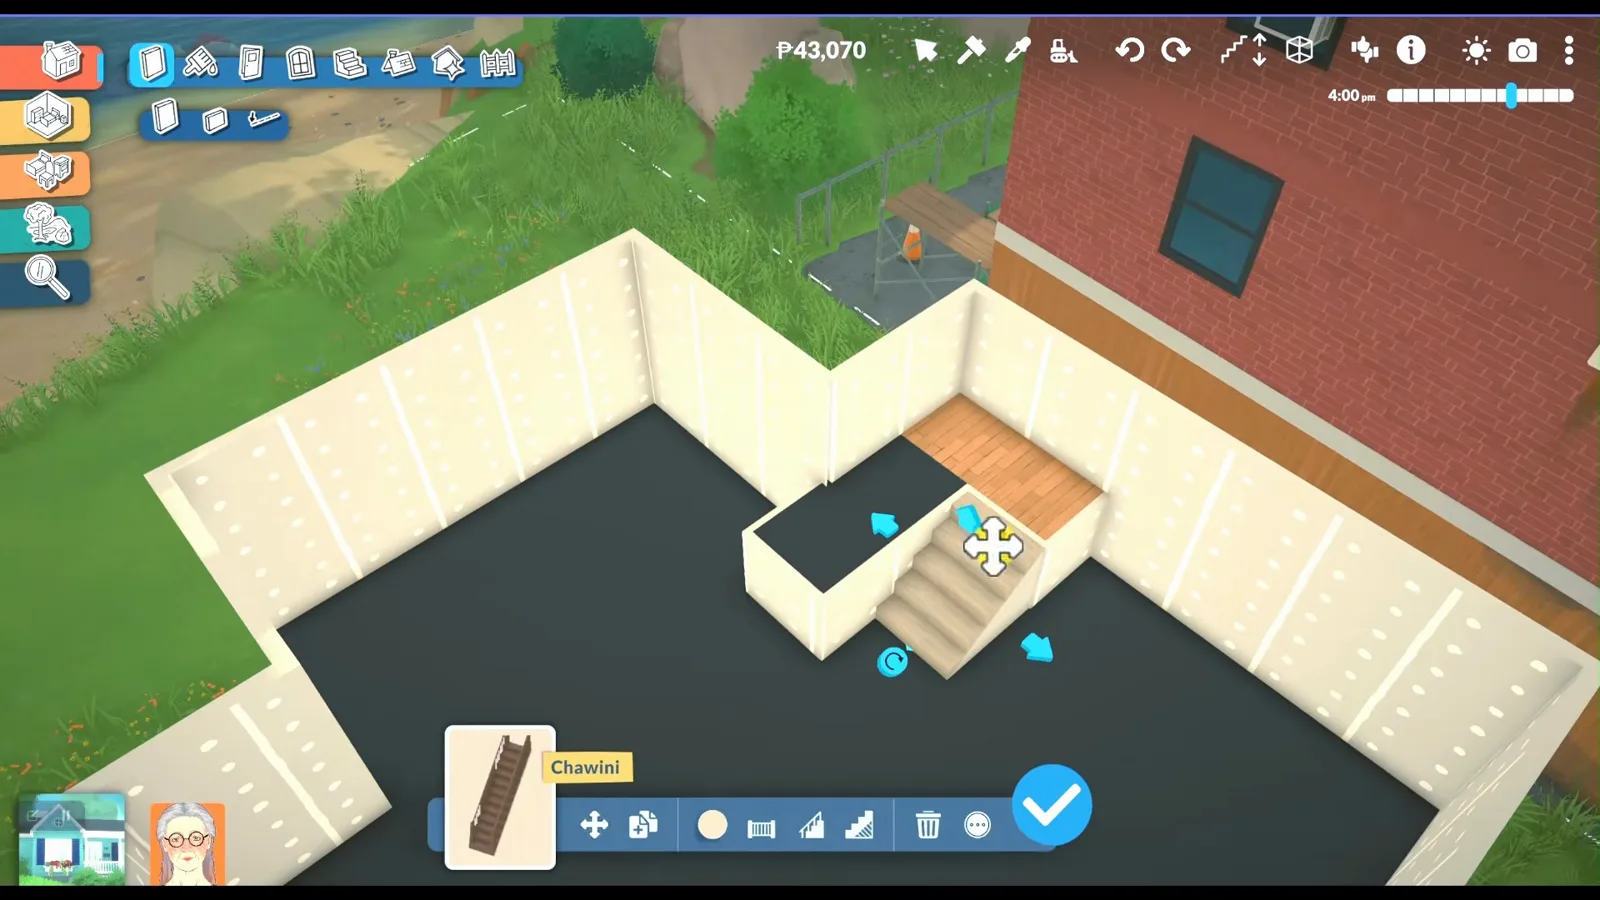
Two flights and a platform: the U-shaped staircase Paralives doesn't have.Watch at 2:20
The roof-clipping fix
Place the roof high, then drag it down
This is the trick the page exists for. A roof anchors to whatever floor you place it on — so place it one floor too high on purpose, and use the advanced build widget to walk it down into position. The game keeps counting it as a top-floor piece, and the clipping never happens.
- 8
Place the roof on the highest floor, not the attic
Here is the trick. Instead of dropping the roof onto the attic floor where it will live, the creator places his chosen roof shape on the highest floor of the building — one level above the attic. That creates a separate roof layer hovering over the finished walls, exactly where a roof would sit on a single-storey house.
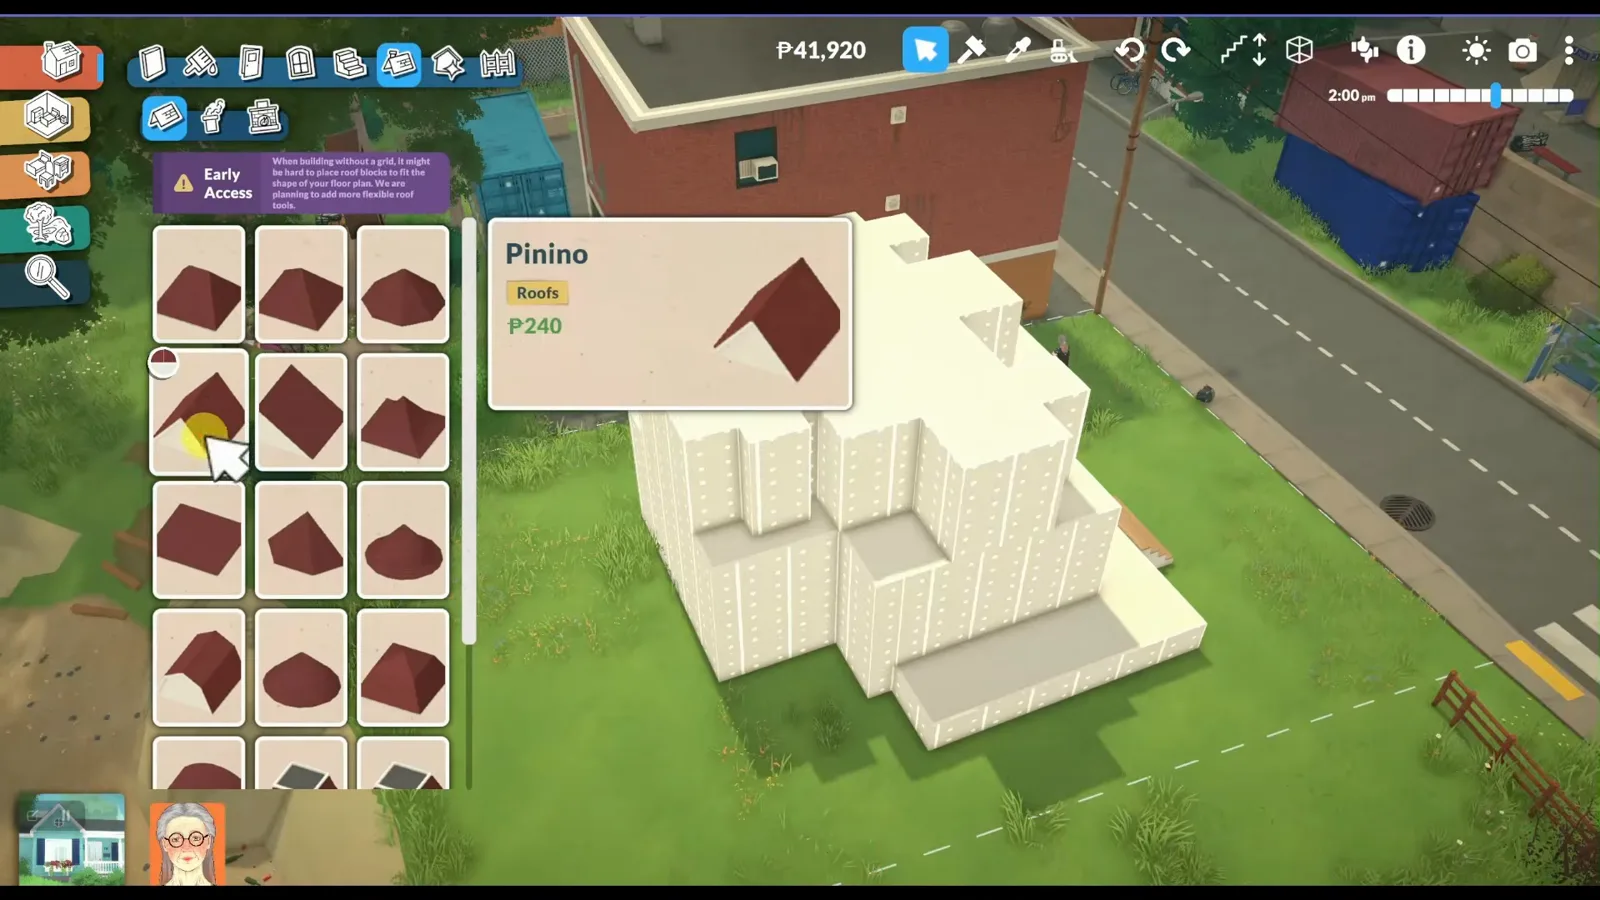
One floor too high — deliberately.Watch at 2:30 - 9
Let the roof park there as its own layer
Parked a storey up, the roof hangs clear of the attic walls with daylight between them — and the game now treats it as a top-floor piece. As the creator explains it, that is the entire mechanism: because the roof never anchored to the attic floor, the game never lets it cut into the attic's walls, no matter which of the building's floors it ends up hanging over.
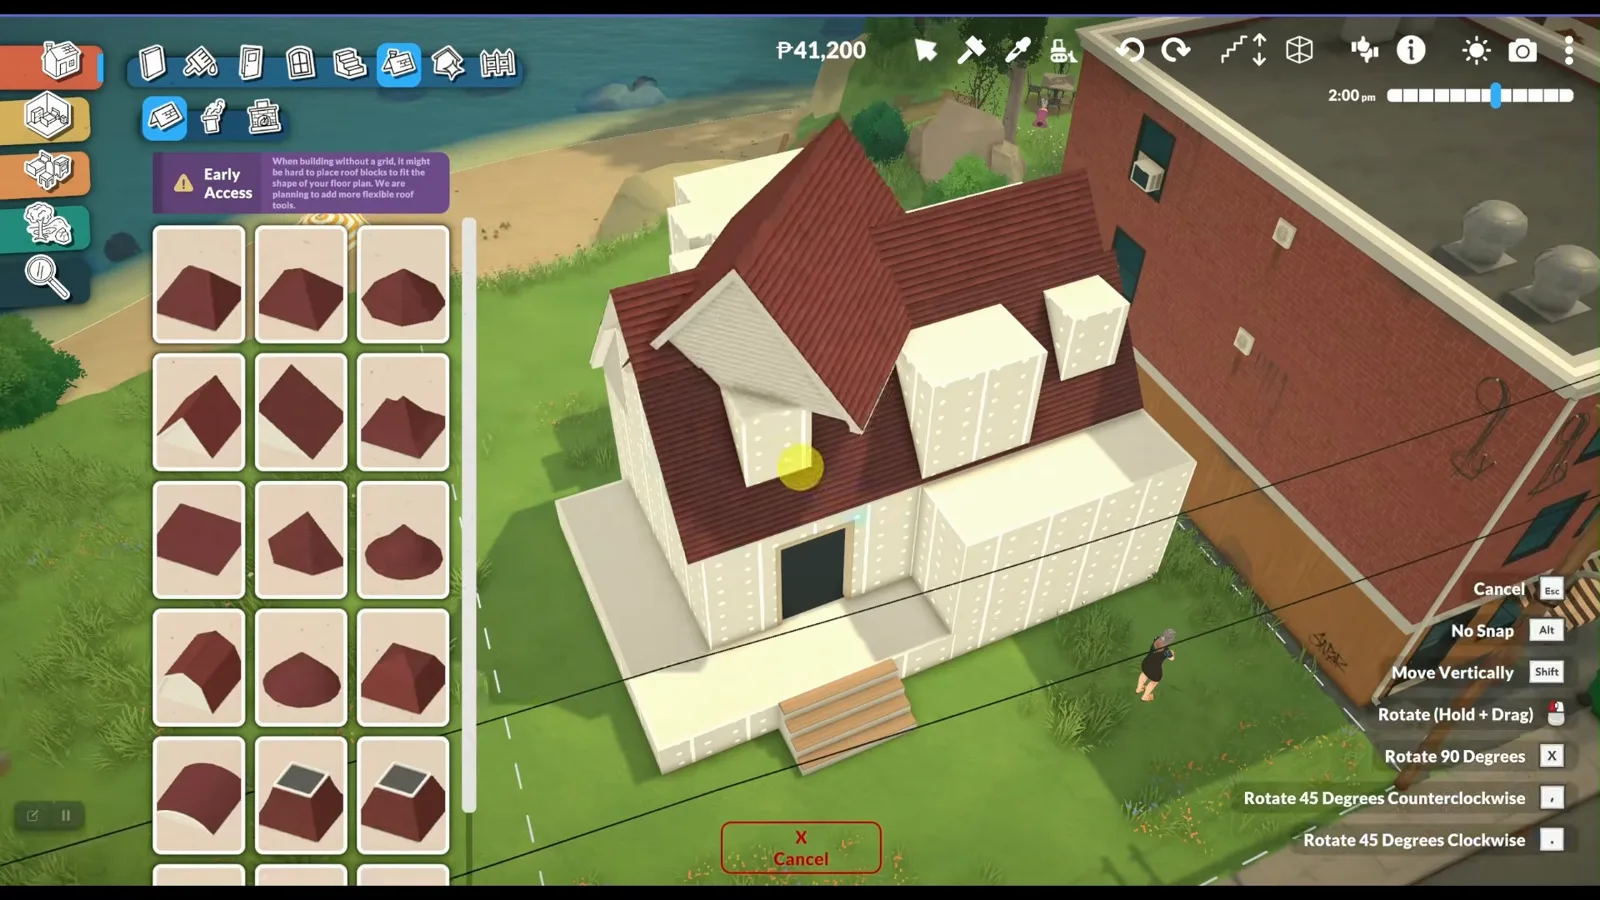
The gap is the point — the roof never touched the attic floor.Watch at 3:00 - 10
Drag it down with the advanced build widget
With the roof selected, * (numpad) opens the advanced build controls, and the piece drags down into position over the attic walls. Because it arrived from the floor above rather than being placed directly, the game keeps counting it as a top-floor roof — which is why, when you view the attic floor alone, the roof automatically hides out of the way.
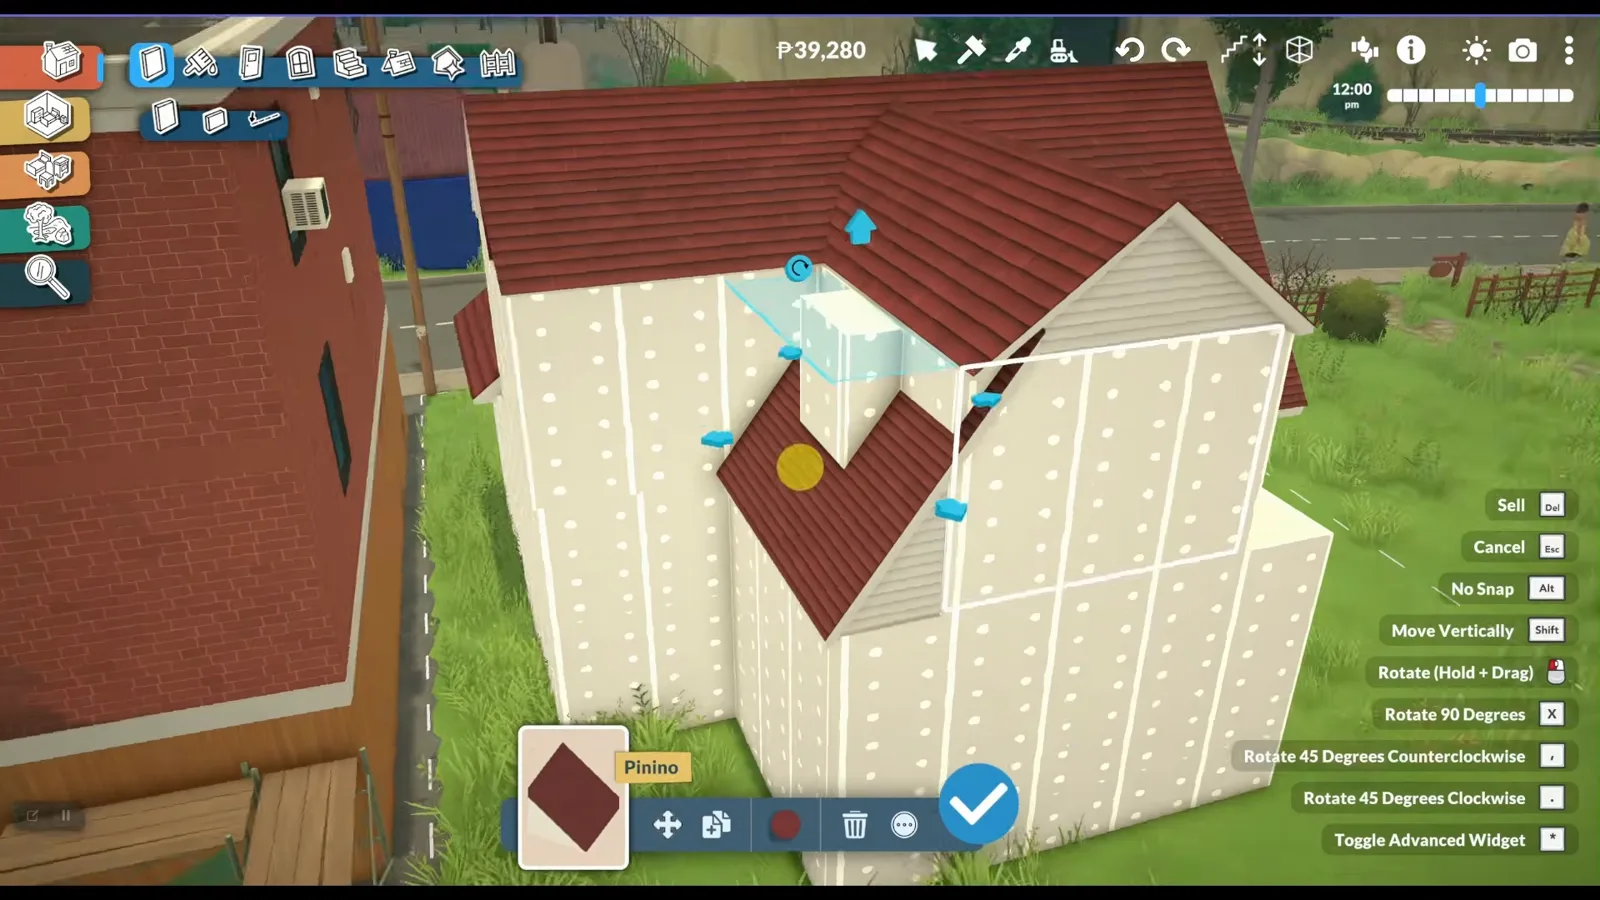
{advanced_widget} walks the roof down without re-anchoring it.Watch at 3:38 - 11
Finish with a clean roof and a working attic
From above, every plane meets: gables, hips and the dormer close over the walls with no clipping and none of the awkward corners a forced piece leaves behind. The creator play-tested the trick several times and reports the entire attic floor stays fully functional — the payoff the last step's rule protects.
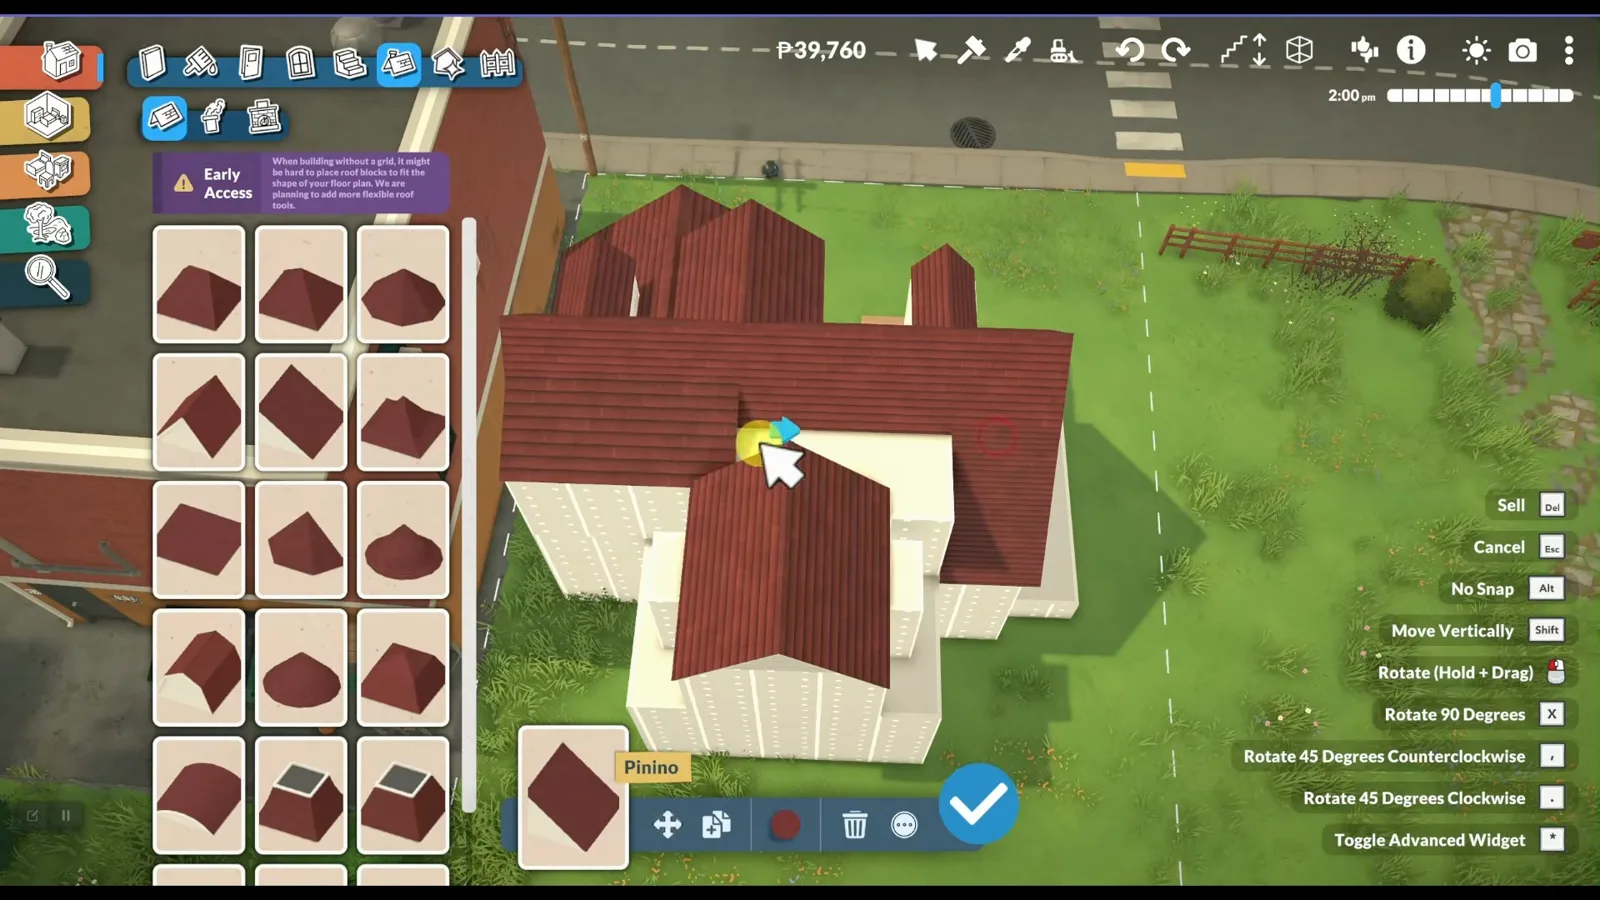
No clipping, no gaps — and the attic floor still works.Watch at 3:25 - 12
The one rule: never park a roof on a walkable floor
The creator's closing warning: "never place the roof directly on a floor where your Para needs to walk. If you do, that area won't be functional." The game reads floored-over space as roof, not room. His restatement of the fix in reverse: always place the roof on a non-accessible surface first — the top floor — and move it into position with the advanced widget afterwards.
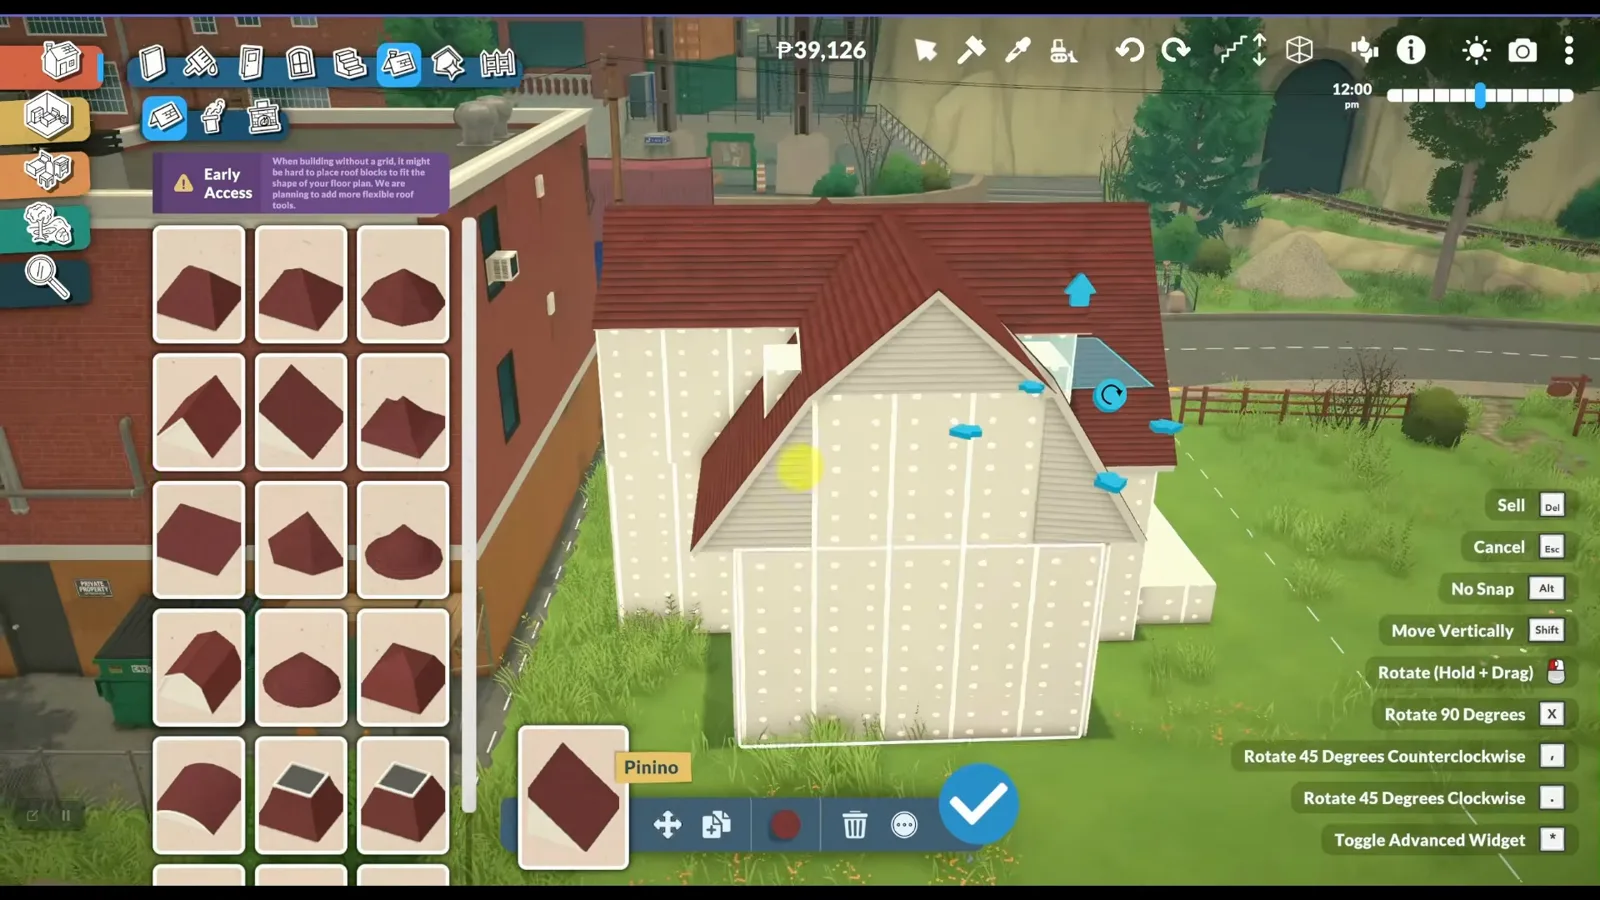
Roofs live on floors nobody walks — then get moved.Watch at 3:44
Make it a room
Dormer, materials and the finish
With the shell clean, the attic house becomes a place: an L-shaped porch roof in a low-stretch material, the dormer centered for a symmetrical front, the lot painted and planted — and, under the slanted ceiling, the working room all of it was for.
- 13
Shelter the veranda with an L-shaped roof
An L-shaped roof extends over the veranda where it wraps the corner. For it the creator picks a specific roof material, one he recommends with this trick because — as he puts it — it doesn't stretch nearly as much and still finishes nicely, which matters once a piece has been moved rather than placed. The wall-separated tool adds a few extra columns under the veranda while he is at it.
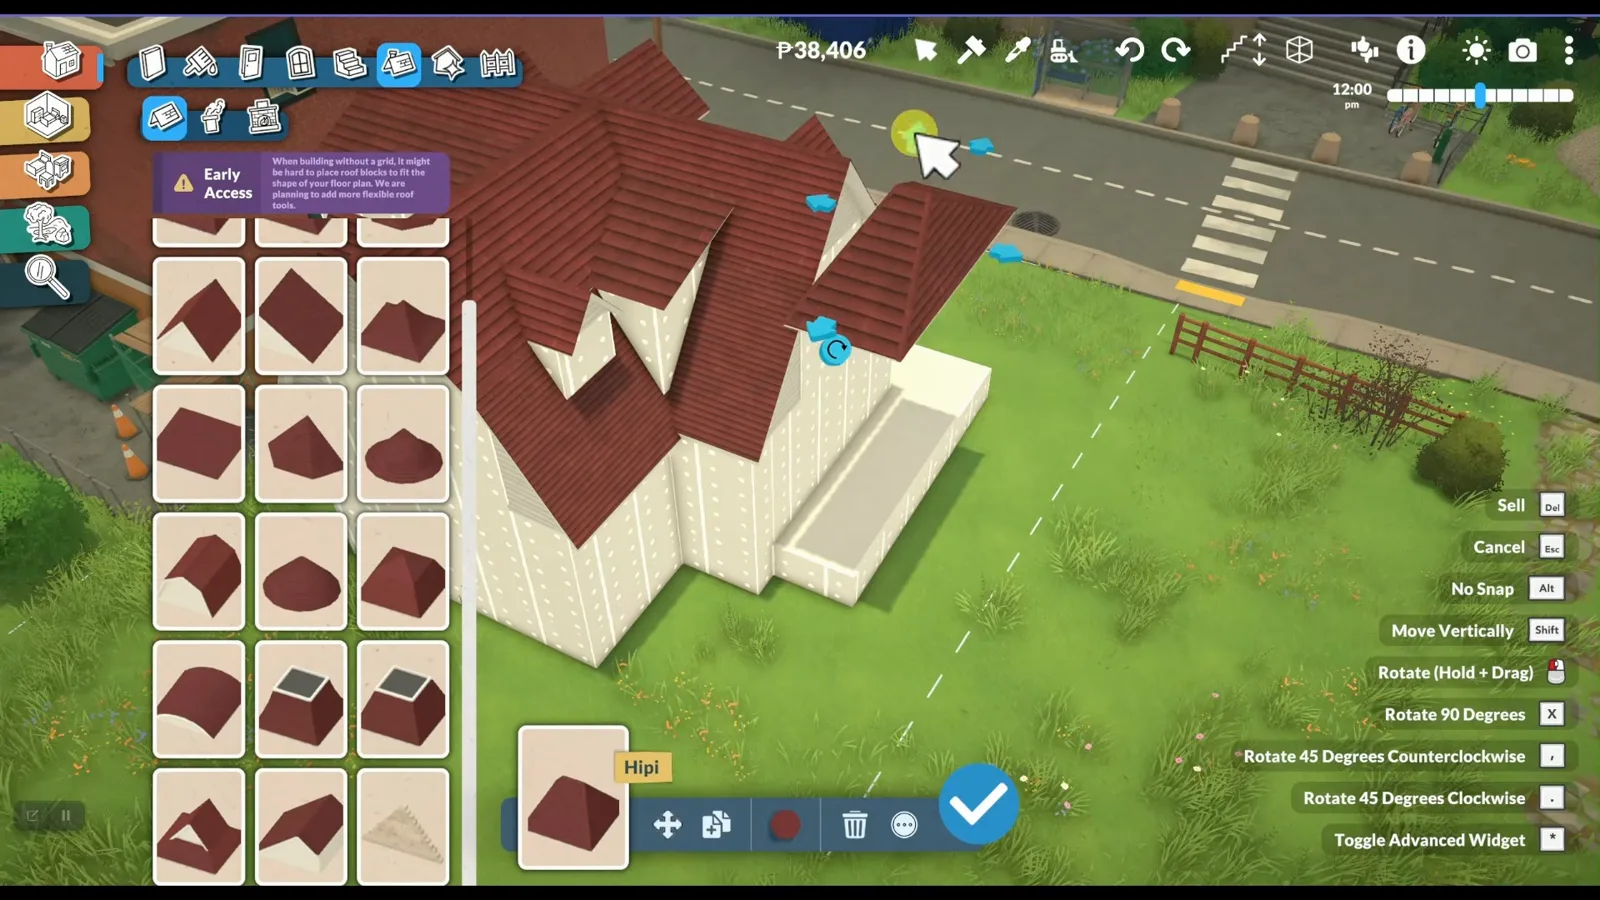
The L-shaped porch roof, in the material that resists stretching.Watch at 3:55 - 14
Center the dormer, then dress the front
The large attic dormer gets nudged sideways until it sits centered over the ground floor — a small move the creator makes so the front elevation feels balanced and symmetrical. Around it: shutters on the attic windows, little planters beneath them, a warm yellow for the siding and a contrasting colour on the rake that helps the roof's shape stand out. Ordinary pieces, every one — the centering is the trick.
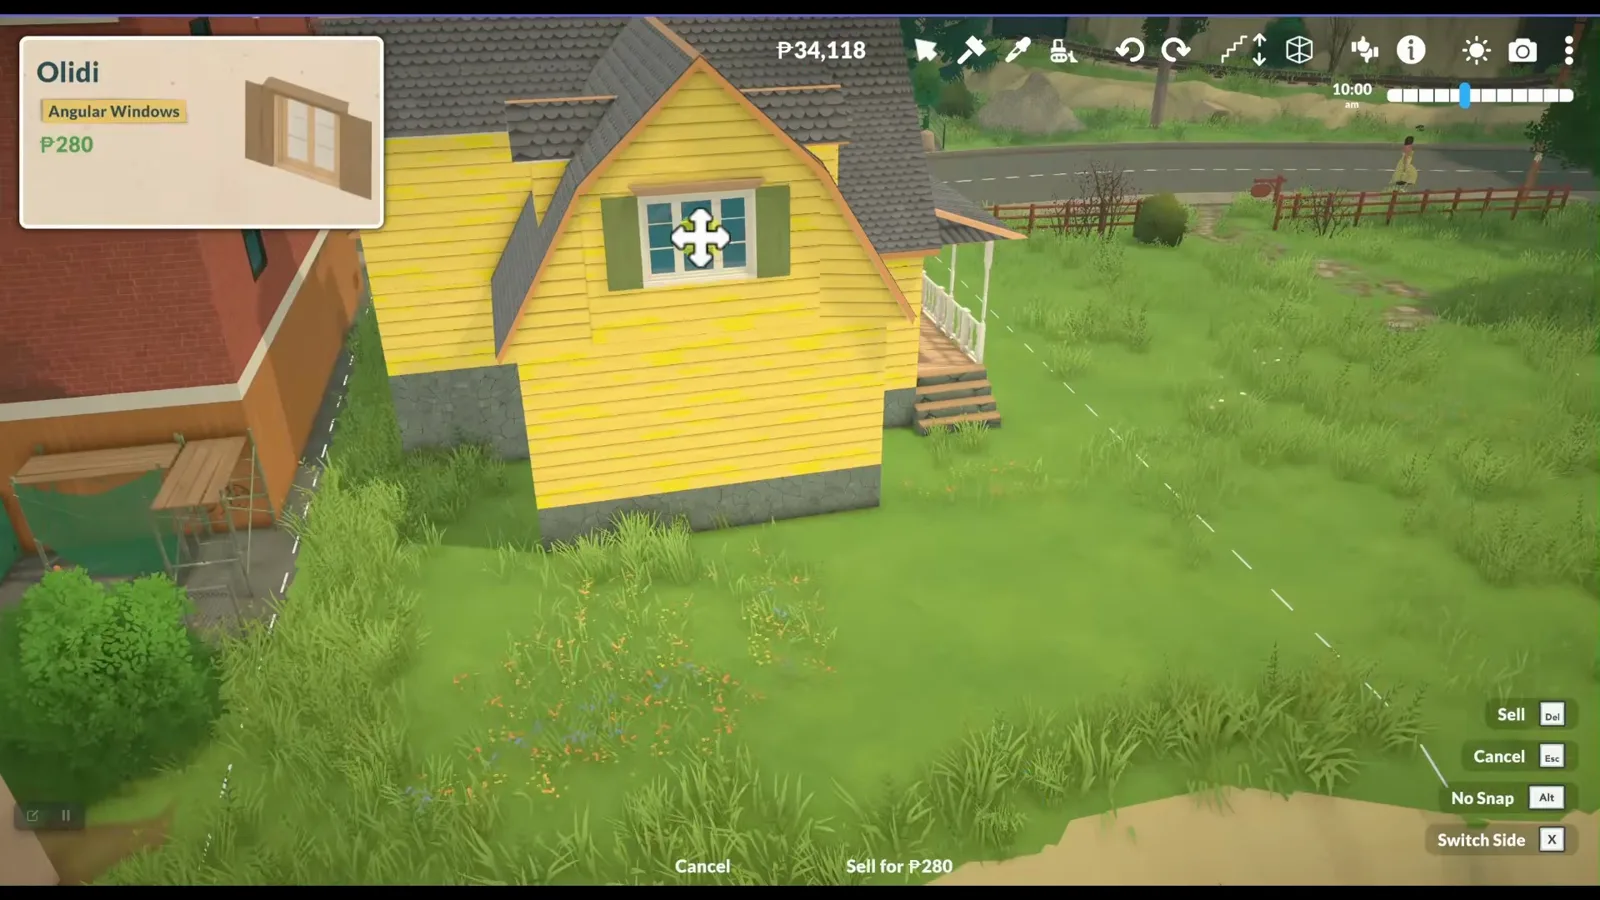
Dormer centered — the front elevation reads as designed.Watch at 5:10 - 15
Finish the lot, then hand the shell over
Terrain paint mode touches up the ground before shrubs, flower beds and a small backyard patio go in — the creator keeps the ground floor simple on purpose, since the roof got the attention this time. Then he uploads the finished shell to the Steam Workshop and invites viewers to decorate the interior and tag him for a showcase. That shell swap is a creator community challenge, not an official game feature — the game's shareable Workshop is, the decorating contest is his.
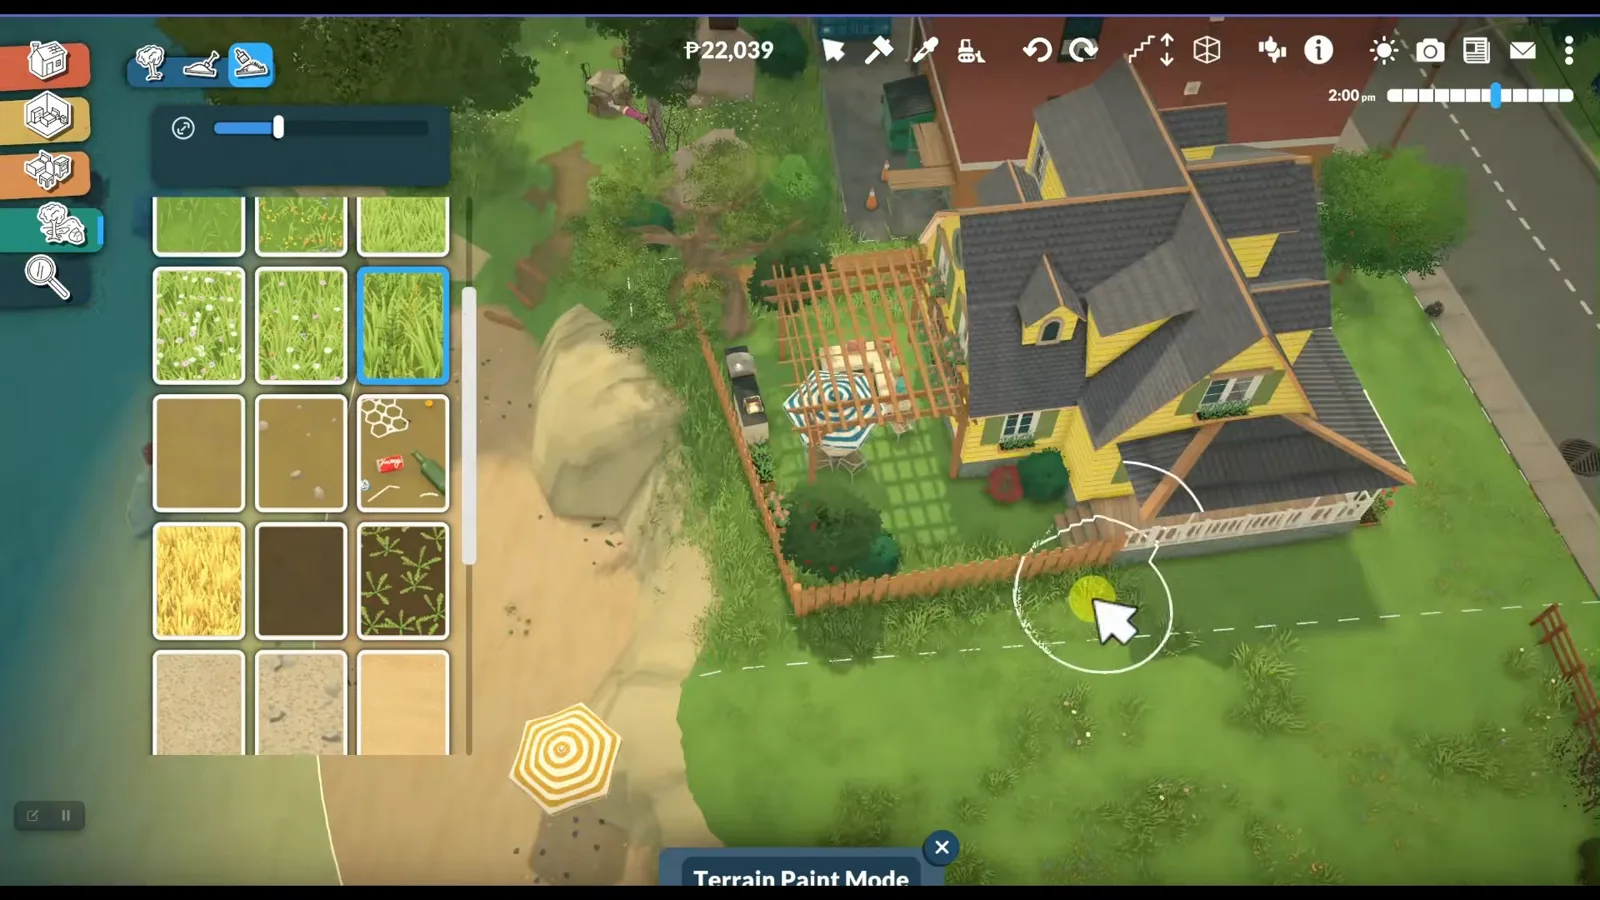
The lot gets the simple half — the roof already had its moment.Watch at 6:42 - 16
Under the roof: the room the trick protects
The second build ends inside, and the frame is the whole argument for the page: a finished attic room with a slanted wooden ceiling, its walls being repainted in wall painting mode. No clipped planes overhead, no dead floor — just an ordinary, usable room that happens to live under the roofline.
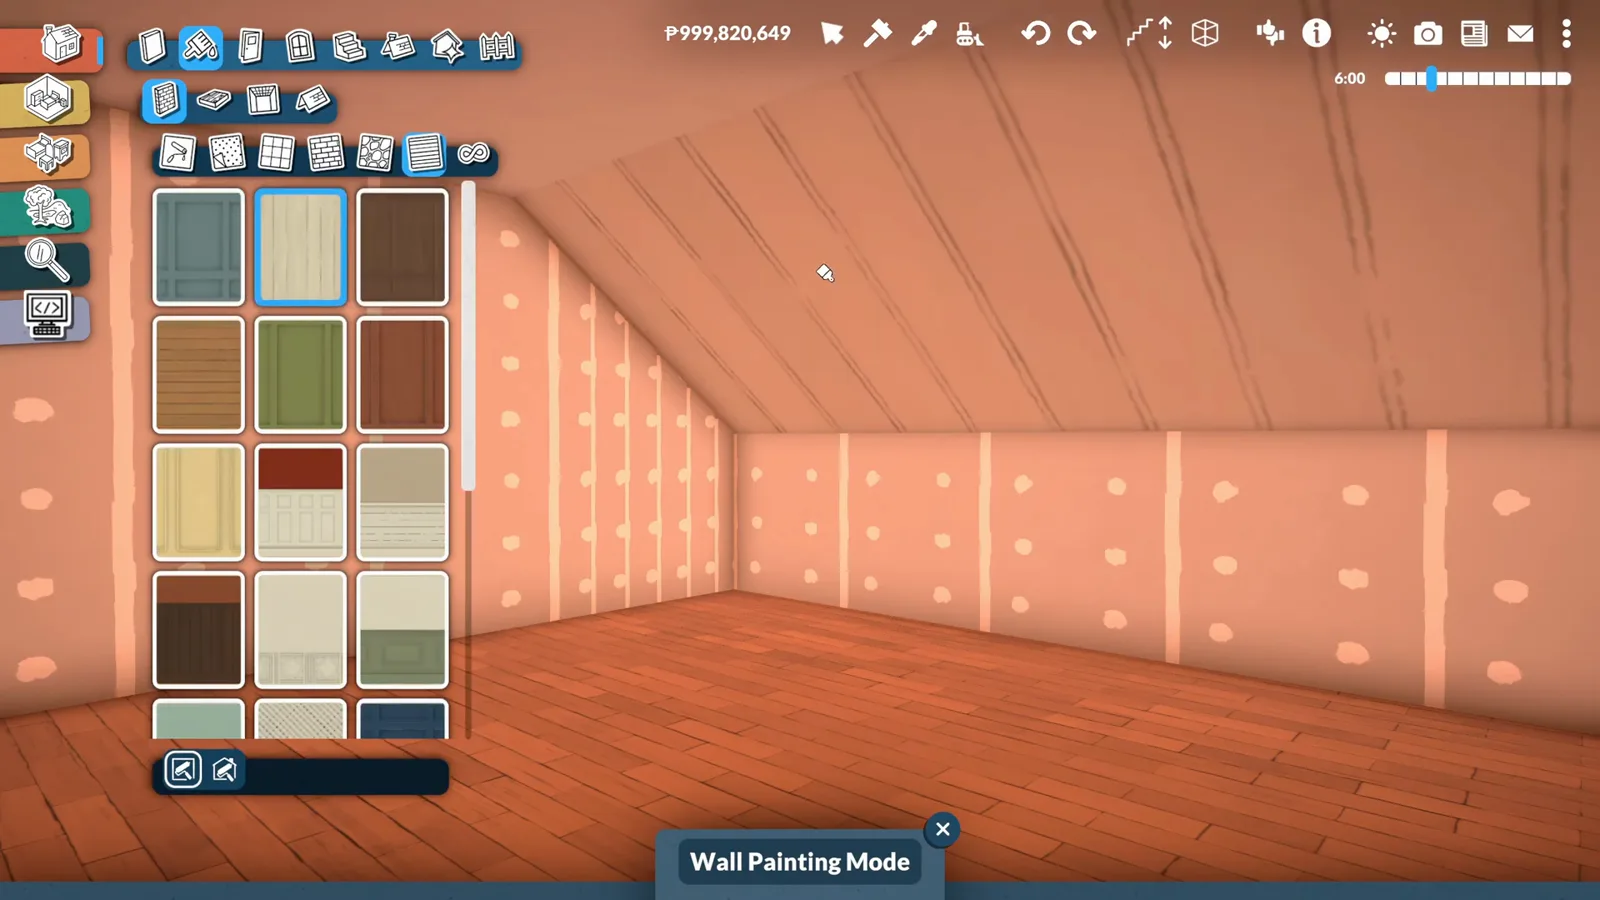
A working room under the slanted ceiling — the whole point.Watch at 4:00
Attic questions, answered from the footage
- Why does my roof clip through the walls of my Paralives attic?
- Because a roof anchors to whatever floor you place it on, and Early Access roof placement is still rigid — the game's own catalogue banner says flexible roof placing tools are planned. The workaround this page builds with: place the roof on the building's highest floor, then drag it down over the attic with the advanced widget. The game keeps treating it as a top-floor piece, so it never cuts into the attic's walls or corners.
- Is there an attic tool or attic room preset in Paralives?
- No. As of 0.1.8b an attic is ordinary walls under a roof — no stamp, no preset, no dedicated tool. The walls go up first as a placement guide, the stairs are built before the roof, and the roof is parked a floor high and lowered with the advanced widget. Finished attic houses can be downloaded from the Steam Workshop through the in-game library, but they arrive as builds, not as a style you can apply to your own walls.
- Is an attic the same as a loft in Paralives?
- No — the words overlap in real estate but not in this game. A loft is an open mezzanine: half a floor added inside a taller room, no roof involved. An attic is an enclosed room stored directly under the roof plane, which is exactly why roof placement is its hard part. If your build has no sloped roof in the way, you want the loft guide; if the roof keeps clipping through your walls, this is the right page.
- How do I build a dormer over an attic room?
- A dormer is just a small room drawn on top of the roof plane, roofed and glazed with any window — no mod needed. In the build above, the creator nudges his finished dormer sideways until it sits centered over the ground floor, which is what makes the front read as designed. Our roof tutorial walks the draw-a-room method step by step, from the first wall on the roof plane to the glazed cap.
- Does the advanced-widget roof trick have any downsides?
- Two, both documented in our roof tutorial: the game still thinks the roof lives on the floor above, so it turns invisible when you view the attic floor by itself — the creator in the video plays that as a perk — and pieces placed this way occasionally disappear when a save reloads, so save often. The video also adds the one rule to remember: never place a roof directly on a floor a Para walks on, because that area stops being functional.
Go deeper on the tools
Roof tutorial
The full roof toolkit: colouring every part, corner pieces, skylights — and the clipping fix this page puts to work, with its two costs.
Stairs
Every flight style and the resizing controls, for the U-shaped chain this build improvises from a landing platform.
Windows & doors
Placement rules and resizing, for the arched attic windows reserved in the gables before the roof arrives.
Keep building
Loft
The open half-floor cousin: a mezzanine inside a taller room, no roof tricks required — and how it differs from an attic.
Platforms
Raised slabs and level tricks — the landing platform under this build's improvised staircase, explained in full.
Shipping container
Two corrugated boxes stacked with an overhang — the stairs-first cousin of this build's zoning.
Build mode tips
The placement modes, snapping rules and widget habits this build leans on, collected in one place.
House ideas
More whole-house silhouettes to steal proportions from — attics included.