
The short version
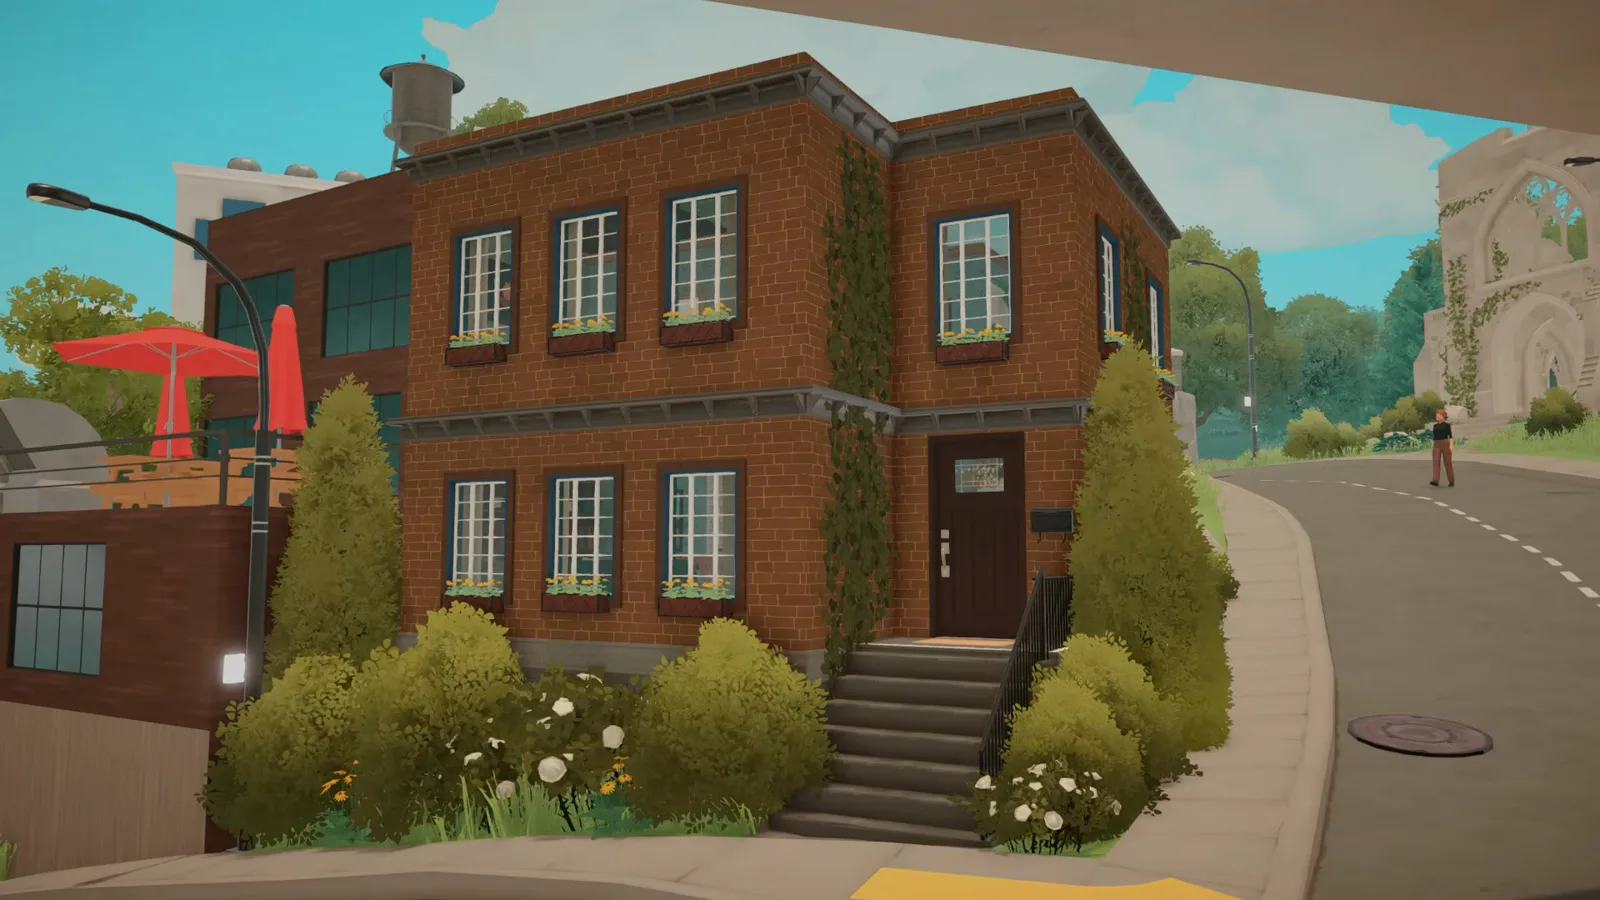
There is no brownstone tool in Paralives as of 0.1.8b — the wiki has no entry for one, because the style is assembled from standard build mode. Three dedicated creator builds appeared recently, and all three follow the same skeleton: a tall shallow shell hugging the sidewalk, tall window columns, a white cornice, brown paint on the brick, and a stoop with railings over a raised basement. The interior is where builds diverge — and where Paras test whether the stairs actually work.
- No brownstone template exists — the facade is brick repainted brown in Wall Painting Mode, topped with a white cornice from Molding Mode.
- The stoop is steps and iron railing over a raised basement; the 'little underneath section' takes the most nudging.
- Interior stairs are the trap: a fence at the stair opening can cancel them, and free placement never warns you — test with a Para.
- The separator wall splits the parlor floor so the kitchen gets tile while the dining room keeps wood.
- Style Creation takes hex codes and saved swatches; right-click a saved swatch to edit or delete it.
- Everything here is base game — all three featured builders used zero custom content.
The shell
Draw the box, dress the facade
A brownstone is a tall, shallow rectangle that hugs the sidewalk. April's build order: footprint first, then window columns and the cornice — and only then the brown paint that gives the style its name.
- 1
Draw the footprint on a narrow lot
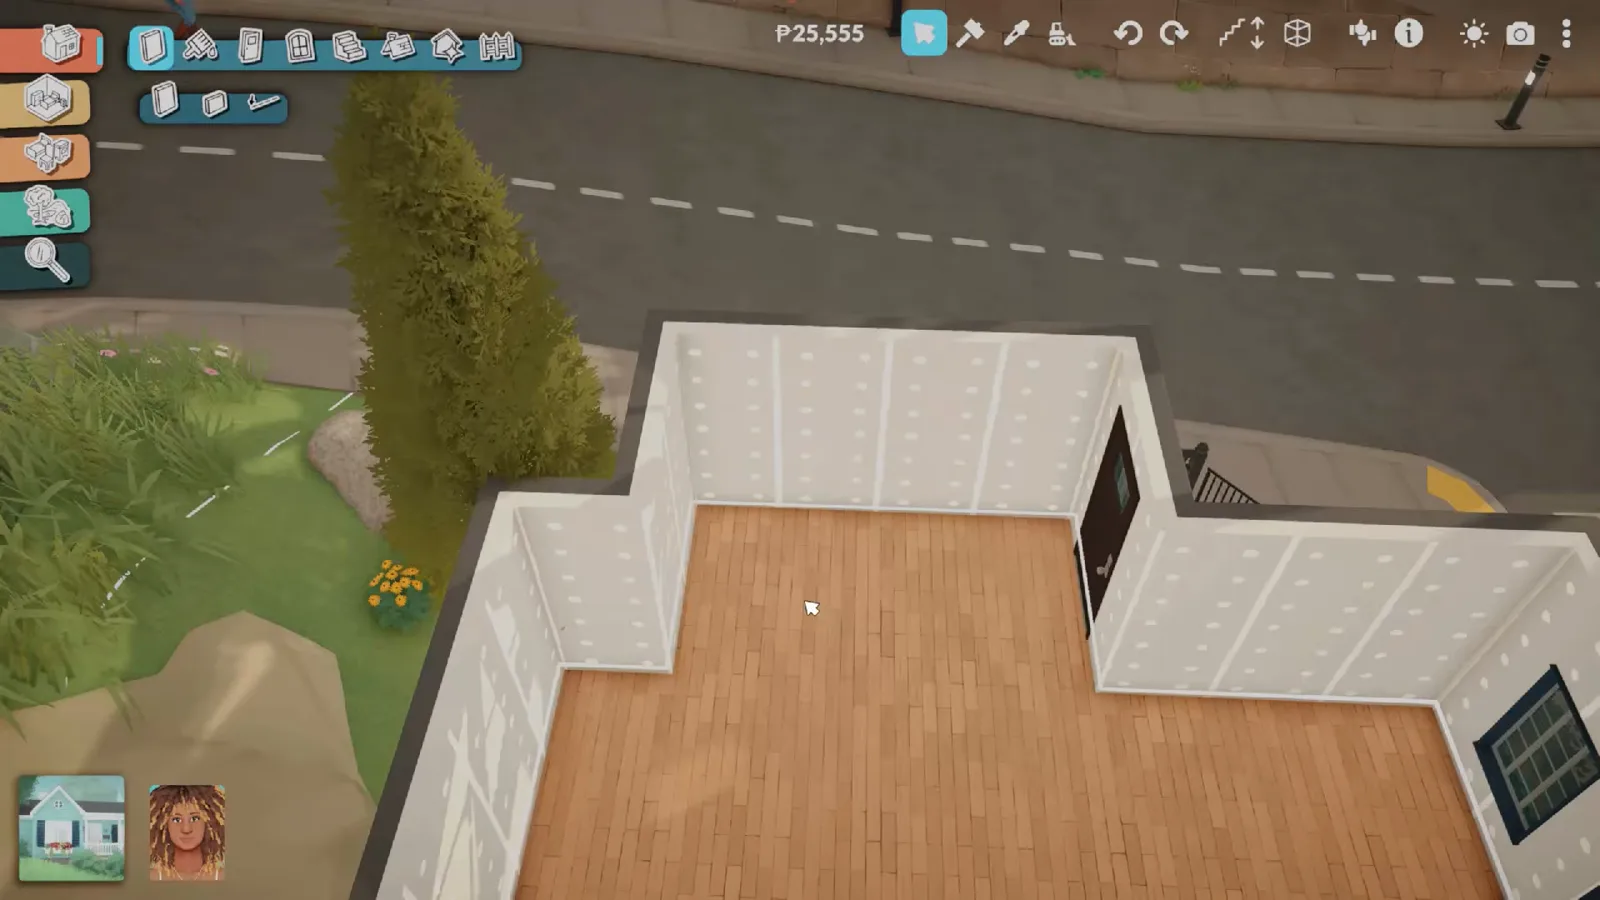
April starts on a corner lot across from the bridge, pulling the Wall Placement Mode rectangle tight to the sidewalk the way a real row house sits on its plot. Keep the plan shallow and tall — a brownstone is a vertical house, and the leftover grass becomes the little rear yard.
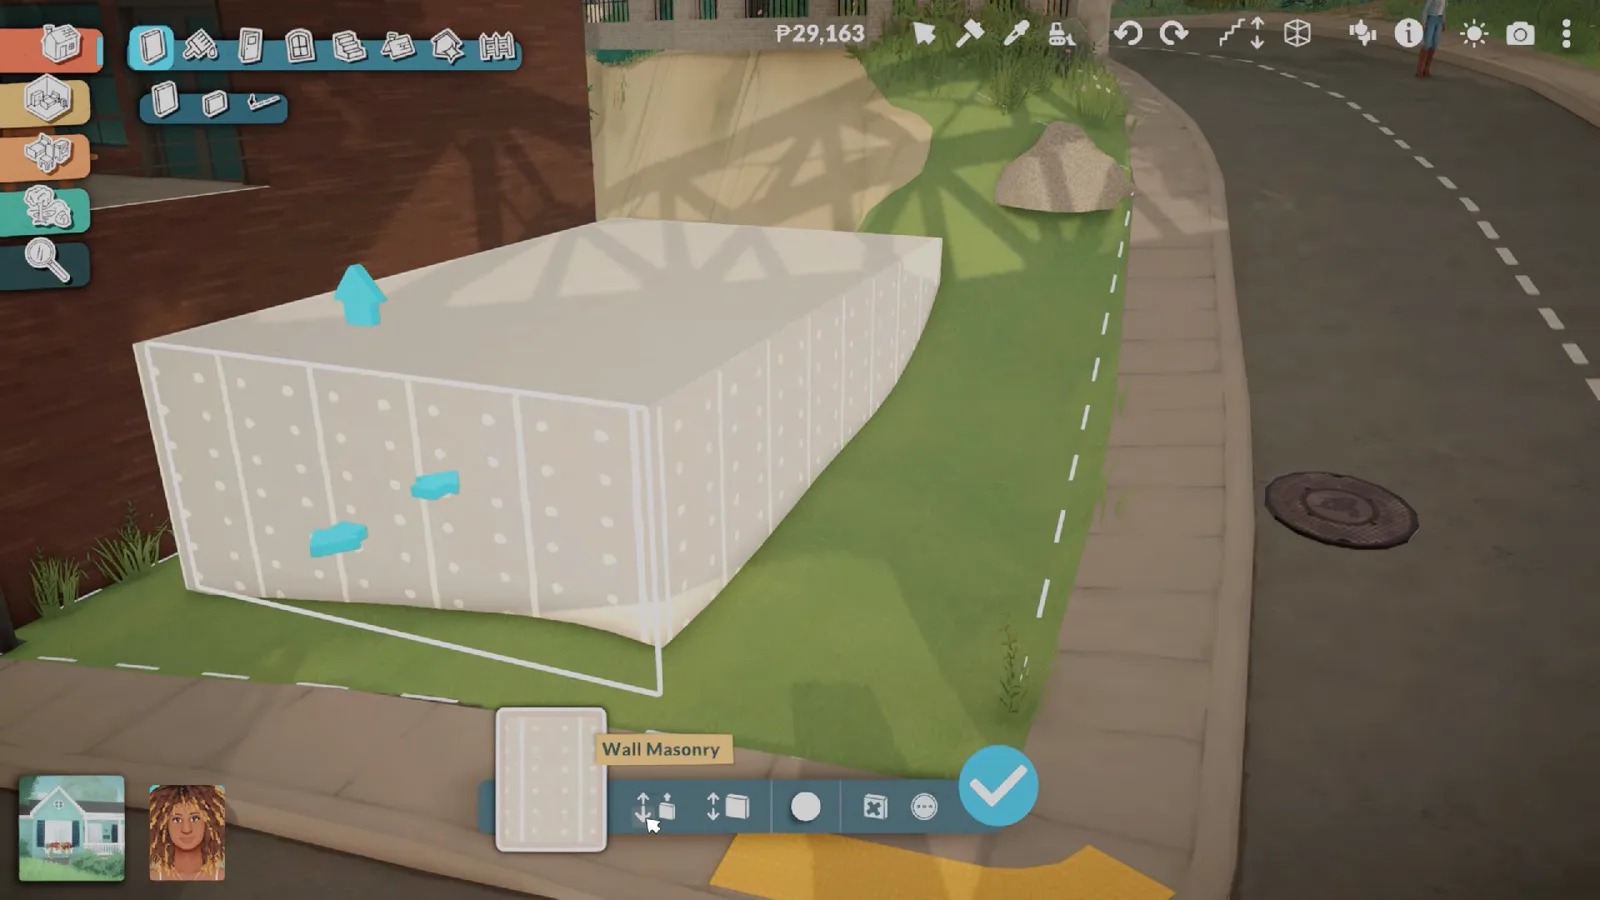
The shell goes up first, tight to the street like a real row house.Watch at 0:28 - 2
Trim the roofline with a cornice
With Molding Mode, run a white cornice around the top of the brick shell. That single band is what makes the flat-roofed box read as a New York townhouse instead of a warehouse — april adds it while the facade is still bare, before any furniture exists.
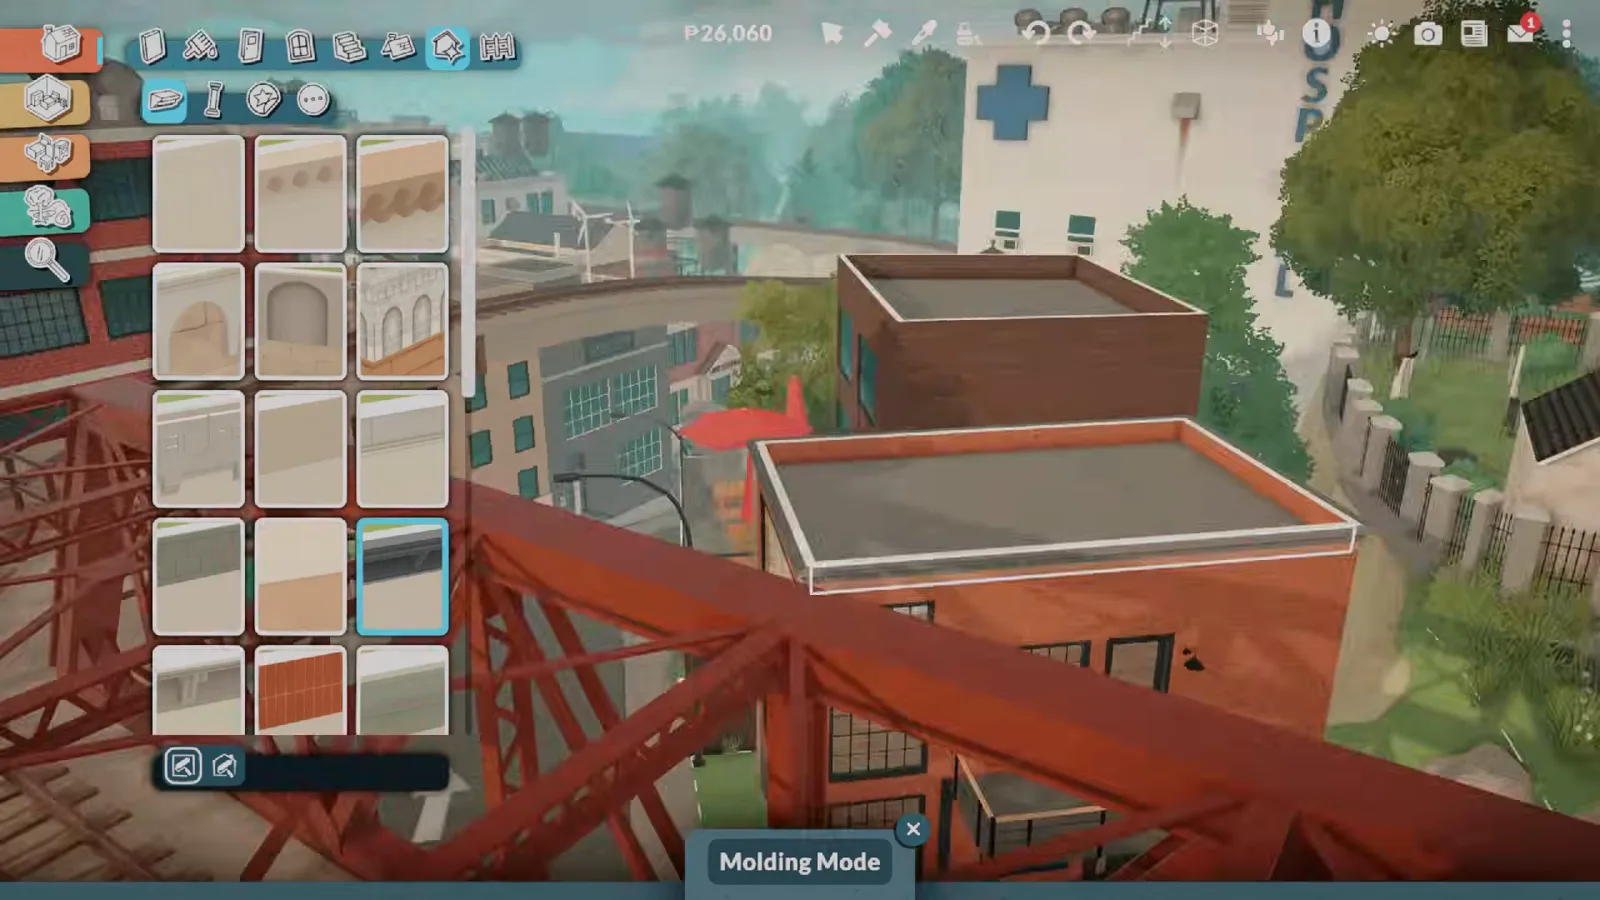
One molding band turns a brick box into a townhouse silhouette.Watch at 4:50 - 3
Fill the facade with tall windows
Open the window catalogue and pick the tall multi-pane sashes, stacking them floor over floor in matching columns. April tests one bay first — the selected window glows cyan until the placement clicks — then repeats the pattern across the front.
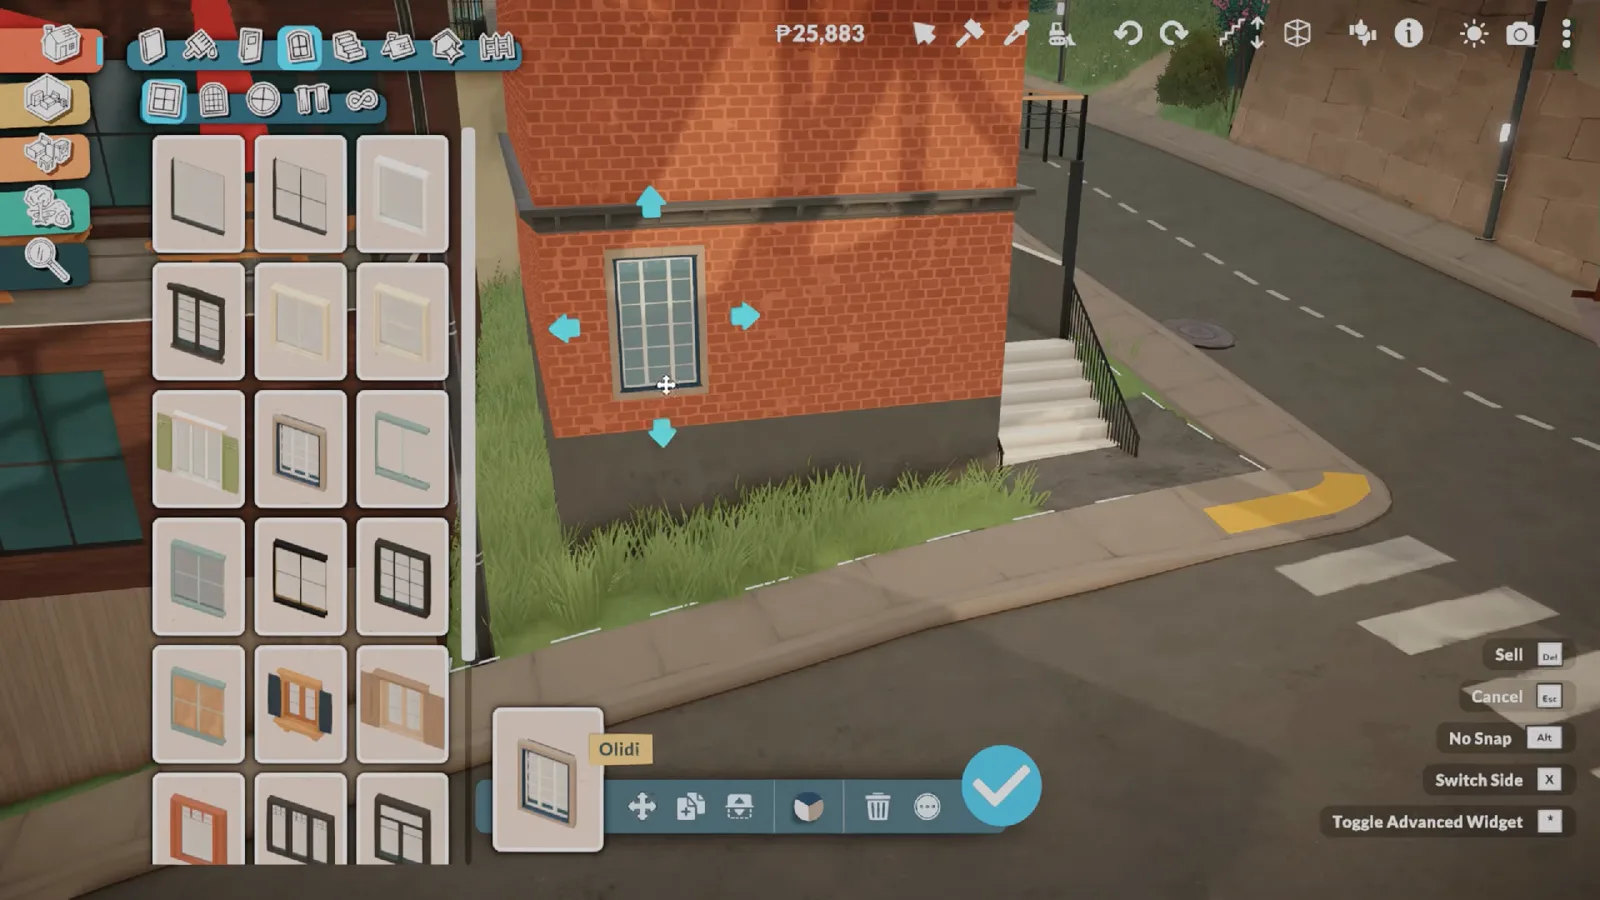
Tall sashes, stacked in columns, carry the whole facade.Watch at 5:08 - 4
Repaint the brick brown
A brownstone is named for its brown sandstone face, so open Wall Painting Mode on the exterior walls and swap the starter red brick for a brown tone — the swatch panel lines up the red, tan, grey and brown options. April tested a cream version first and went back for the brown, so try more than one before you commit.
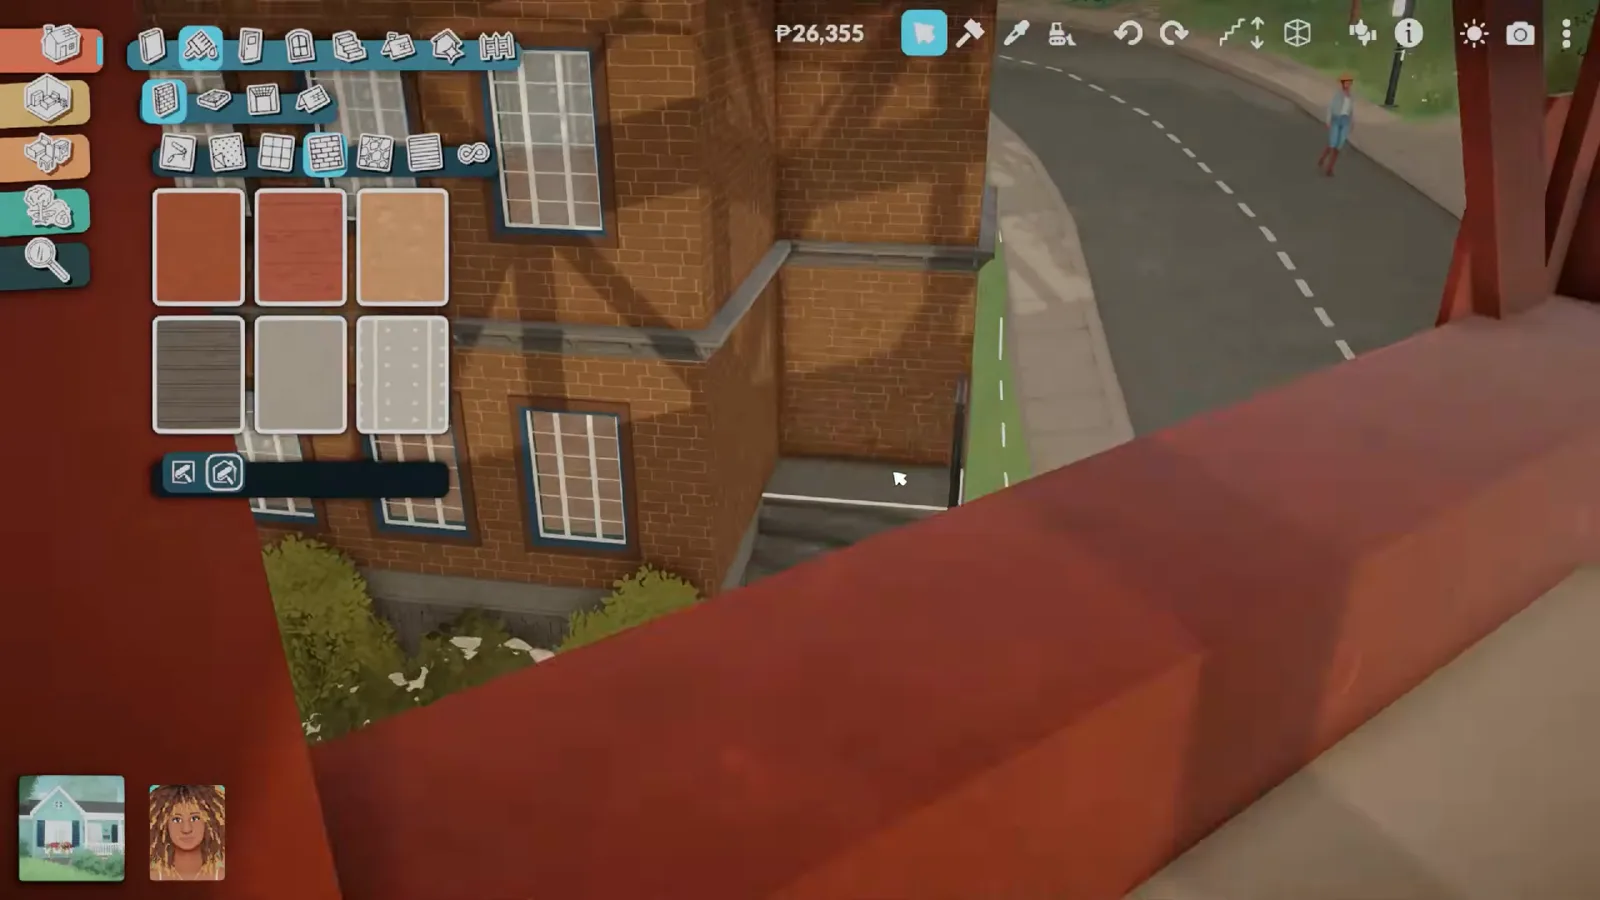
Wall Painting Mode does the sandstone: red brick in, brown brick out.Watch at 7:46
Stoop and stairs
Build the stoop, dodge the stair traps
The stoop is the brownstone's handshake — steps and railing over a raised basement. It is also where the build bites: columns refuse heights, fences can cancel stairs, and nothing warns you until a Para tries the path.
- 5
Learn from the balcony that almost wasn't
April first tried a full second-floor balcony and abandoned it: the columns refused the height she wanted and pushed up through the floor, and trim would only attach with a wall below. Her fix is the brownstone answer anyway — a shallow juliet balcony with a black iron railing, all look and no deck.
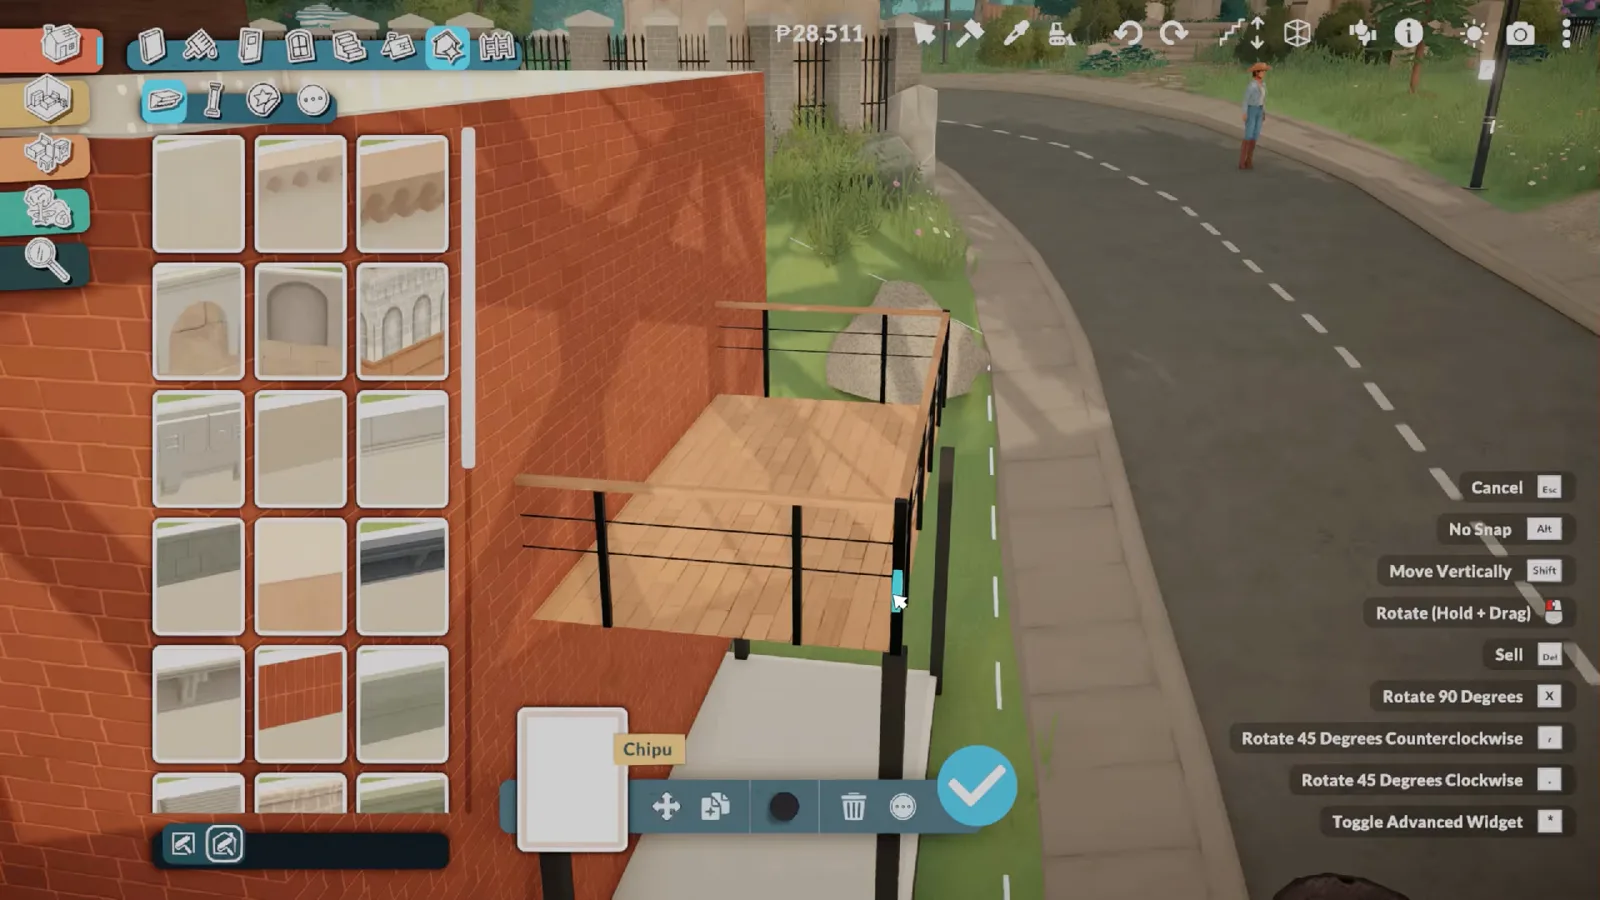
Columns through the floor killed the deck; the juliet railing stayed.Watch at 1:48 - 6
Raise the stoop and ring it with railing
The signature move: steps up to the front door above a raised basement level, boxed in with railings. April lines her stoop with white ironwork and plants hedges along the areaway so the entry sits half a storey above the sidewalk, exactly like the New York original.
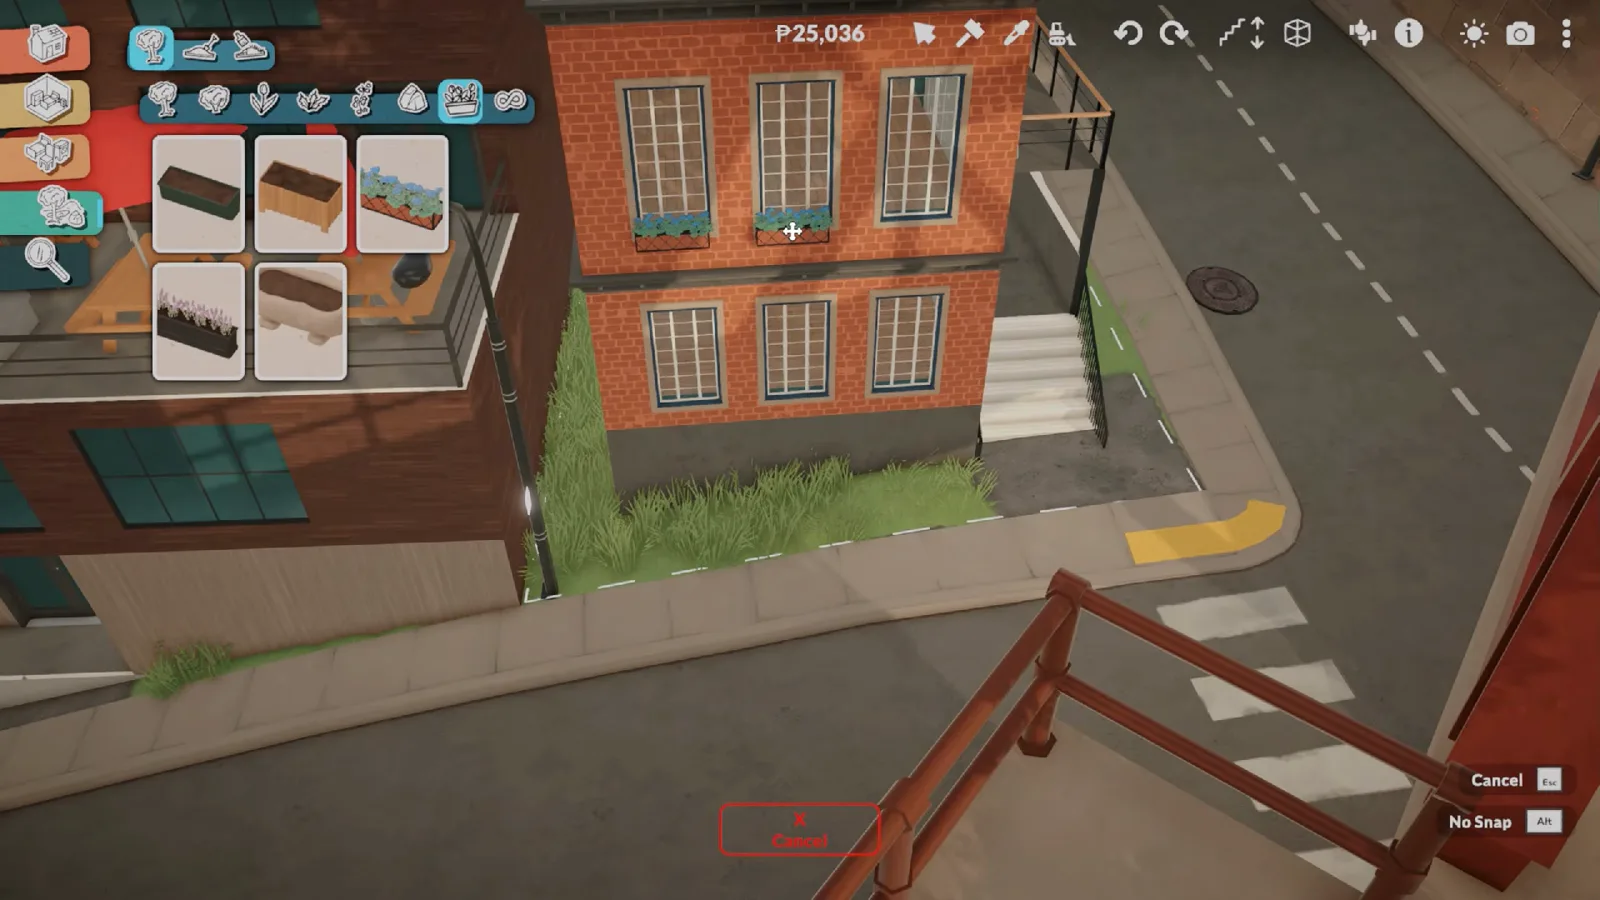
Stoop steps, iron railing, hedge line — the brownstone handshake.Watch at 5:30 - 7
Wall in the raised basement
Under the stoop, adjust the side walls until the entry level reads as a proper English basement rather than a floating porch. Splash of Gaming calls this 'the little underneath section' and names it the hardest part of her build — expect to nudge wall heights more than once.
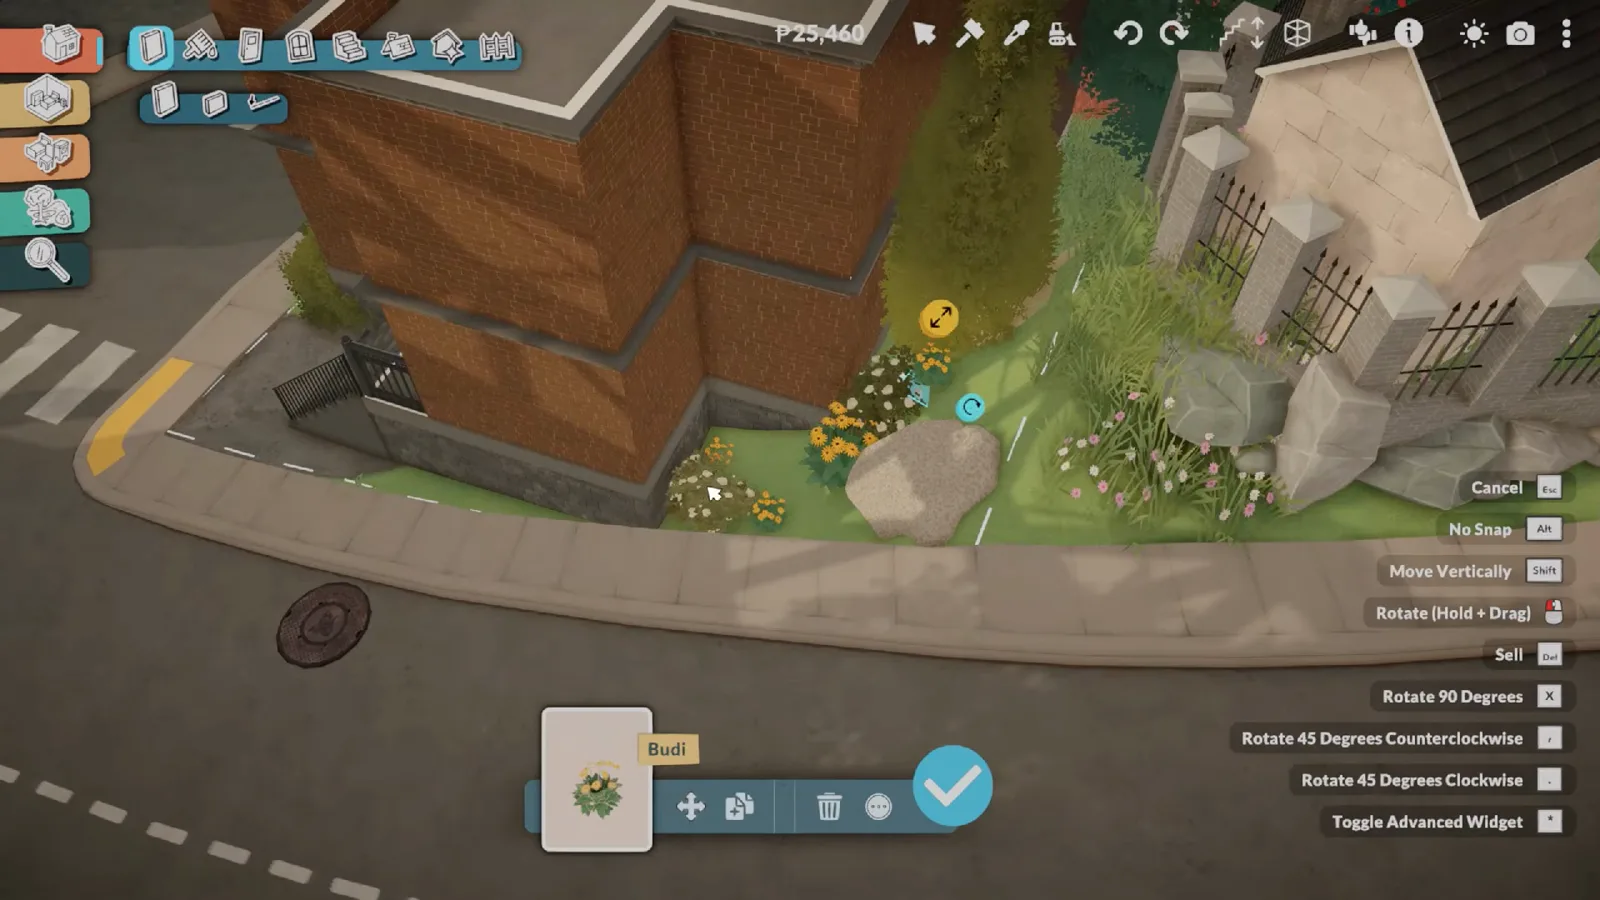
The 'little underneath section' — the part every builder fights.Watch at 8:15 - 8
Thread the stairs up the middle
Inside, place a slim black metal staircase against the party wall. April's first run ended bottom-step-against-the-wall and had to move; keep the flight clear of the walls and remember free placement will not warn you if the pathing is broken — only a Para test will.
Slim, dark and against the wall — every inch counts on a narrow plan.Watch at 8:48
The parlor floor
Split, paint and furnish the show floor
Real brownstones show off on the parlor storey. The separator tool gives you a tiled kitchen and a wooden dining room in one open floor; Wall Painting Mode and Style Creation handle the period layering.
- 9
Split the parlor floor with the separator
The separator tool draws a room division without building a wall: april runs it across the back of the parlor floor, then paints kitchen tile on one side and keeps wood on the dining side. Two floors, one open room — the divider trick she says she was proud to figure out.
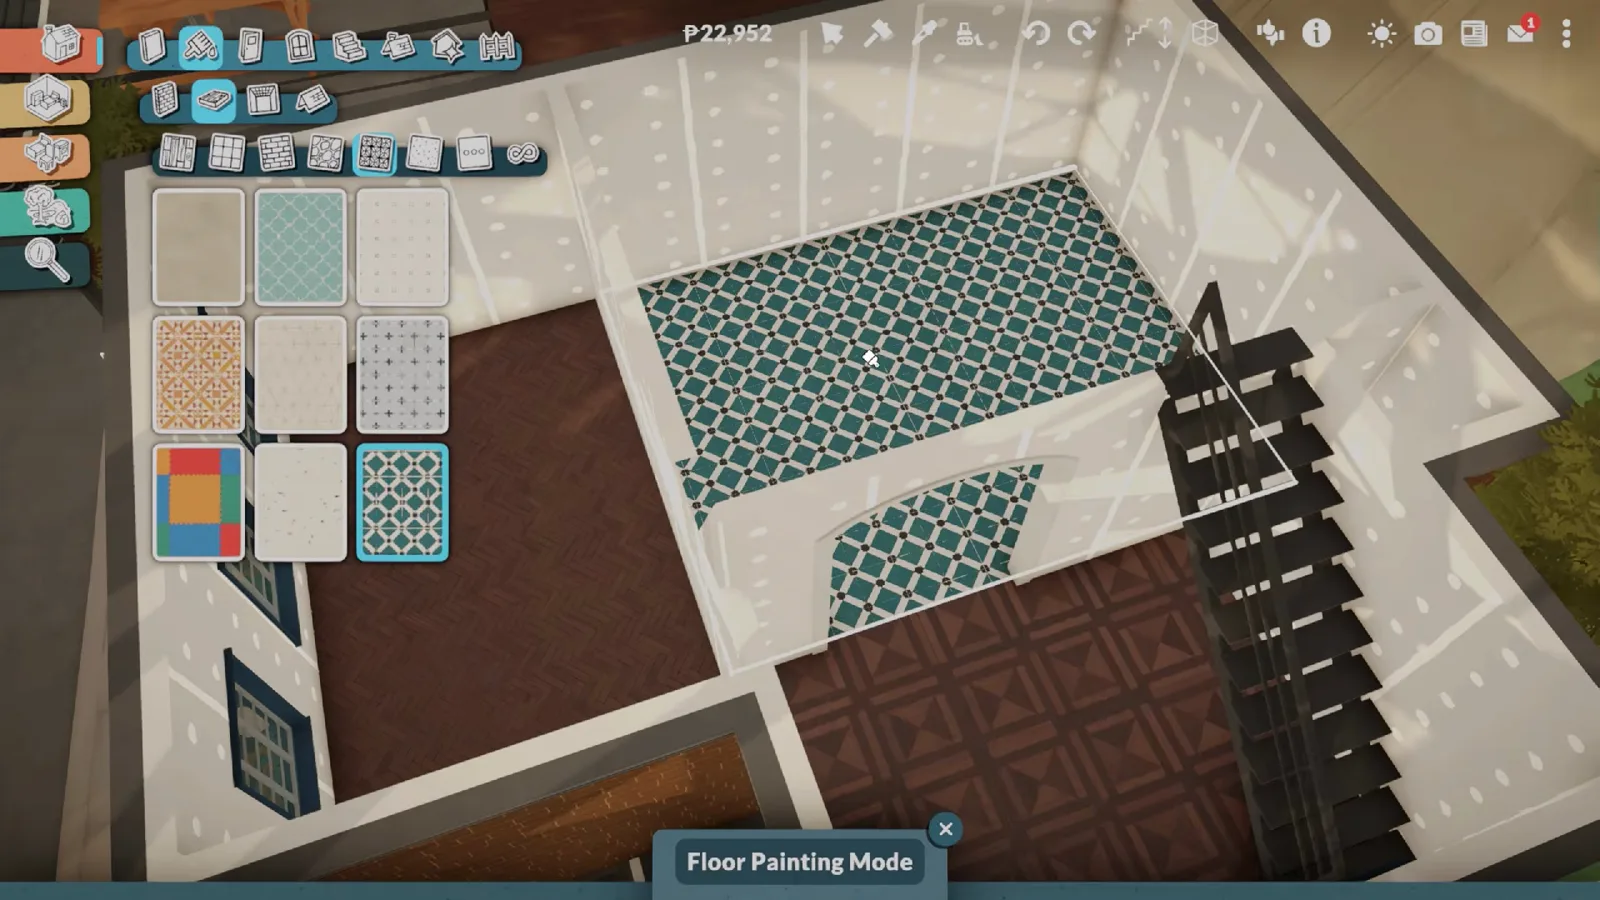
One invisible line: tile for the kitchen, wood for the dining room.Watch at 10:25 - 10
Paint the parlor walls in period layers
Open Wall Painting Mode on the parlor and work in layers: a patterned wallpaper above, a darker wainscot tone below. April iterated through several attempts on camera — the herringbone wood floor stays constant while the wall colours cycle around it.
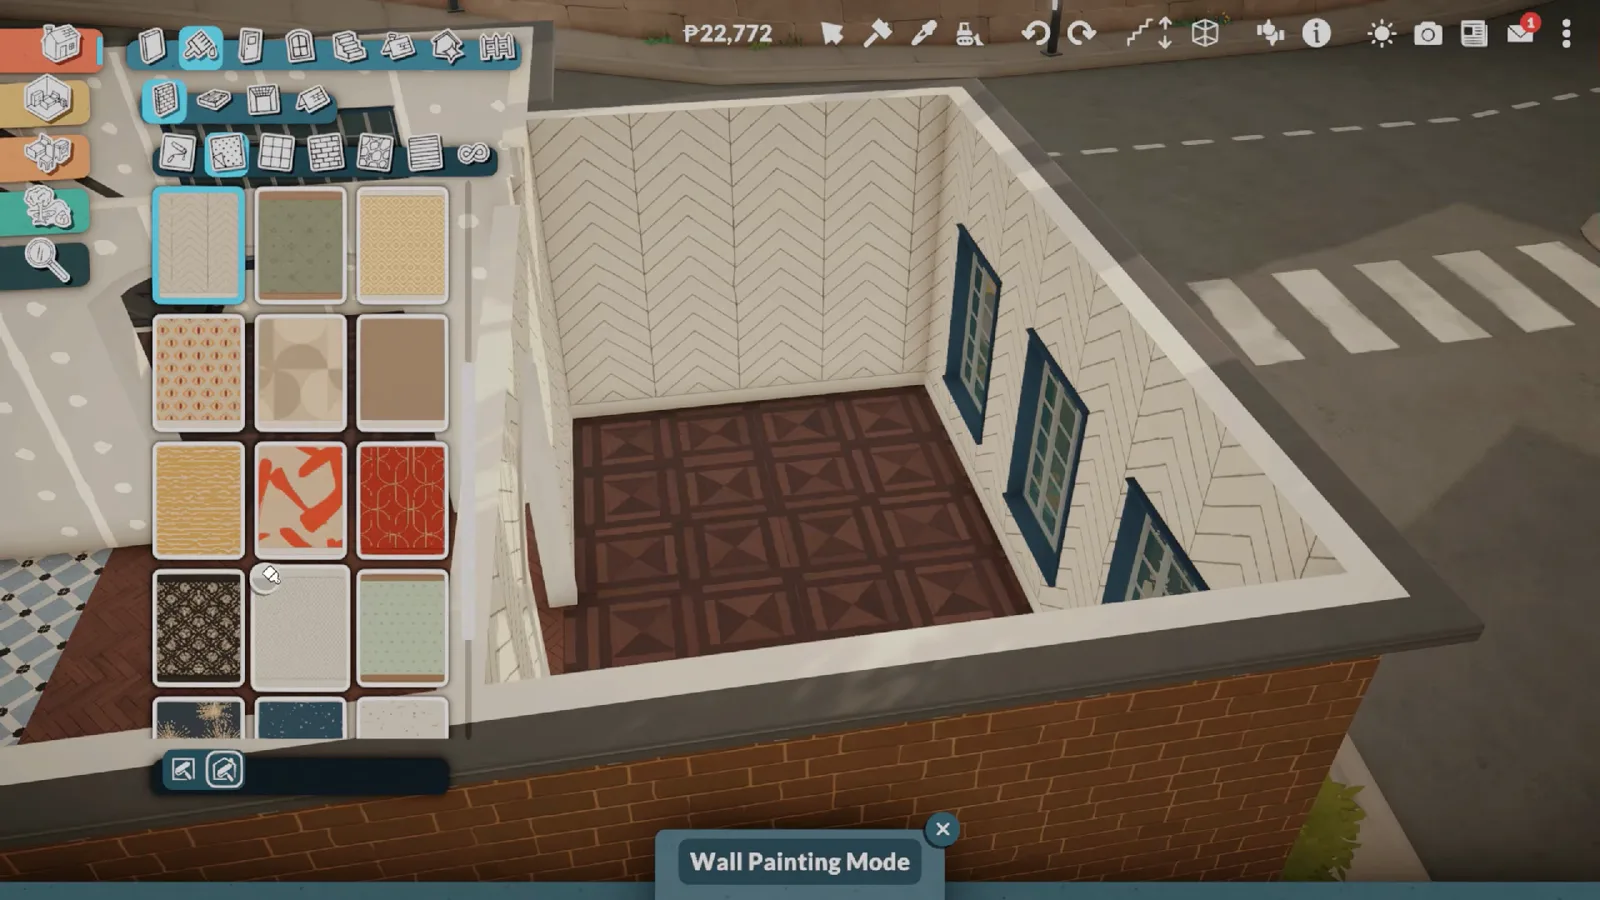
Wallpaper above, wainscot below — the parlor formula.Watch at 10:48 - 11
Recolor furniture with Style Creation
Select any piece and open Style Creation: the colour wheel takes a hex code, and saved swatches carry across items so the sofa, curtains and rug agree. April also learned the maintenance trick — right-click a saved swatch to edit or delete it instead of hoarding strays.
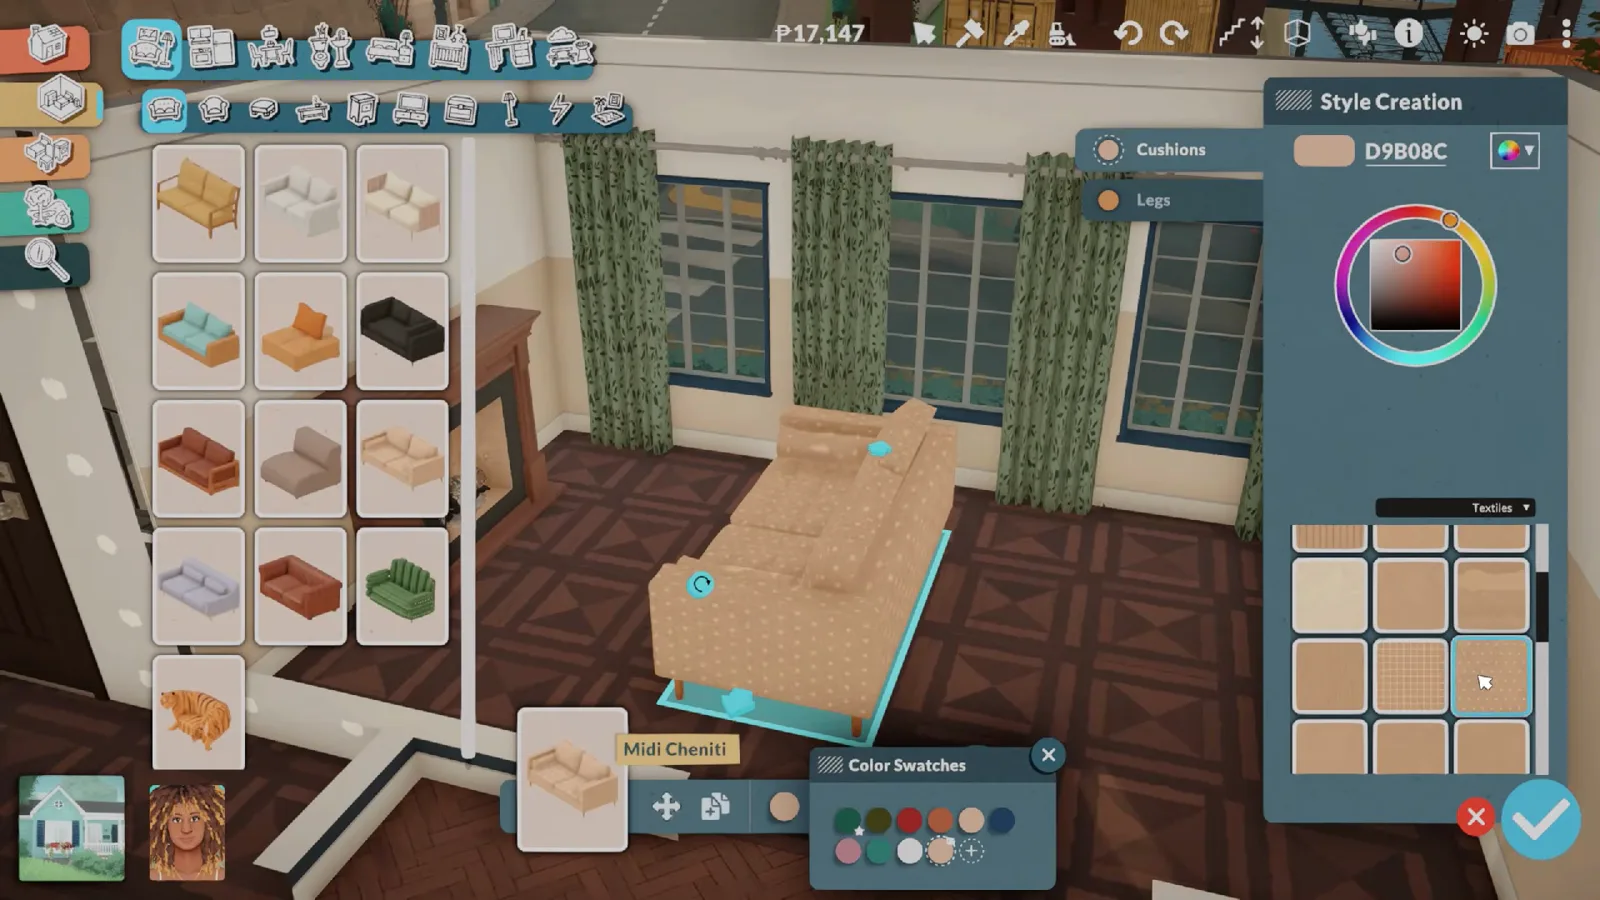
The colour wheel takes hex codes; saved swatches keep rooms consistent.Watch at 12:28 - 12
Furnish the front parlor
The front room gets the good furniture: a green sofa and tufted armchair by the fireplace, the TV mounted above it, gallery frames and a patterned rug. April replaced her first attempt wholesale — plan for at least three seats if a family of three lives here.
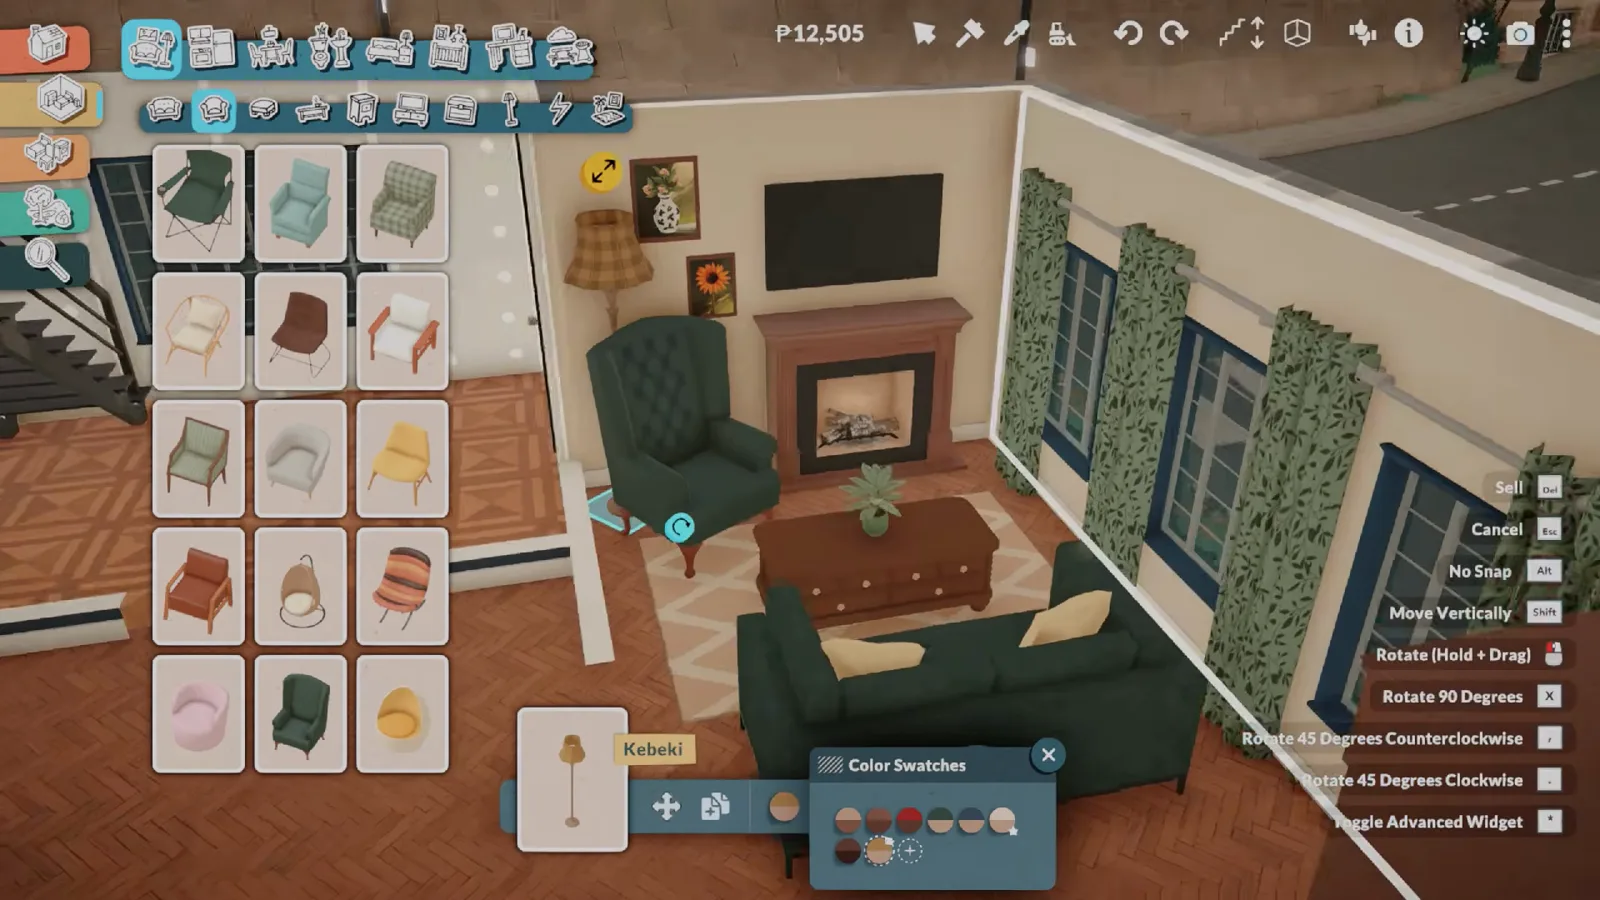
Green upholstery, fireplace, wall TV — attempt number three.Watch at 16:05
Kitchen to bedrooms
Work from the dining room upward
Behind the parlor sits the kitchen; above it, the bedrooms. Both narrated builds stack a half bath on the entry level and a full bath on the bedroom floor — plumbing logic nobody has verified, but it fits the plan.
- 13
Set the dining room behind the arch
Through the archway, the dining room runs blue: painted walls, a grandfather clock in the corner, a wood table with mixed chairs and a chandelier above. In a real brownstone this parlor-storey flow — living room into dining room — is the floor you show off.
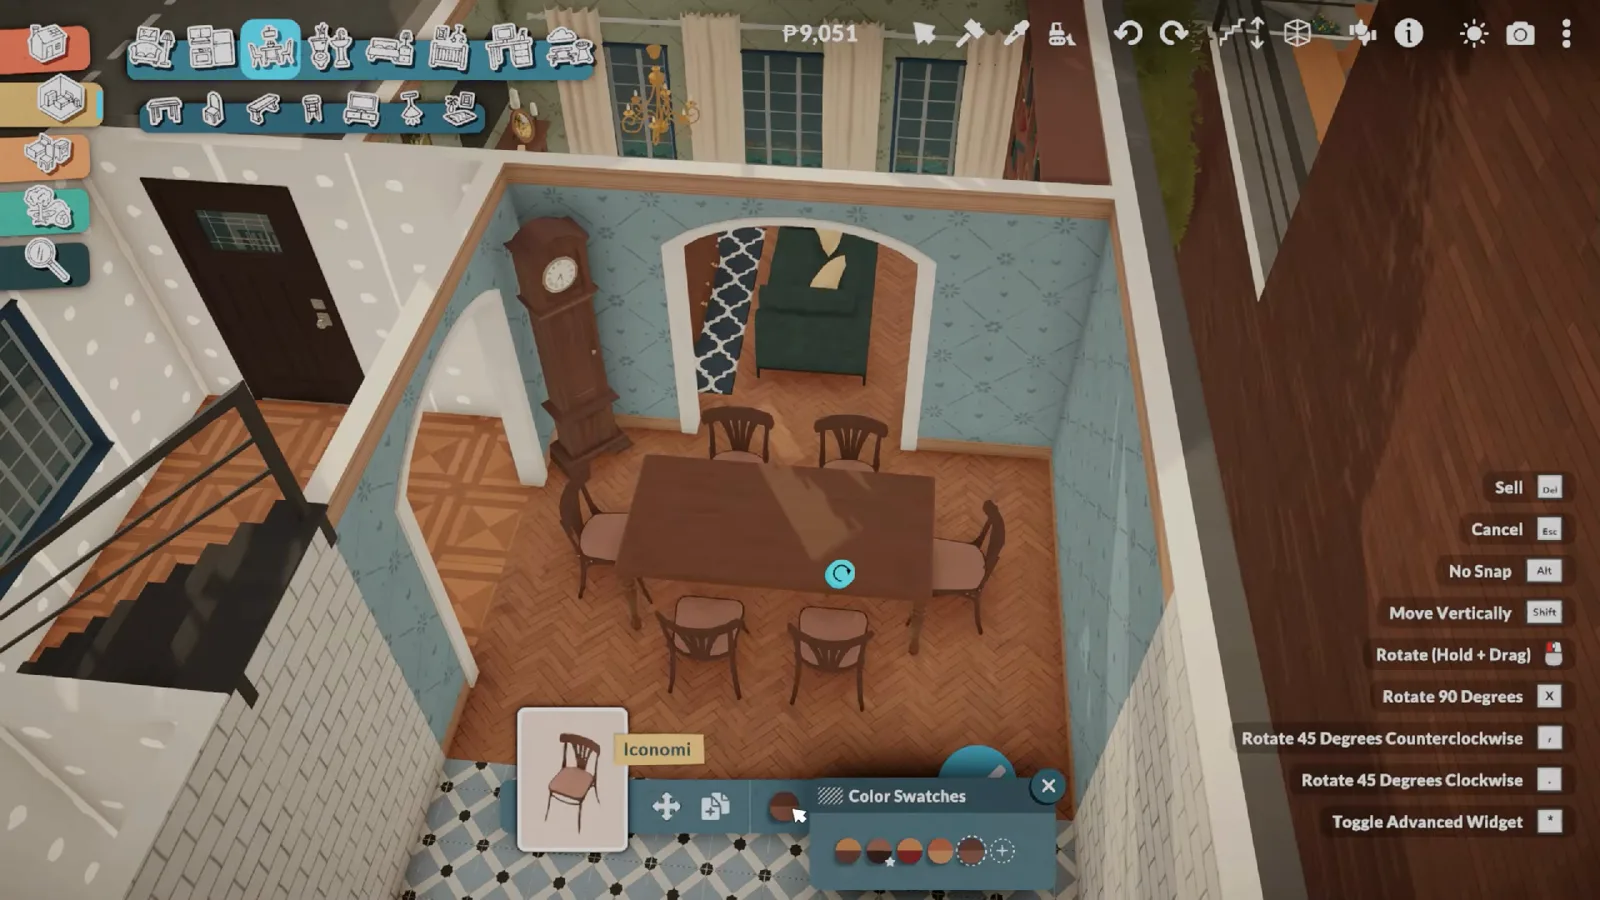
Blue walls and a grandfather clock in the second parlor.Watch at 18:08 - 14
Tile the kitchen at the back
The kitchen takes the service-floor treatment: white subway-tile walls, a diamond tile floor, wood counters sized by dragging and a shelf of glassware over the stove. April notes counters stretch to any length but never snap perfectly to the grid — and she never found a corner piece.
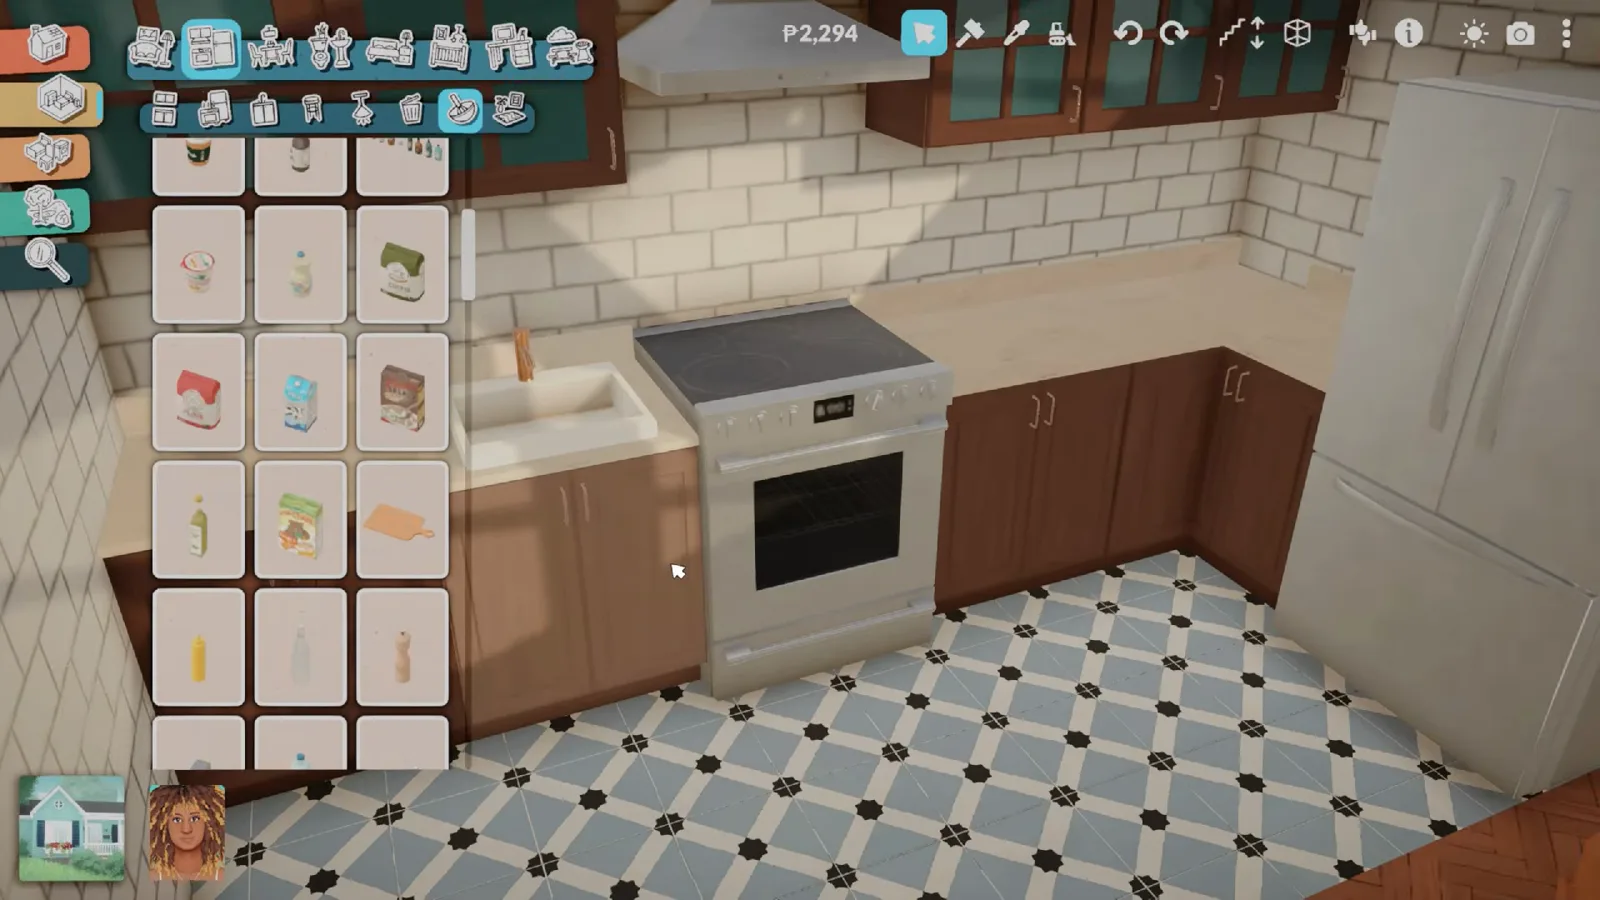
Subway tile, diamond floor, stretched counters — service floor done.Watch at 20:10 - 15
Give the master a calm green floor
Upstairs, the primary bedroom pairs a green bed with yellow pillows, a quatrefoil rug and a gold mirror. April laughs that the bed alone swallows a quarter of the room, so keep the floor generous — and note both narrated builds put a bathroom on this level.
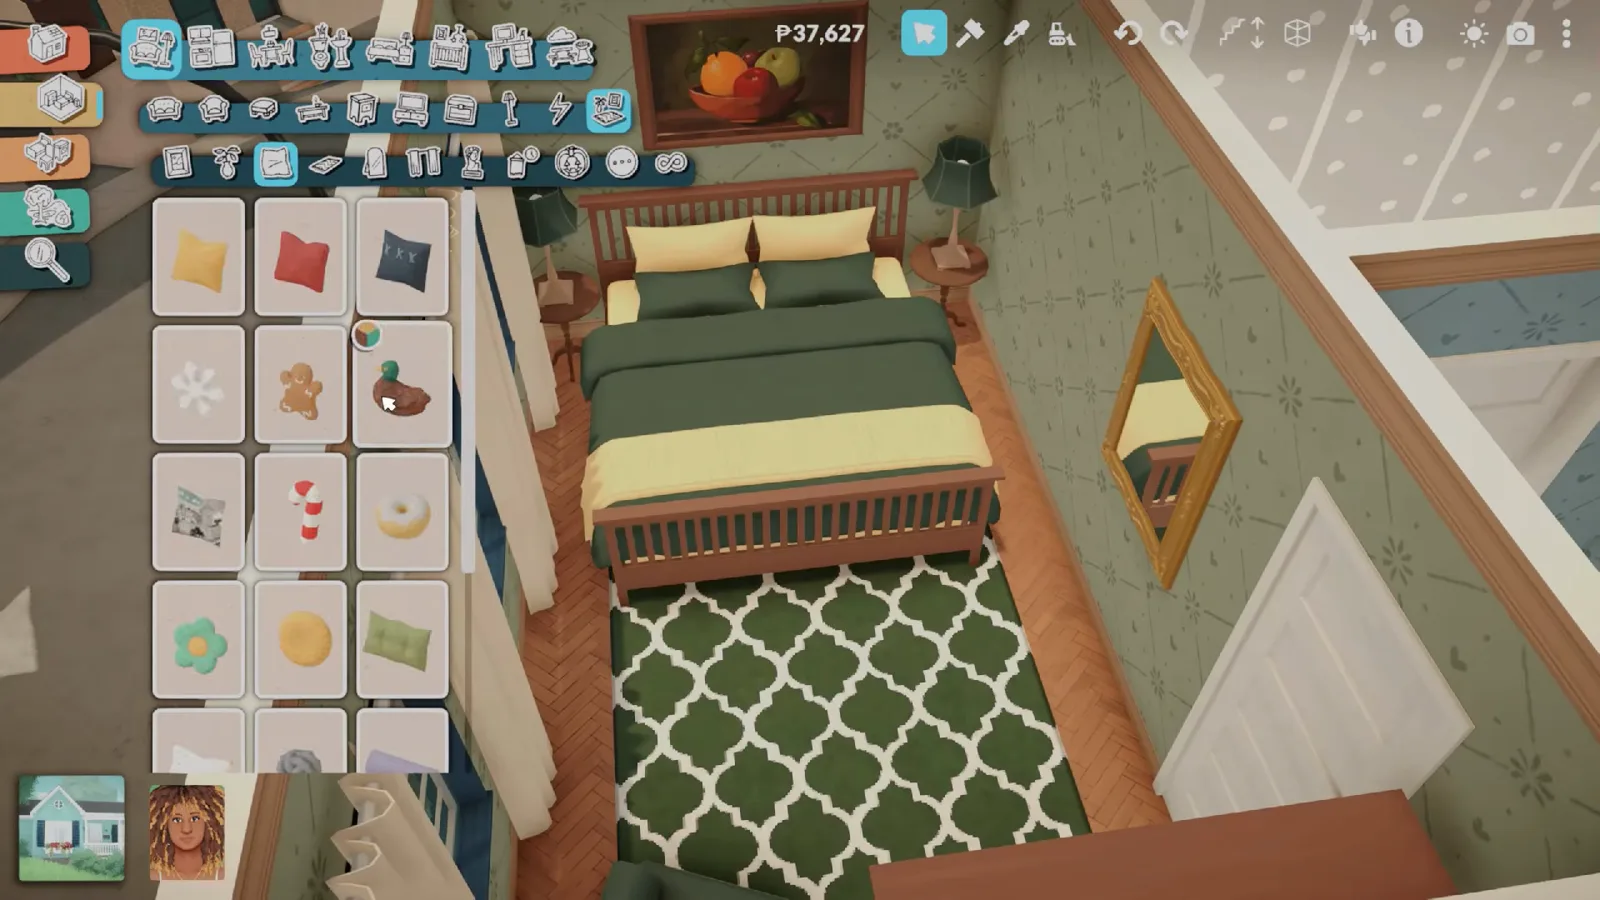
Green and gold upstairs — the bed alone eats a quarter of the plan.Watch at 26:22 - 16
Finish with the kids' room
The top floor becomes a child's room: pink bed, patterned rug, tassel wall hangings and a corner of plushies from the official Unpacking collab — free base-game items, not custom content. April sized several plushies up with the resize control to fill the shelves.
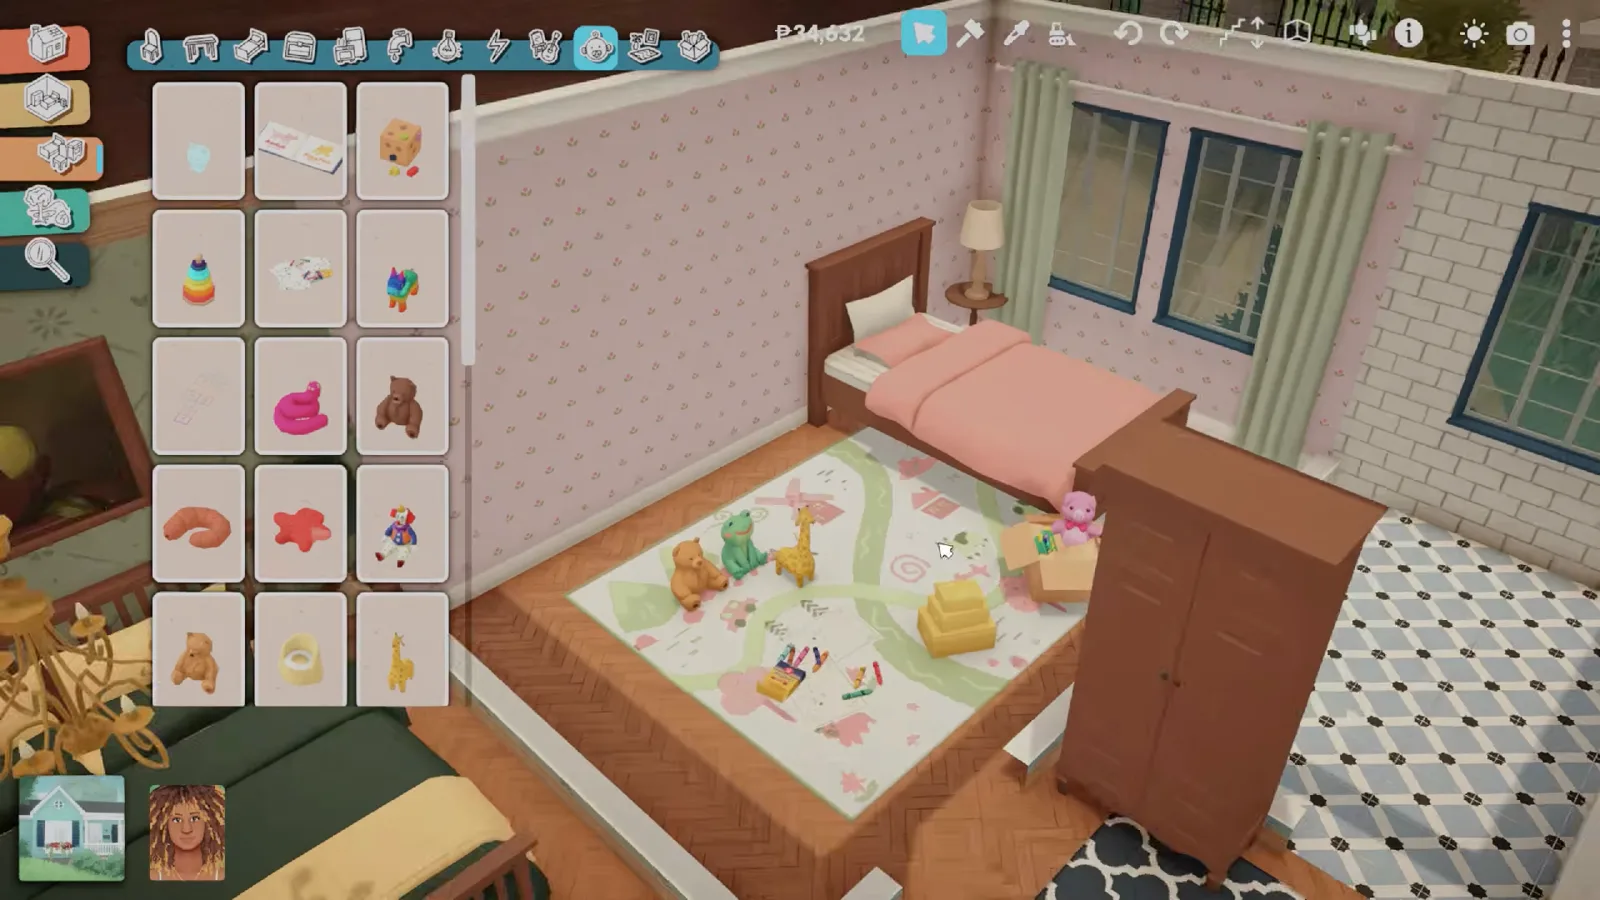
Unpacking collab plushies — official items, not custom content.Watch at 28:25
A brownstone is a style, not a mechanic
Search the Paralives wiki and you will not find a brownstone entry — there is no row-house tool, no sandstone material set, no stoop builder. Everything this page does is standard build mode wearing period costume, which also means nothing here can break in a patch: the look is yours to rebuild at any time.
The three dedicated builds behind this guide solve the same brief differently. aprilstillplays repaints a red brick shell brown and keeps a juliet balcony after her column deck failed; Splash of Gaming terraces a sloped lot and squeezes the house between two existing buildings to fake the row; theElena goes pale limestone with black window grids in a music-only build. Same bones — footprint, stoop, cornice, tall windows — three finishes.
Left deliberately unverified: whether building requires a Para on the lot (april suspects so but is not sure), corner countertop pieces (she never found one), why her coffee maker refused to work, whether custom uploaded photos survive a Steam Workshop download, and any plumbing logic behind stacked bathrooms. Nobody has published these details — when a source turns up, this page will say so.
Brownstone build FAQ
- Is there a brownstone in Paralives?
- Not as a template or mechanic — as of 0.1.8b there is no brownstone entry in the game or on the wiki, and no build tool targets the style. Players recreate it with standard pieces: brown brick paint in Wall Painting Mode, tall stacked windows, a cornice in Molding Mode and a stoop built from stairs and railings. All three featured creators built theirs from the base catalogue.
- What is the difference between a brownstone and a townhouse?
- In the real New York, a brownstone is a townhouse (row house) specifically faced with brown sandstone, entered up a stoop over a raised basement. In Paralives the distinction is purely styling on top of the same narrow, tall, party-wall shape — our townhouse guide covers the general form, and this page adds the brown face, the stoop and the cornice.
- How do you build the stoop steps in Paralives?
- aprilstillplays raises the entry half a storey on walls, runs stairs up to the front door and boxes the flight with iron railings, then plants hedges along the areaway. Splash of Gaming gets a similar look on sloped ground with the terrain elevate and smooth tools. The fiddly part is the 'little underneath section' — the basement wall under the stoop — which both creators adjust several times.
- Can you build row houses side by side in Paralives?
- Not as one structure — lots are separate, so there are no shared walls. The demonstrated workaround is placement: Splash of Gaming chose a narrow lot squeezed between two existing buildings so the finished brownstone reads as infill on a row. Matching the neighbours' masonry tone, as she did, sells the effect.
- Why won't my Paras use the stairs in my brownstone?
- aprilstillplays hit this twice: a fence placed around the stair opening cancelled the stairs until she extended the treads past it, and an earlier run had the bottom step flush against a wall. Free placement does not warn you when a placement breaks pathing, so bring a Para onto the lot and test the climb before you decorate.
- Do Paralives brownstone builds need custom content?
- No. All three featured builders worked from the base game — the kids' room plushies come from the official free Unpacking collab, not from custom content. Style Creation's colour wheel and saved swatches cover most of the period look; right-click a saved swatch to edit or delete it.
- Can Paras actually live in a brownstone?
- Yes — both narrated builds end with a live test. April's family home went up to the Steam Workshop after she verified the stairs; Splash of Gaming walked her Para in to shower and cook from the fridge recipes on camera. One caution from her run: a hard reboot with nothing saved wiped the entire build, so test early and save often.
Keep building
Townhouse guide
The general narrow-and-tall row house form, without the brown paint — layouts, facades and party-wall tricks.
Victorian house guide
Ornate era detailing — trim, turrets and porches — that pairs well with a brownstone streetscape.
Suburban house guide
The opposite build: detached, wide and green on all sides, for when your Paras want a yard.
House ideas gallery
A curated sweep of build styles for the next lot once the brownstone is done.
Blueprint builds
Step-by-step illustrated builds in the same format, from creator walkthroughs you can follow along.
Starter home guide
Small, cheap and functional — a first home before your Paras move up to a brownstone.