
If you only take three
Turn autosave off before you drag any wall. Build raised porches with the separator tool instead of hunting for a foundation tool. And copy a colour's hex code once, then paste it everywhere — it is the quickest way to make a house look designed rather than assembled.
The fifteen tips
In roughly the order you will need them: getting in, shaping the shell, then the finishing tools that are easy to miss.
- 1
Build mode has no loading screen
The house button in the bottom-left corner drops you into build mode instantly, and your Para's portrait takes you back to live mode. If you own several homes you can move the cursor between lots and edit them one after another without loading anything. Coming from other life sims, this is the habit that takes longest to unlearn.
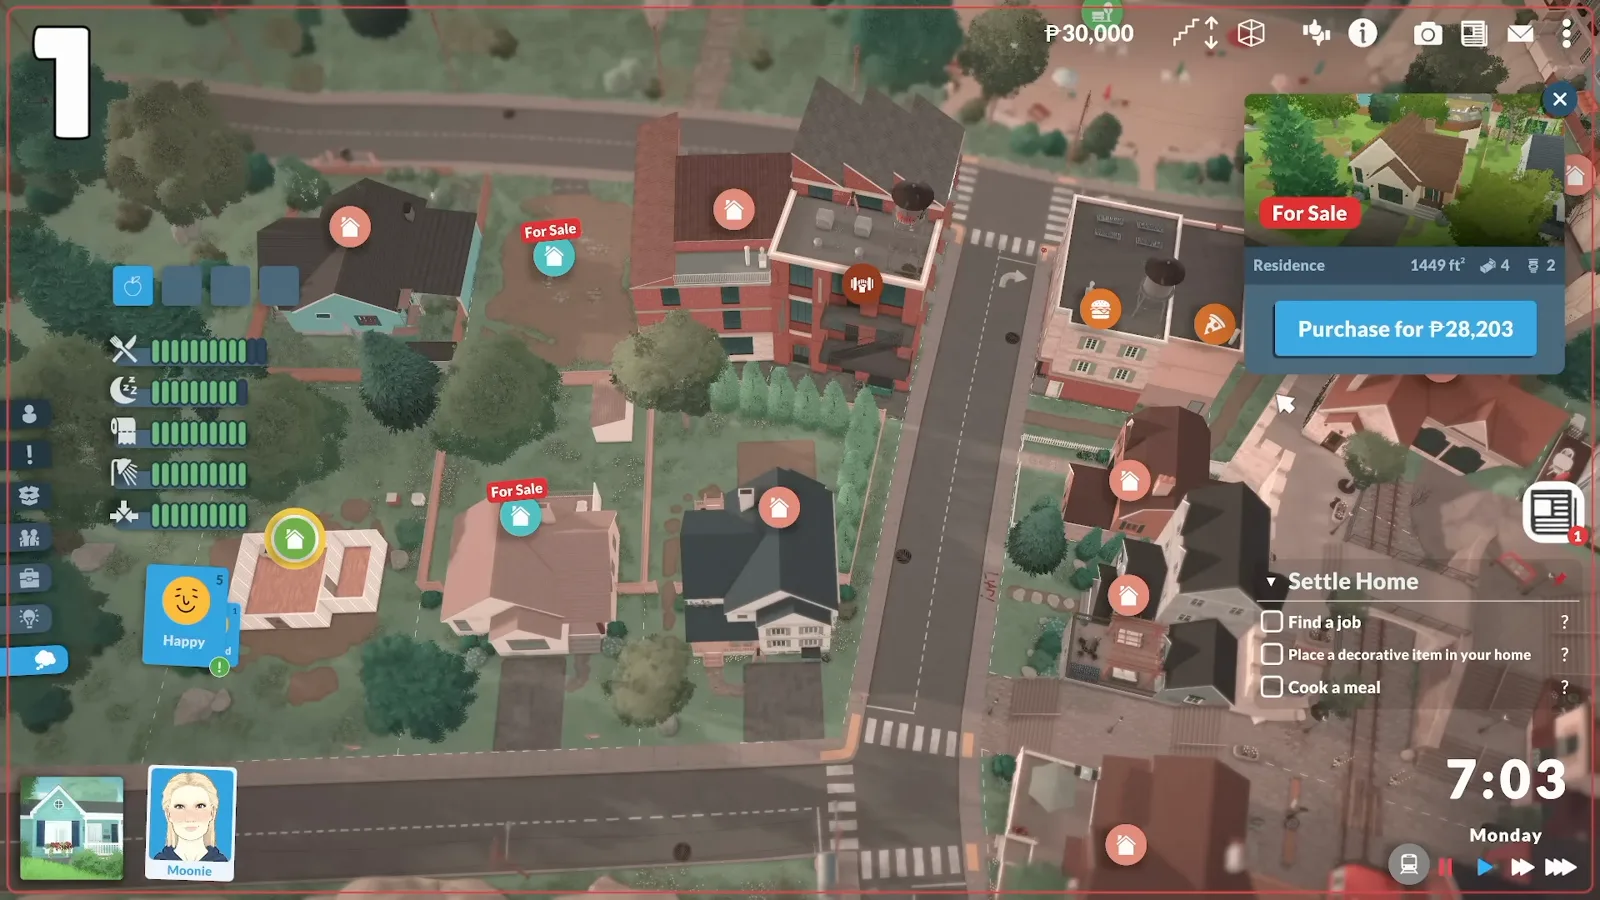
House button in, portrait out. No loading either way.Watch at 0:55 - 2
You cannot move a room, but you can stretch it
Walls, rooms and whole houses cannot be repositioned on a lot in Early Access. What you can do is click and drag one wall of a room to push it out or pull it in. Save first: dragging walls is the single action most likely to glitch a room, and the reliable fix is quitting to the main menu without saving and loading the file again.
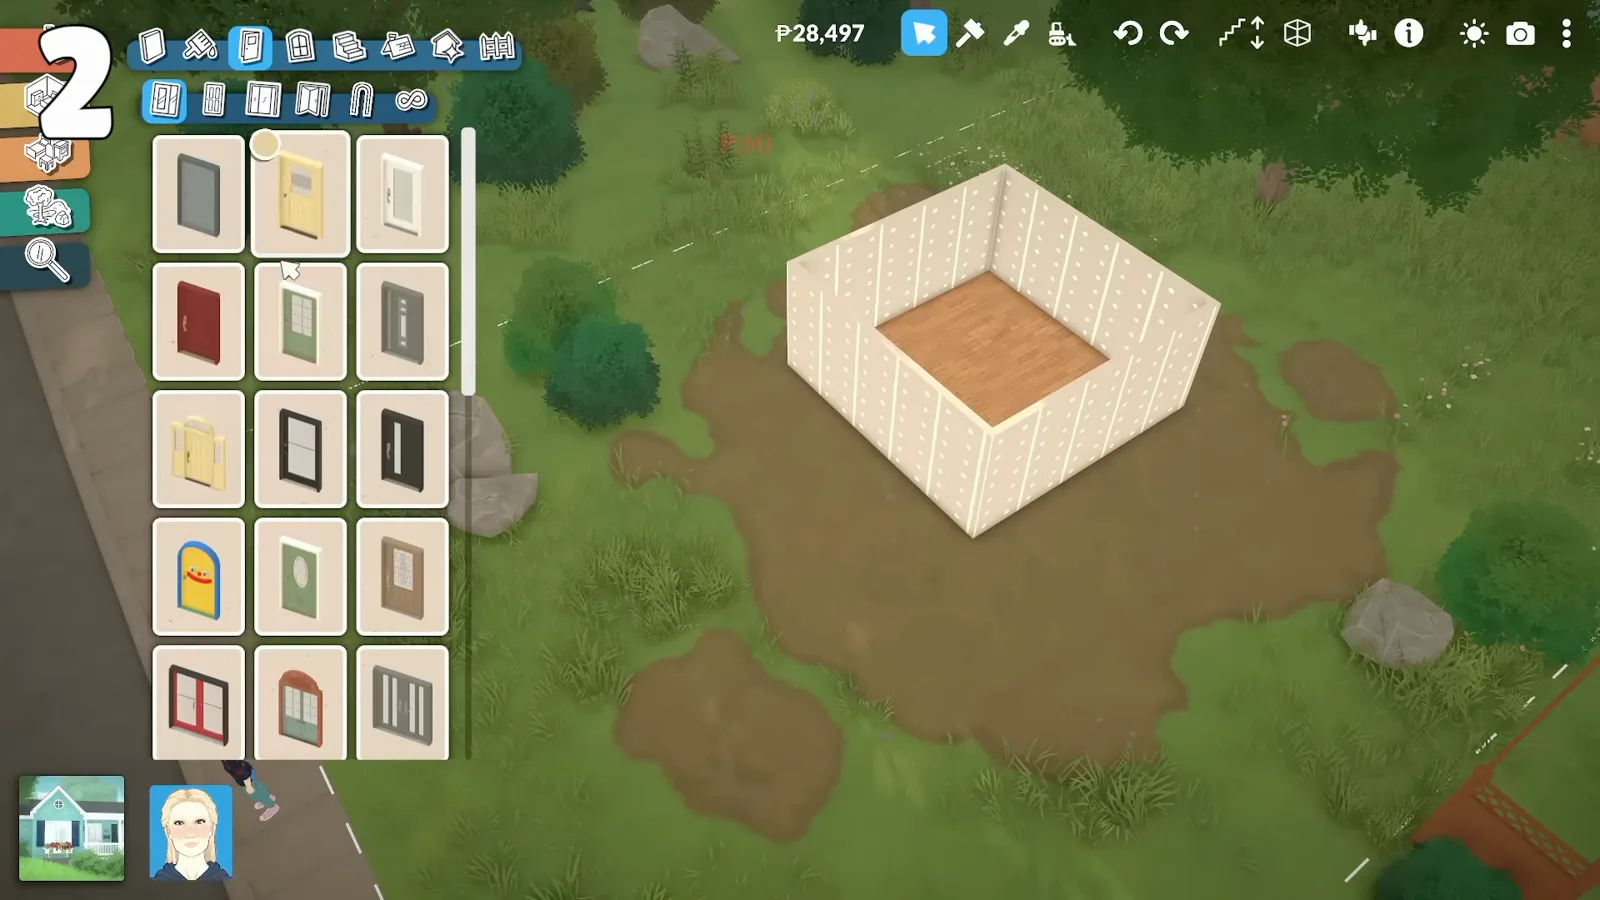
Drag a wall to resize. Save before you do.Watch at 1:11 - 3
The separator tool is the missing foundation tool
Foundations work backwards in Paralives. Place the walls for the room first, because you will not be able to move it later, then pick the separator to the right of the wall tool and trace over the shape. The separator marks an edge without building a wall, and that edge is what a staircase can snap to.
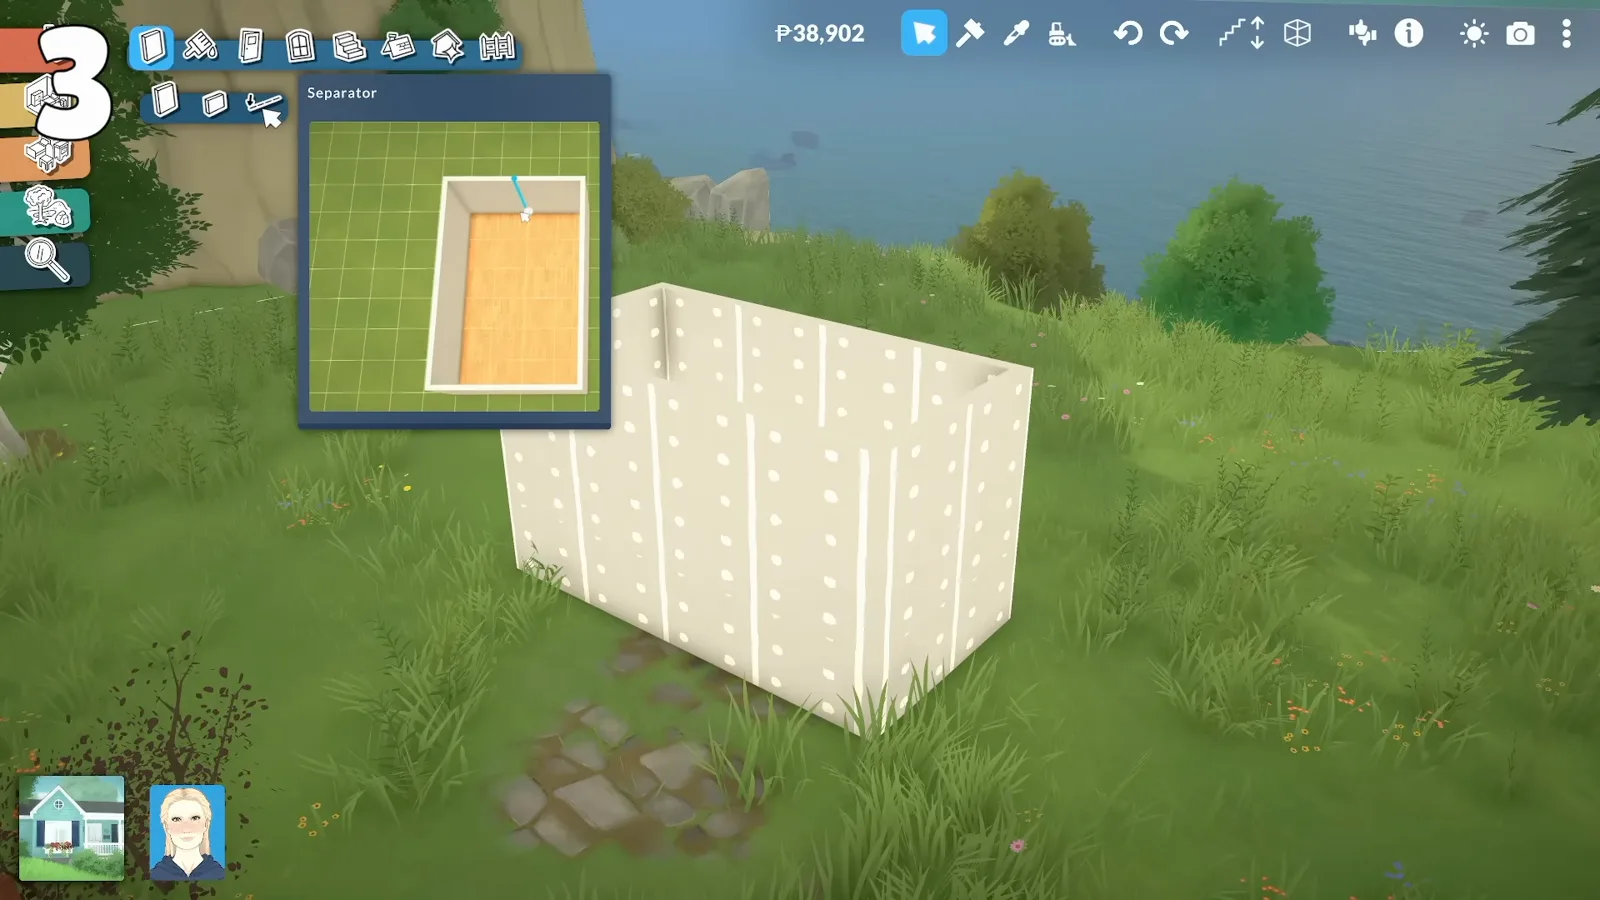
Separator first, then raise — the order matters.Watch at 2:50 - 4
Raise the floor with the blue arrow
Click inside the room and a blue arrow appears in the middle of the floor. Pull it up a few ticks for a porch, more for a full raised foundation. Remember to raise the rest of the house to the same height afterwards, or your front door opens into what looks like a basement.
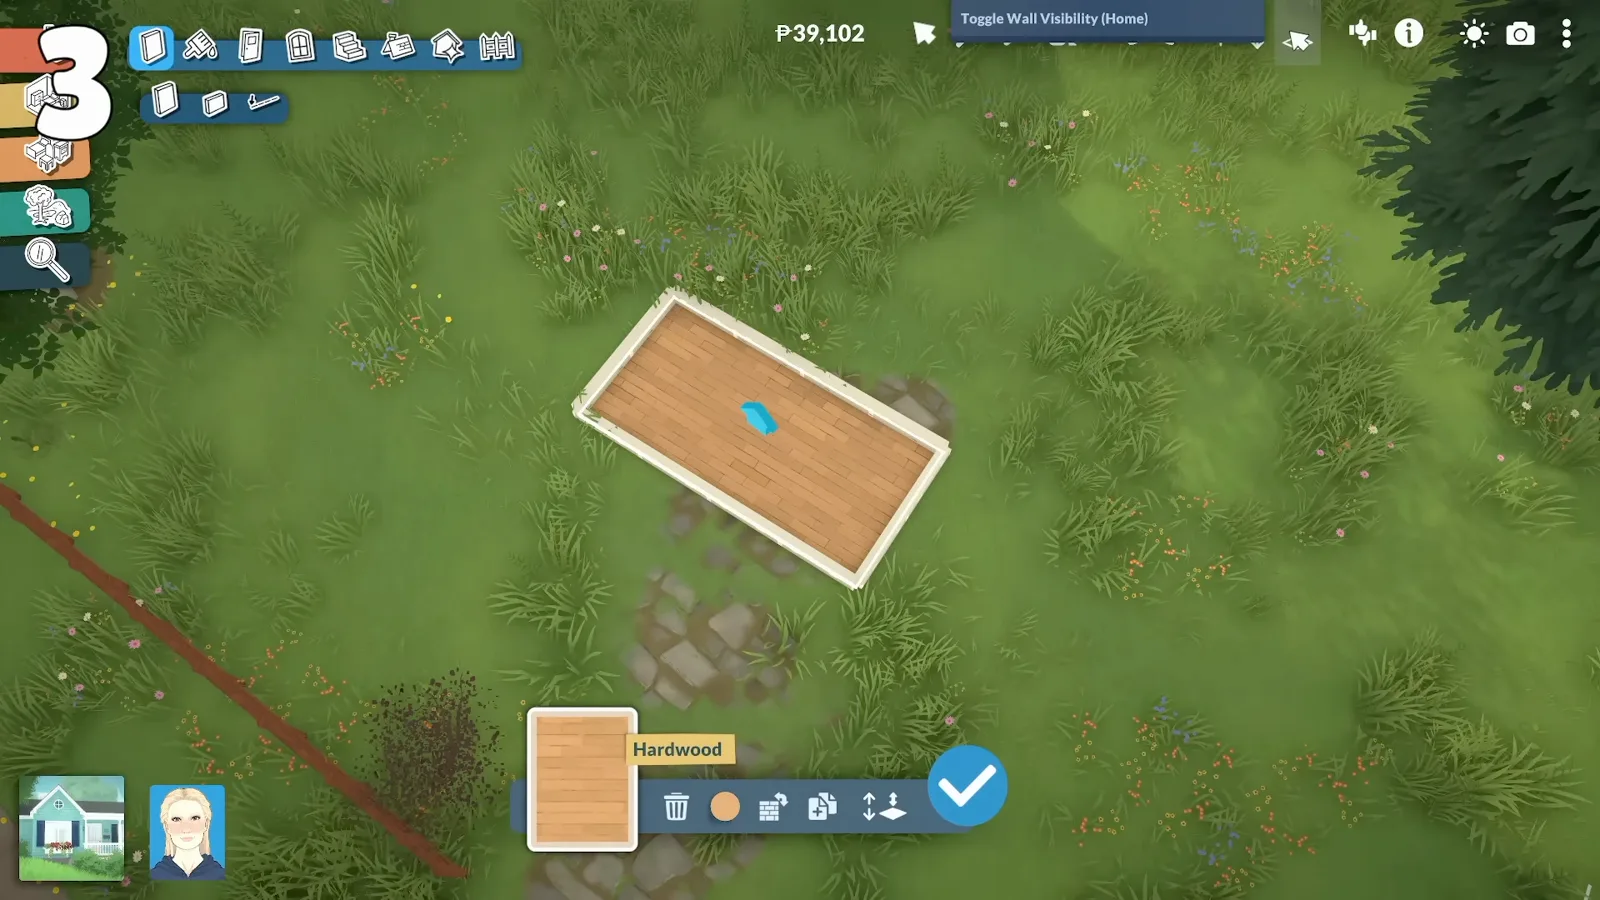
A few ticks for a porch; match the rest of the house after.Watch at 2:39 - 5
Let the stairs snap, then fix them
Drag a staircase as close to the raised edge as you can and let it click into place. Perfect positioning by hand is wasted effort — once it snaps you can drag the side handles to match the stair width to the opening, and recolour it from the same menu.
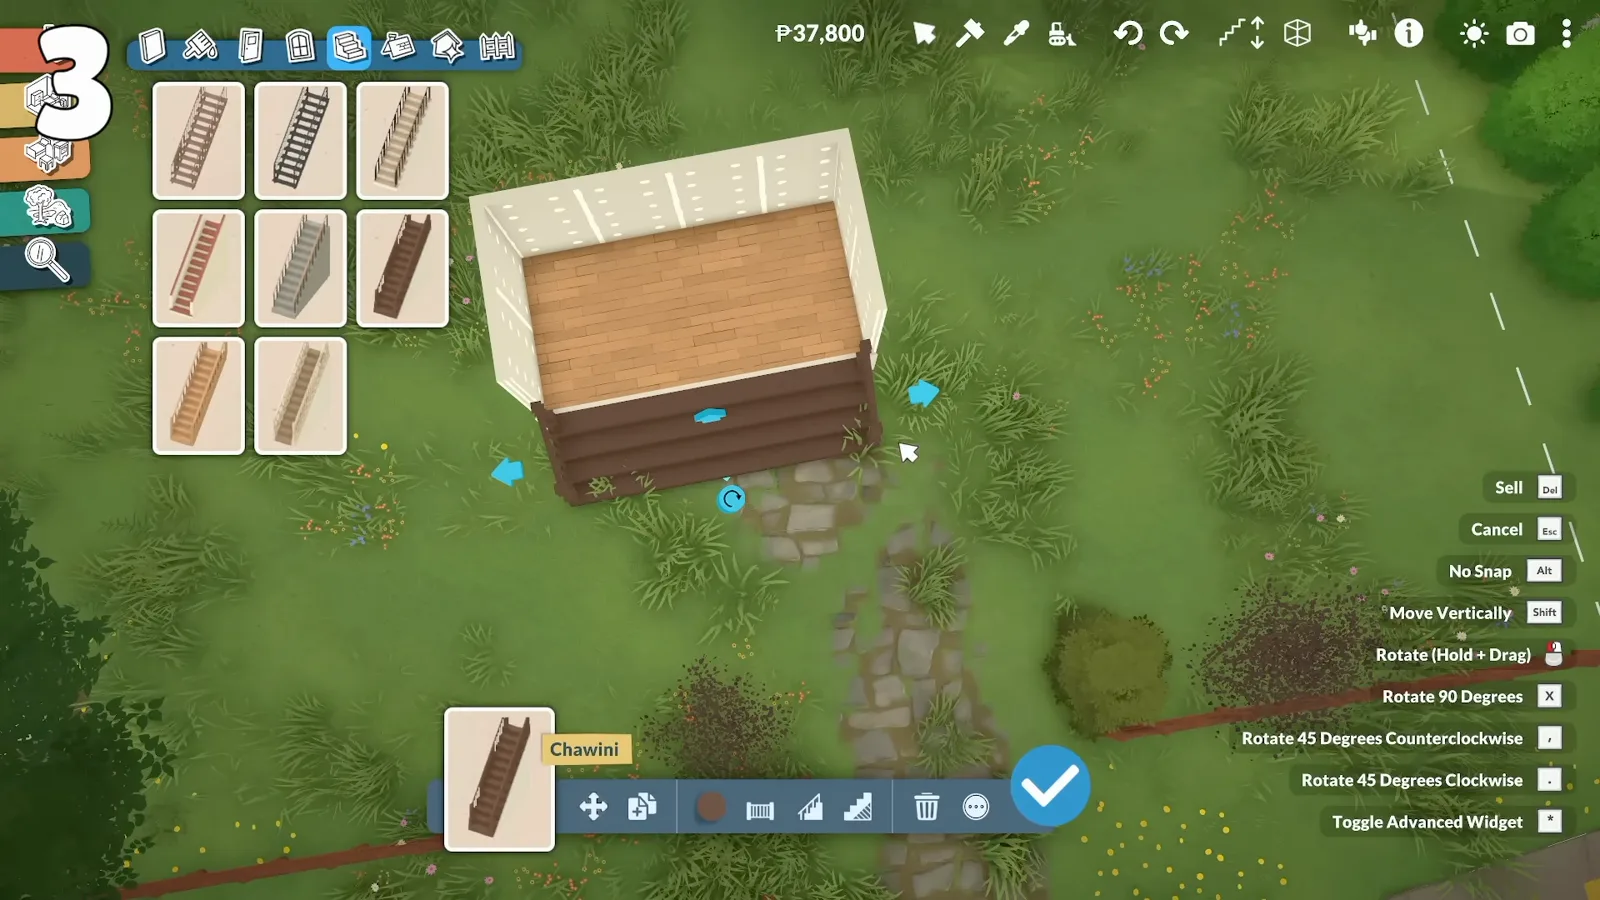
Snap first, widen second.Watch at 3:22 - 6
What the finished porch looks like
Walls, separator, raised floor, snapped stairs, front door. Painting the foundation a different colour from the walls is what sells it as a foundation rather than a raised box — the paint tool treats the raised section separately.
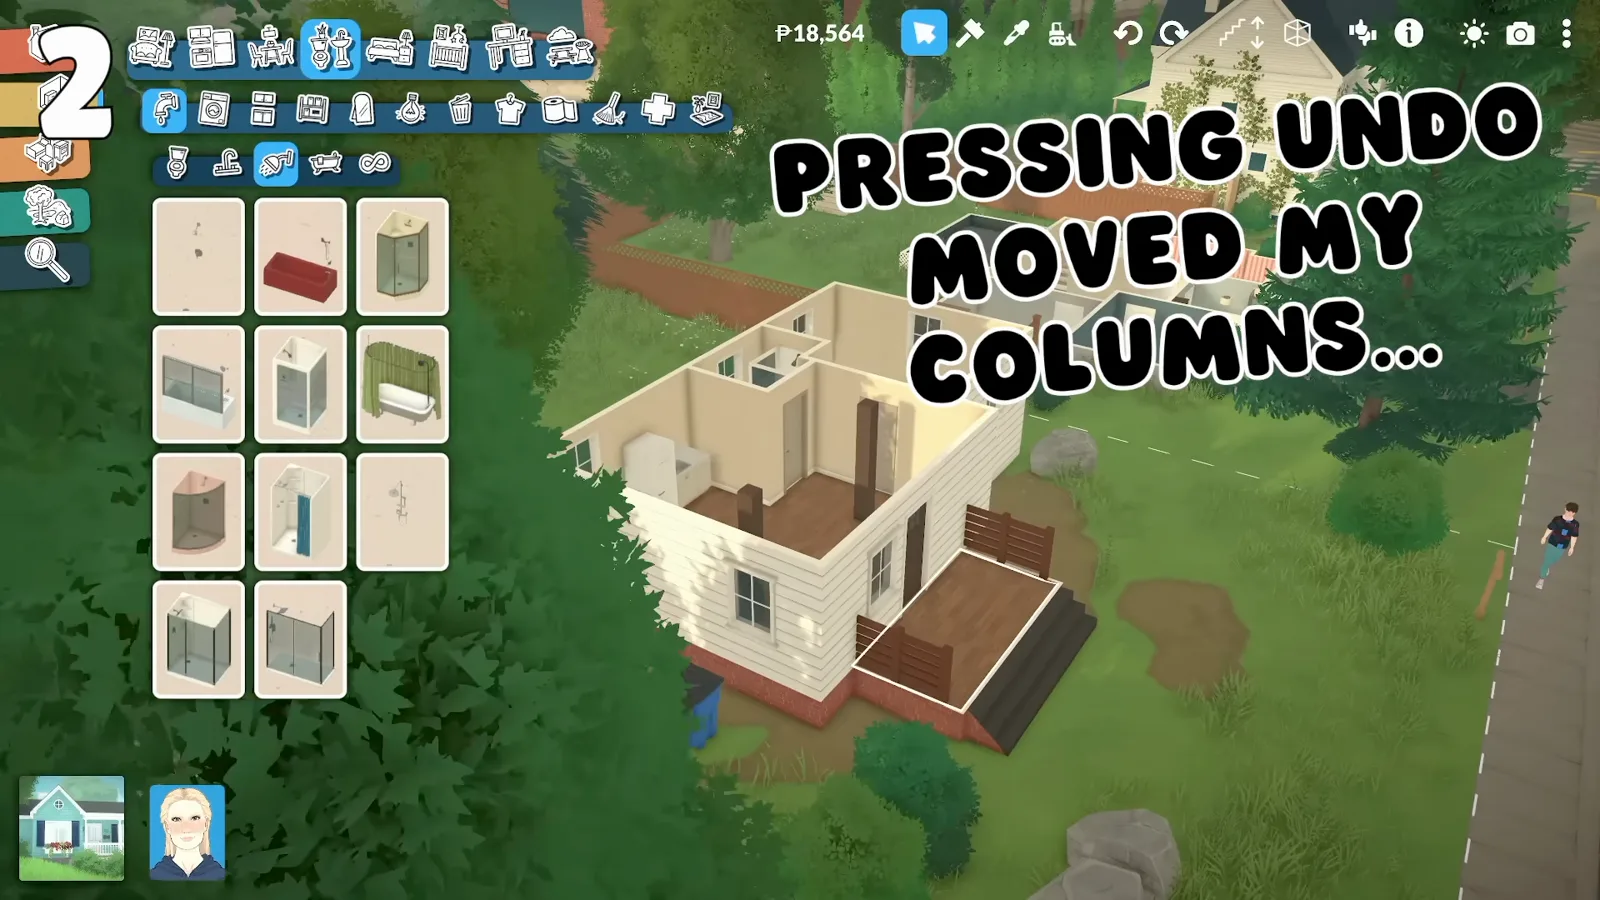
Paint the raised section separately so it reads as a foundation.Watch at 1:27 - 7
Rotate floor planks after laying them
Place the flooring first, then select the room or the floor itself and use the direction sliders. Planks and stone snap to the new angle immediately. Trying to set the direction before placing does nothing, which is why the option is easy to miss.
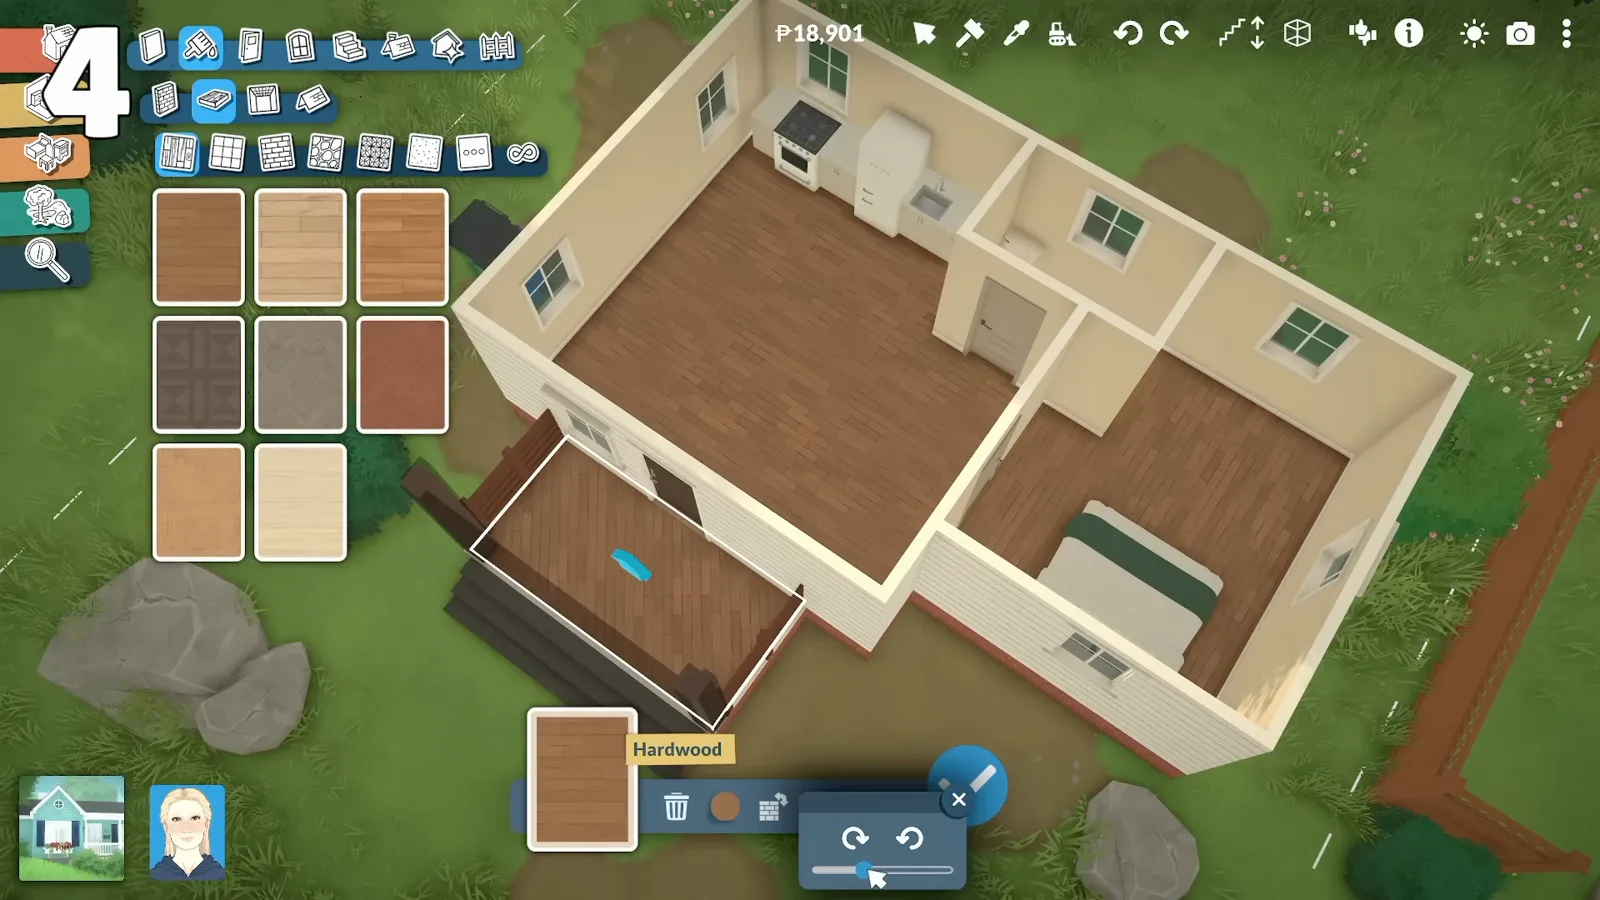
Lay it, then rotate it. Not the other way round.Watch at 3:52 - 8
Blue highlight means identical height
Free-placing a window just above a bed is easy. Getting a second one to match is not — unless you clone the first instead of placing a new one. The clone keeps the exact height, and the blue highlight that appears while dragging confirms two objects sit on the same level.
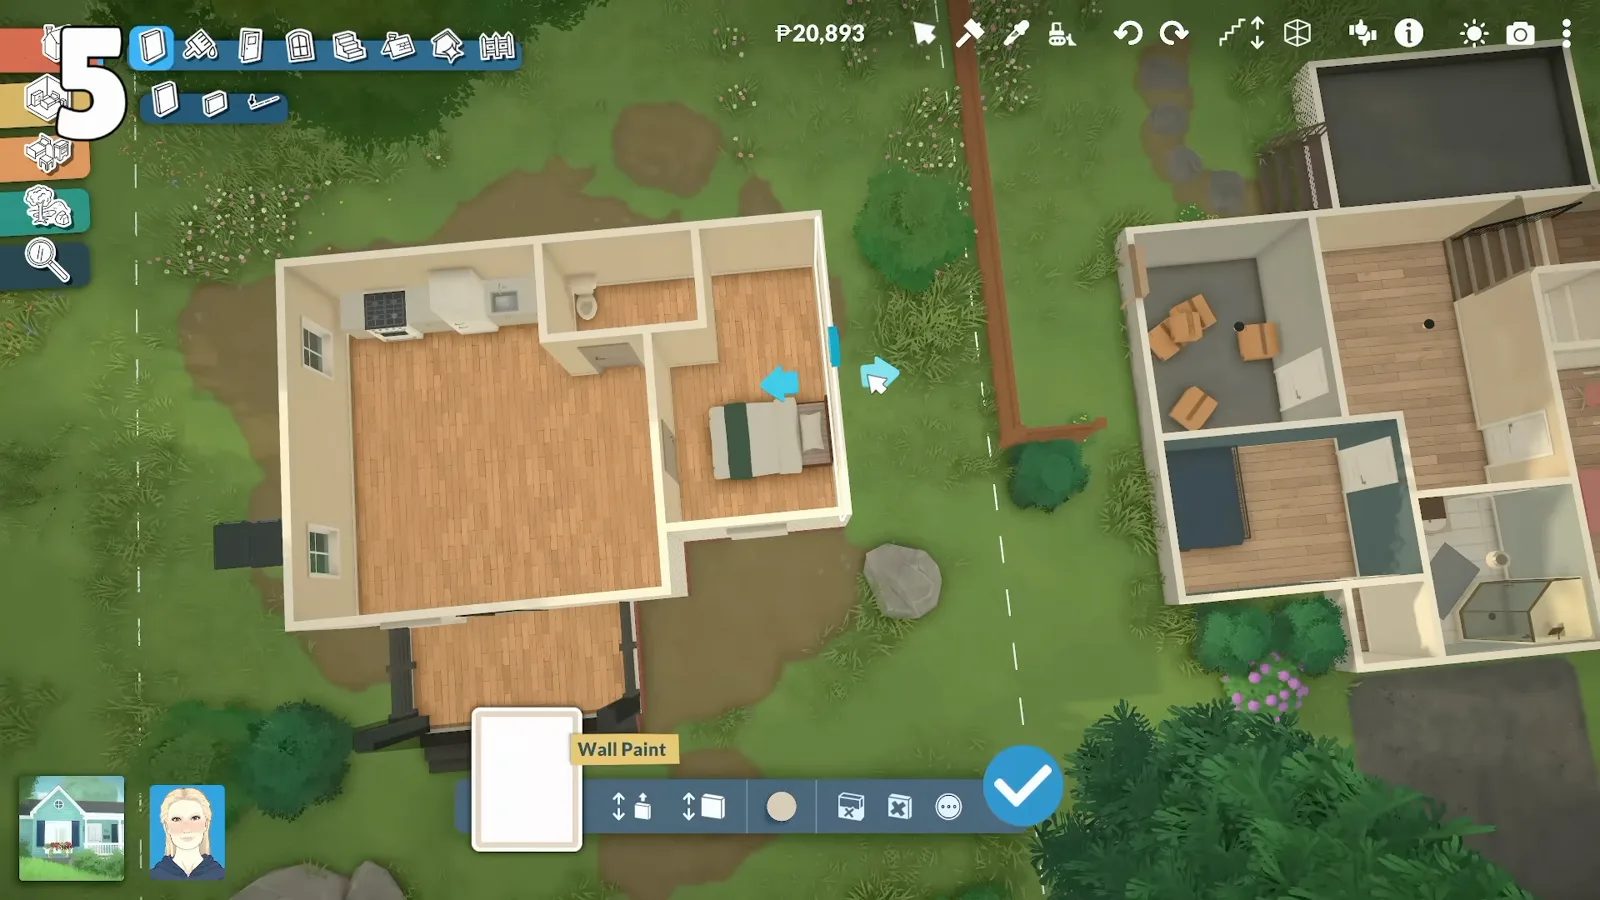
Clone rather than re-place, and watch for the blue highlight.Watch at 4:05 - 9
Every shortcut you need is in the object menu
Select anything and the shortcut list appears: Esc to cancel, Alt for no snap, Shift to move vertically, hold and drag to rotate, Del to sell, X to rotate 90 degrees, and two 45-degree rotations. Toggle Advanced Widget at the bottom is the one to remember — it is how you lay a pillow flat, stretch an item along one axis or float a shelf.
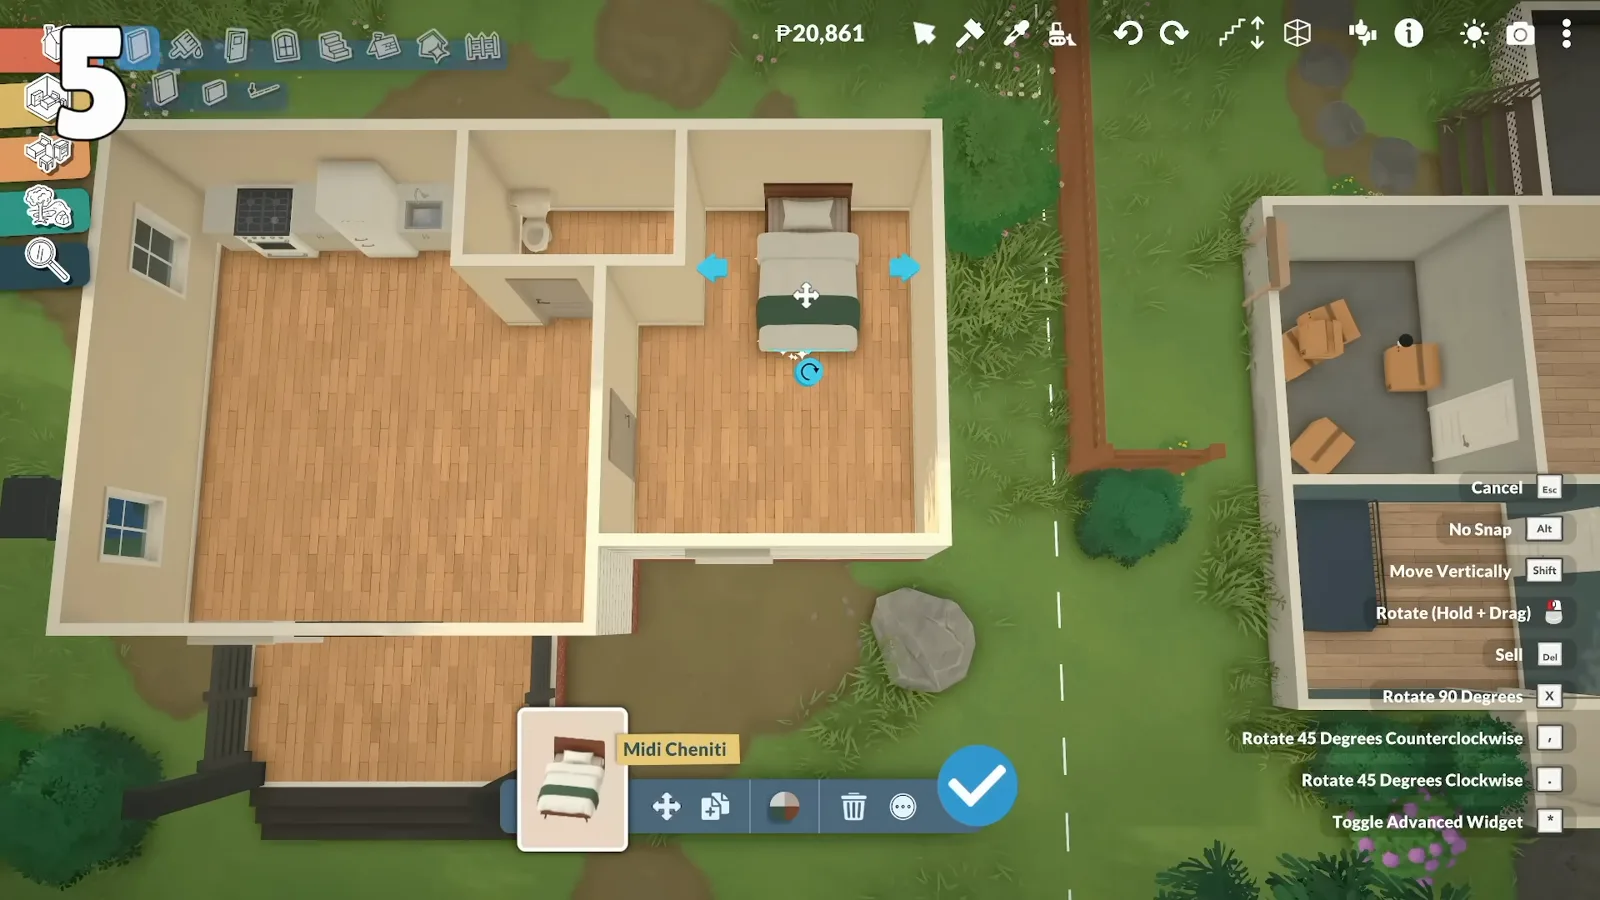
Toggle Advanced Widget unlocks free stretching and tilting.Watch at 4:10 - 10
Assemble awkward roofs from pieces
Advanced roof tools are still on the roadmap, so roofs clip and occasionally snap at odd angles. Two things help: reload the save when a roof refuses to align, and build complicated shapes from several small roof sections joined together rather than one large piece.
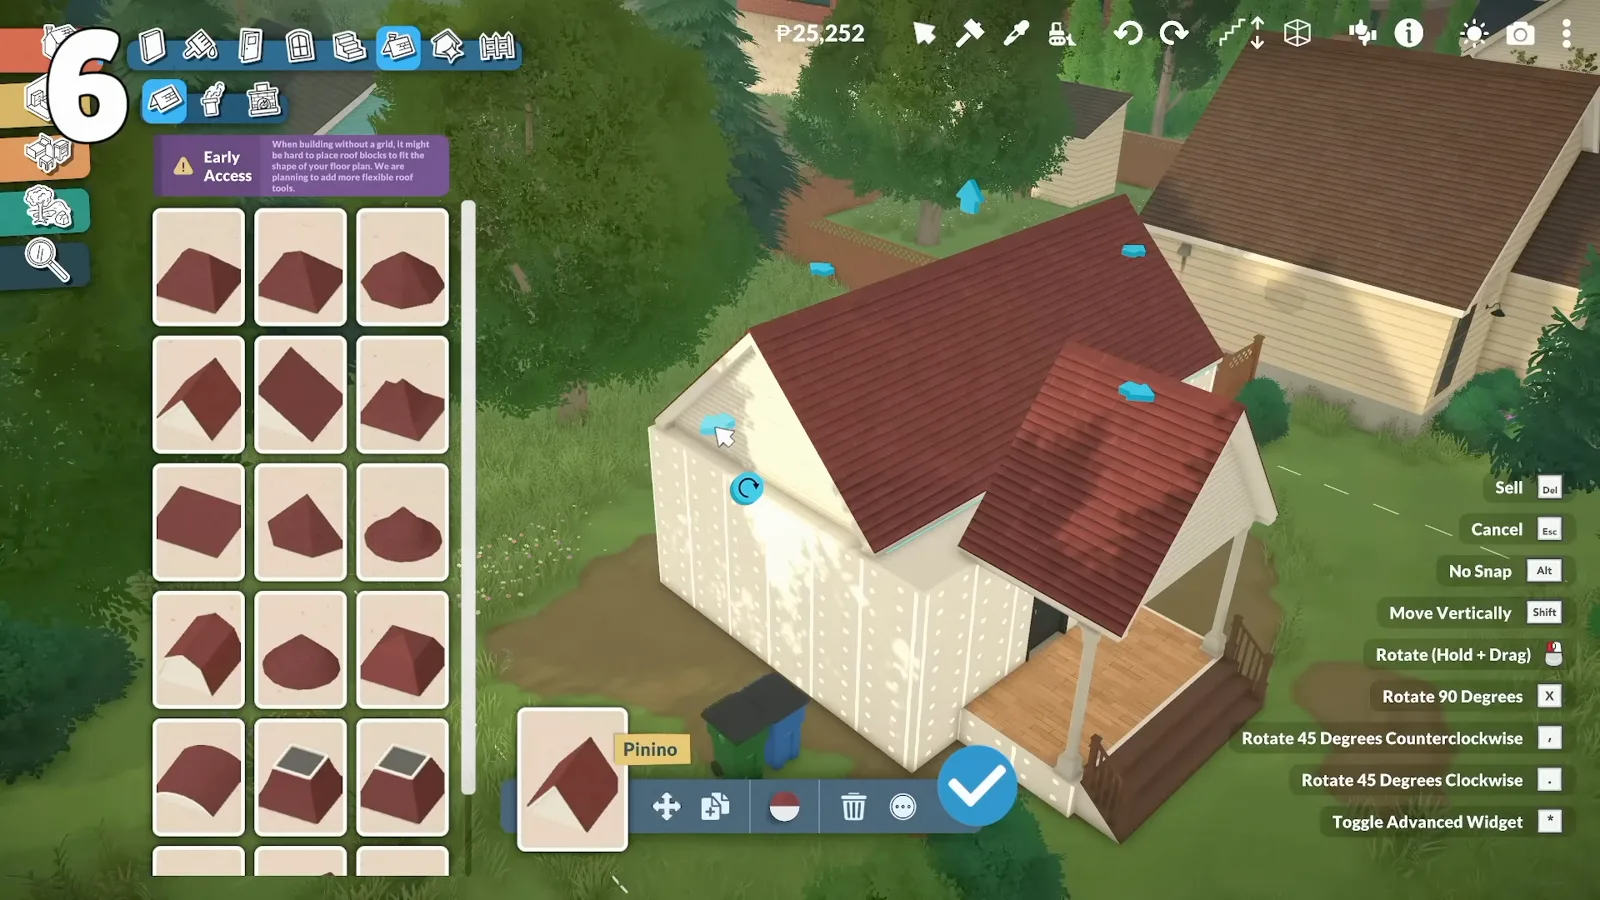
Several small pieces beat one stubborn big one.Watch at 4:46 - 11
Not everything resizes
Nearly all furniture can be resized, recoloured with the colour wheel and given a pattern — but the limits are uneven. A counter run stretches to fit under a window while the sink inside it will not; curtains widen but refuse to reach the floor. Check an item before you design a wall around it.
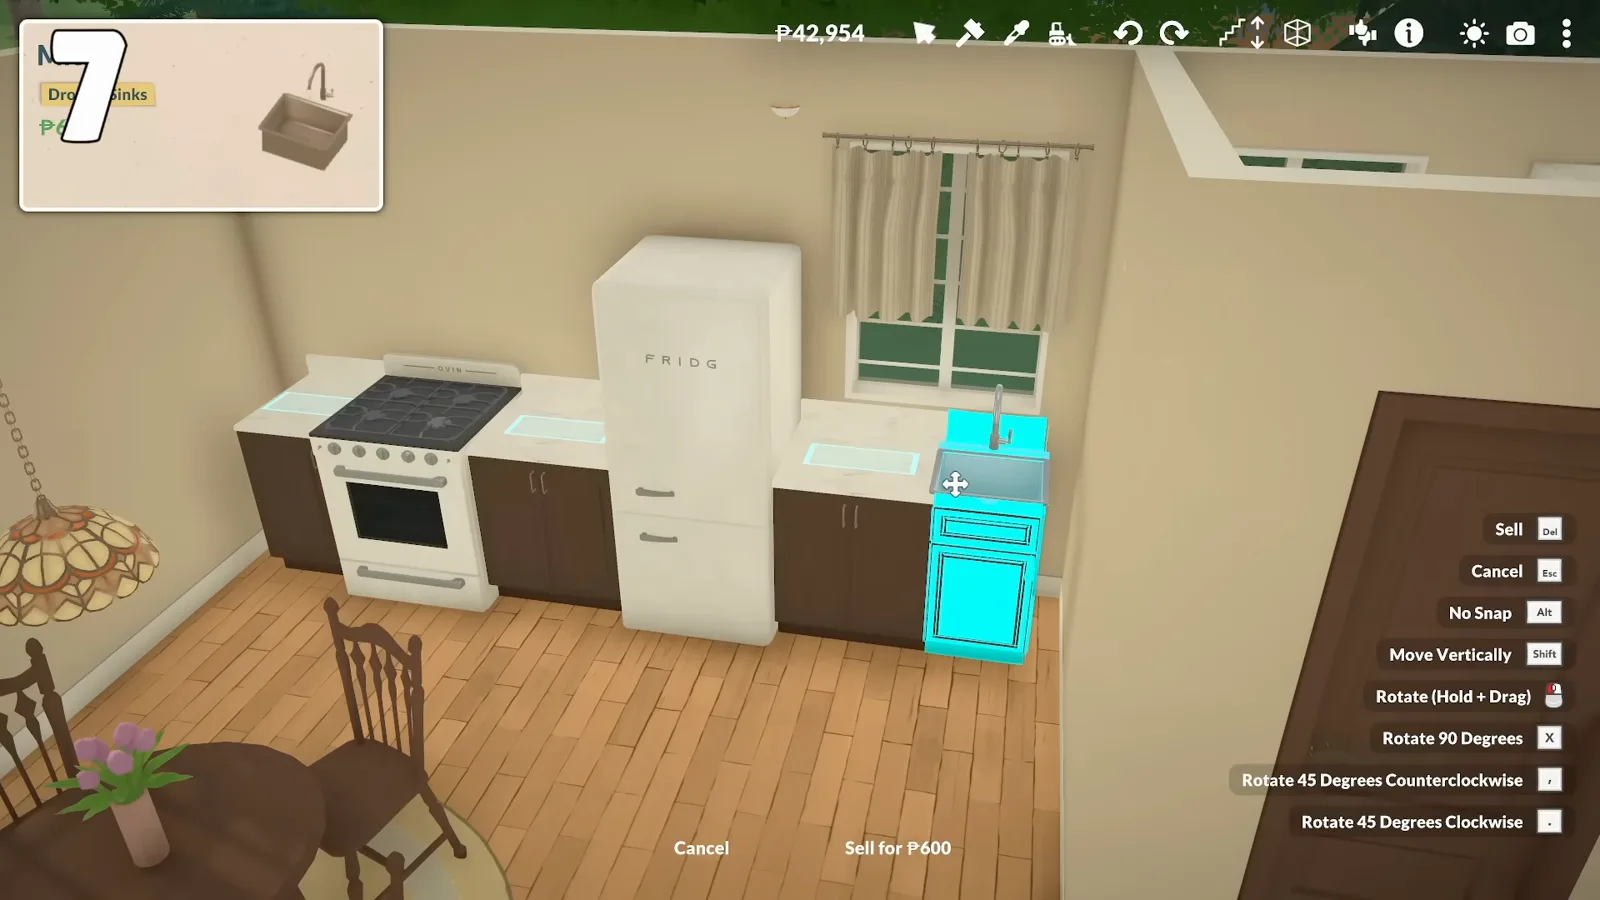
Counters stretch. The sink in them does not.Watch at 5:20 - 12
Save the lot before you experiment
Zoom out from build mode, select the house and save the lot to your library with a name. It costs nothing and gives you a restore point that survives the glitched-room problem, which is worth doing before any big remodel.
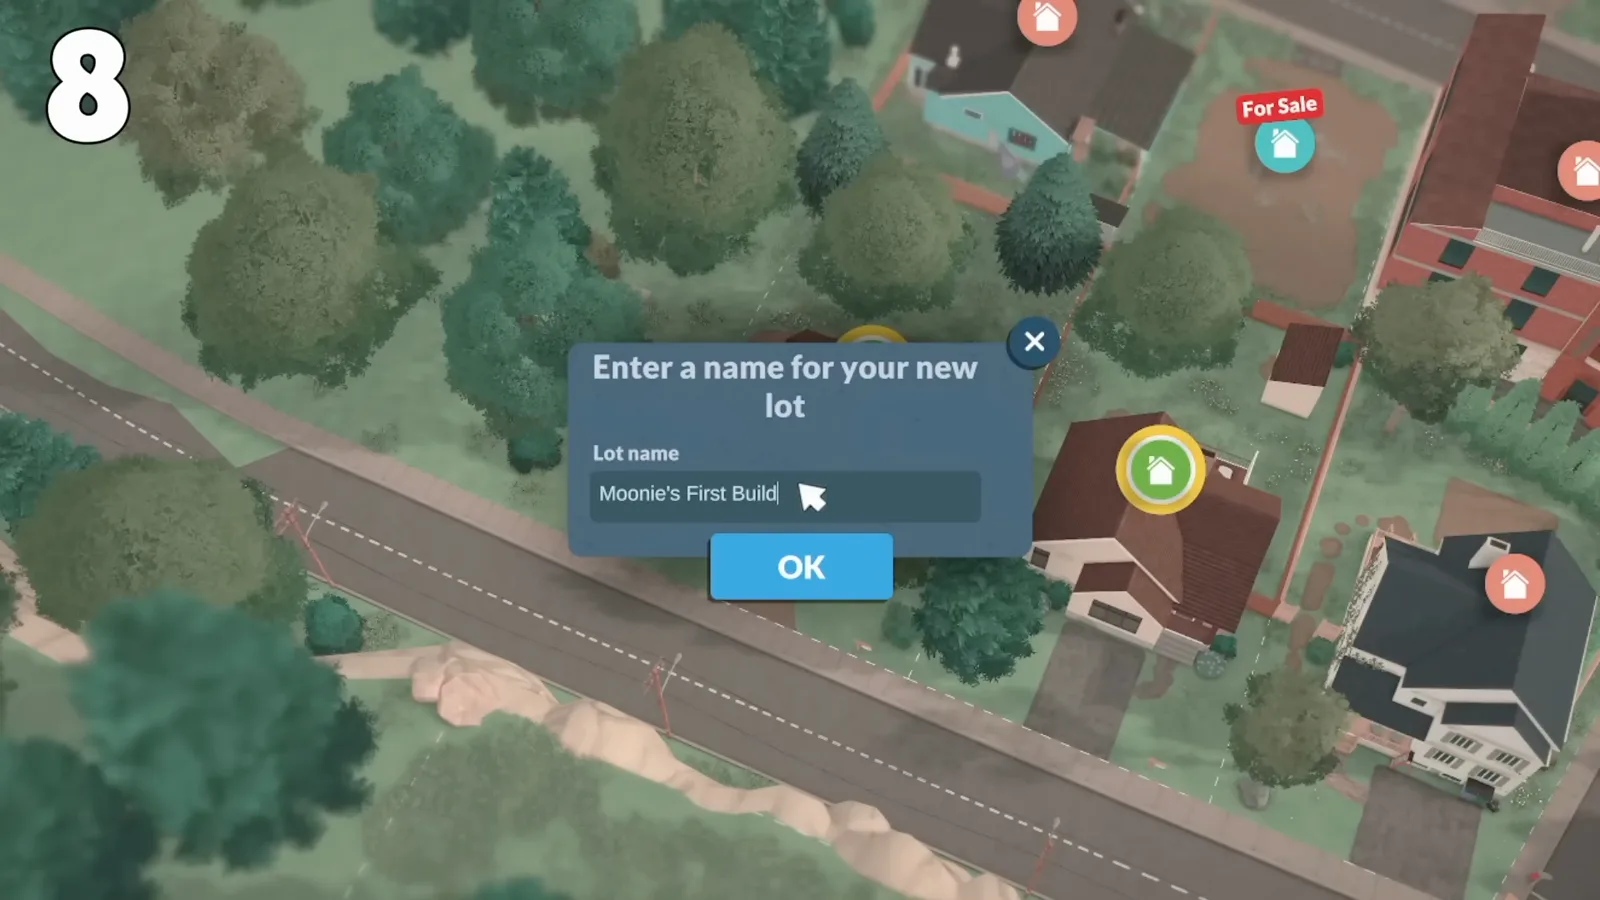
A saved lot is the cheapest backup you have.Watch at 5:56 - 13
Upload to the Steam Workshop from the library
Open place a lot from the library and select one of your builds. The buttons along the bottom upload it to the Steam Workshop, set a custom thumbnail, edit its name and description, or delete it. Uploading takes seconds and the game confirms with a link to the Workshop page.
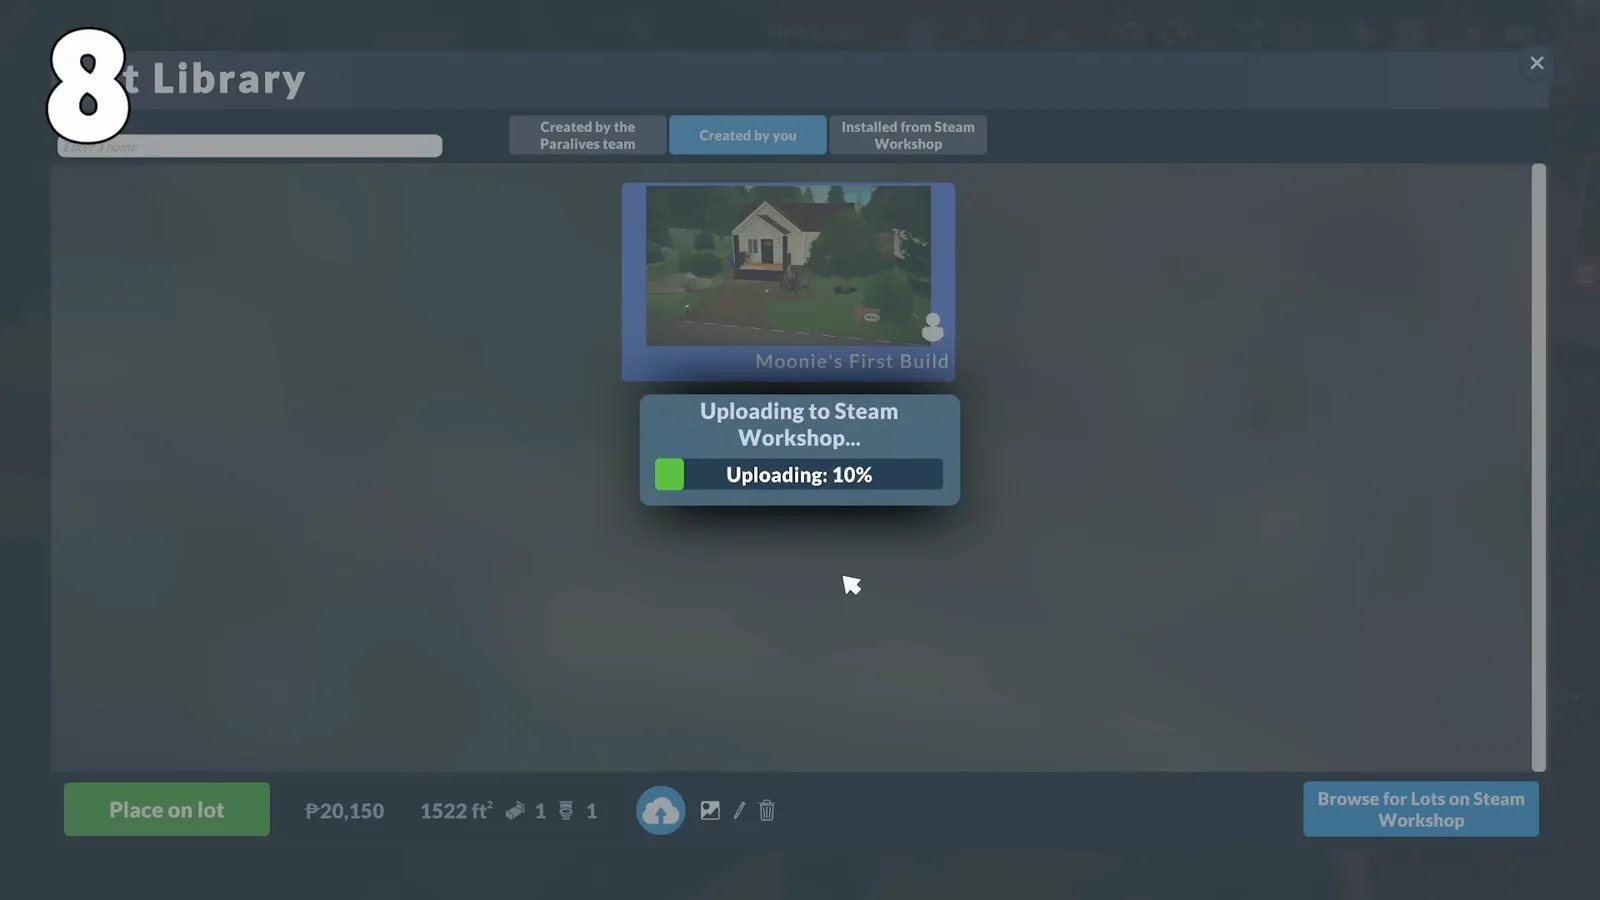
Thumbnail and description are set from the same panel.Watch at 6:12 - 14
Right-click a swatch to edit it
Custom colour swatches can be edited, duplicated and deleted by right-clicking them. Without this you end up with a swatch list full of near-identical shades, which makes finding the one you actually used harder every hour you build.
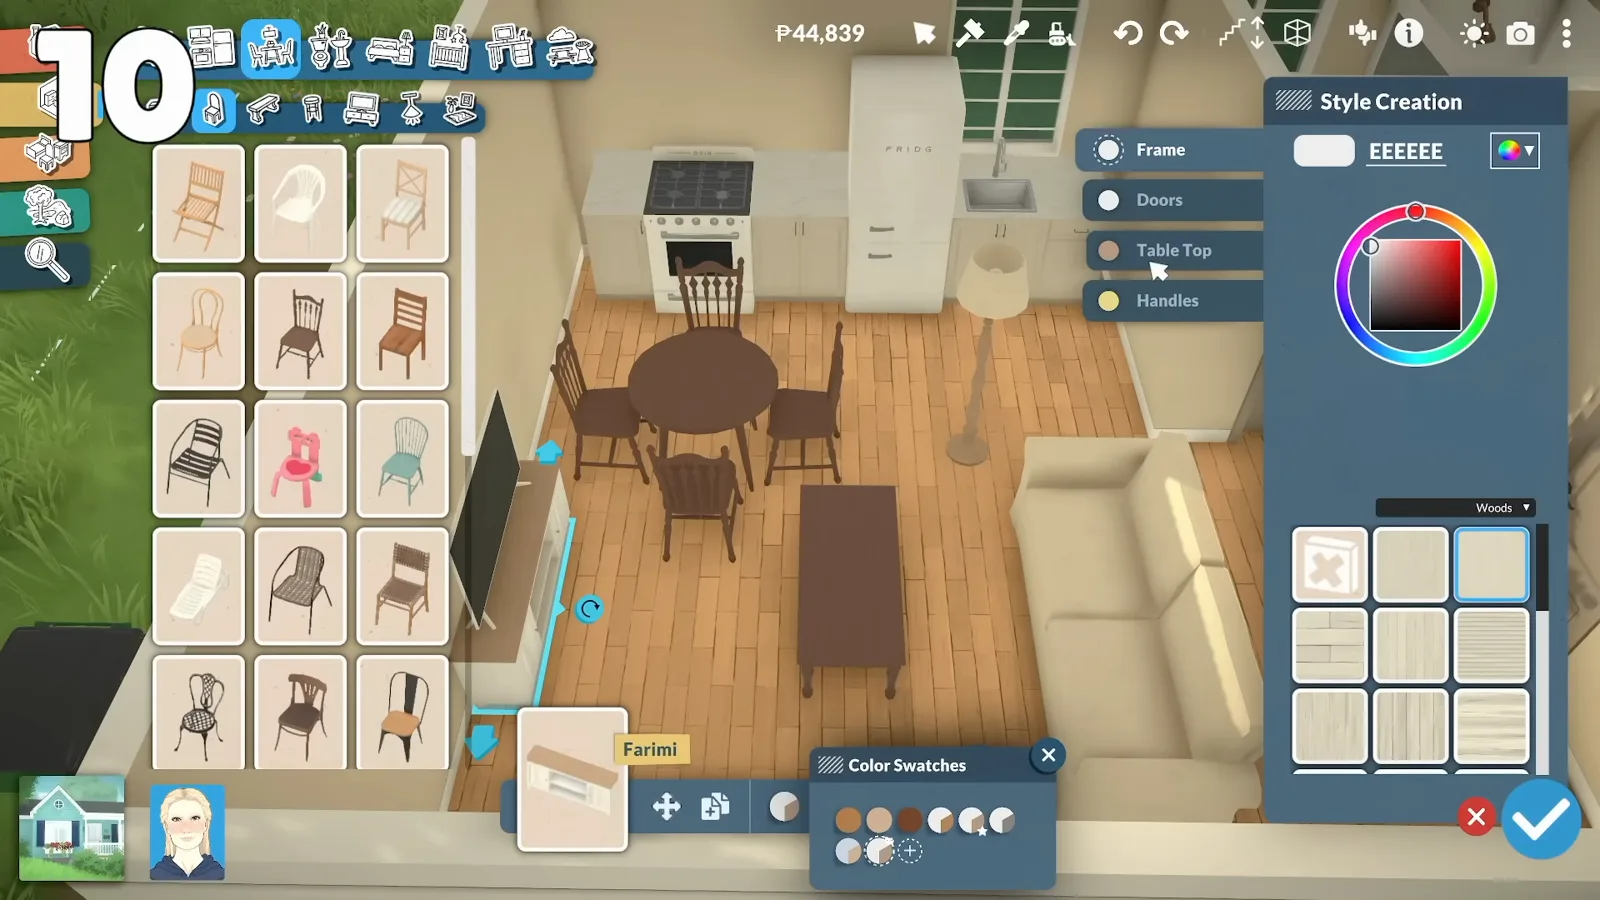
Right-click: edit, duplicate, delete.Watch at 6:40 - 15
Copy the colour code to repeat a shade
Open the colour wheel, highlight the colour code and press Ctrl+C, then paste it into the code box on any other item with Ctrl+V. This is how you get one wood tone or one metal finish repeated through a whole house. Swatches you pick also appear on duplicates of the same item, and the pipette (I) copies a colour straight off something you already placed.
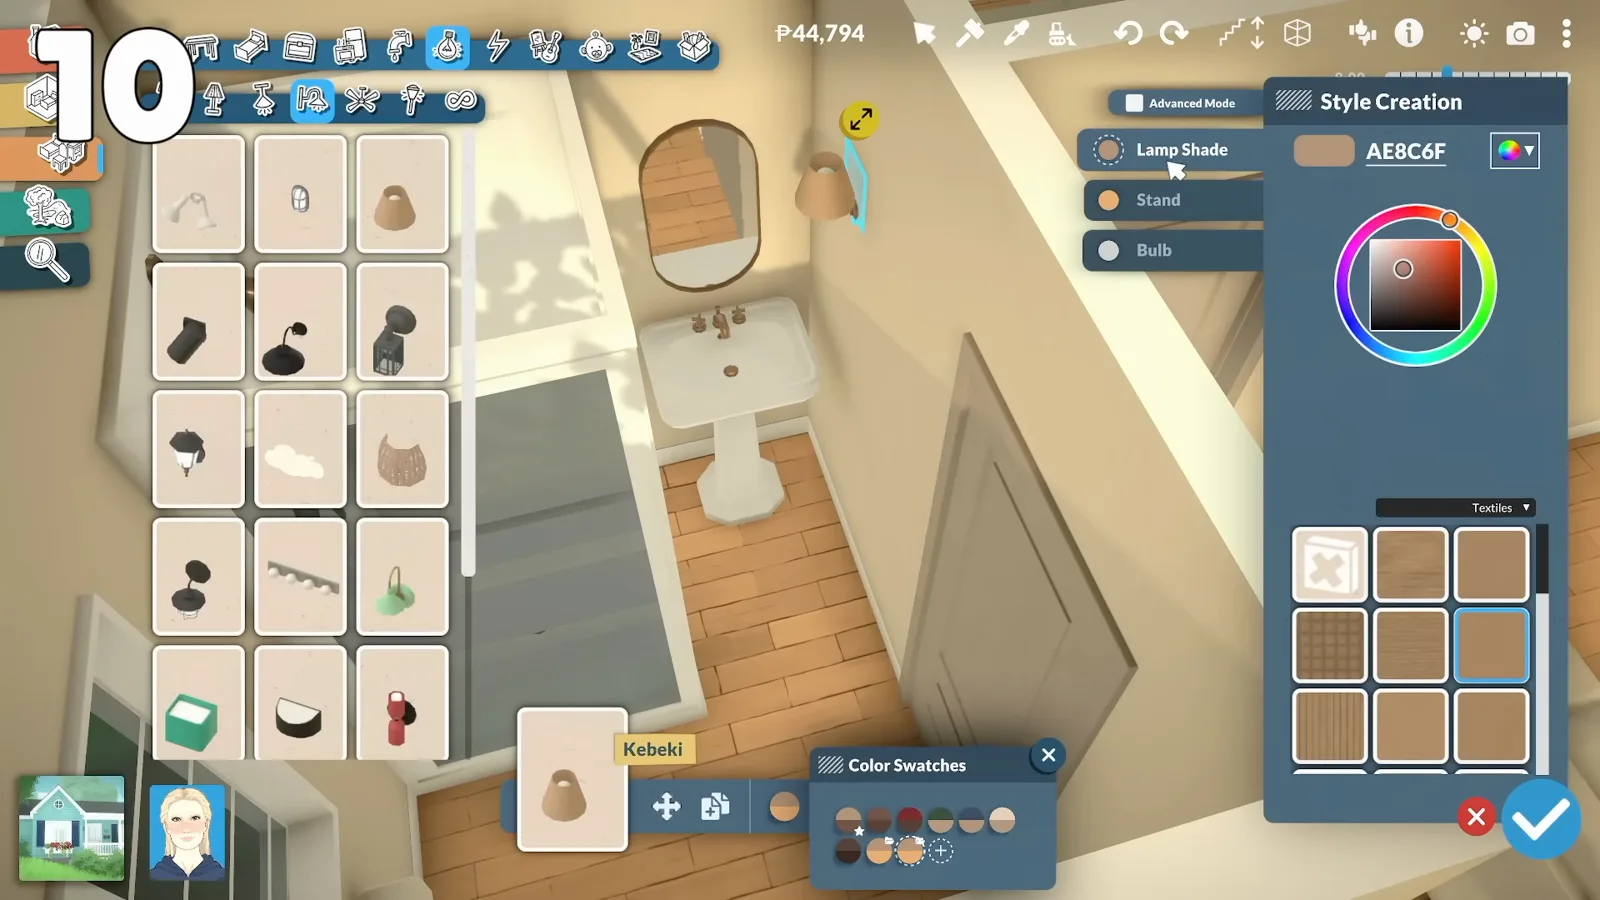
Ctrl+C the code, Ctrl+V it anywhere else.Watch at 7:06
Lighting
Lighting: lamps, colour and the 0.1.7 revamp
Two different questions hide behind “paralives lighting”: how to place and recolour lamps, and why a room suddenly reads darker than the screenshots you remember. The first has documented answers. The second rests on exactly two official sentences, quoted here in full.
“Lights Revamp: We have revisited how our lamps light their surroundings.”
Official patch notes, 10 August 2026 (paralives.com/news and the Steam news hub). That one sentence is the entire entry — no lamp is named and no setting is listed.
“We’ve revamped the indoor lights so that they look more realistic, have better range, and don’t light up the walls as brightly!”
paralives.com/news/lights-revamp, 4 August 2026 — the studio’s own preview of the same change, and the only official text that says what “revisited” means.
So a room you lit before 0.1.7 can read differently now, and that is the change rather than a bug: the studio’s wording is that indoor lights gained range while throwing less brightness onto wall surfaces. Everything below is what the catalogue and the billing tables actually support.
Where lights live in the catalogue
Build Mode’s Lighting block is six categories, not one: Floor Lamps, Table Lamps, Ceiling Lights, Wall Lights, Ceiling Fans and Outdoor Lighting. Garden fixtures are catalogued separately from indoor lamps, which is why a dark path is a shopping trip and not a setting you missed.
Recolour a lamp like any other object
Lamps take the same colour wheel as furniture and surfaces, swatches included — so the hex copy-and-paste in the last two tips works on a shade exactly as it does on a sofa. That changes the object. No source documents tinting the light it casts.
Lights are a metered cost, not a free toggle
The community wiki’s bills tables list Lights in the Low electricity tier at −0.013 kWh per minute, and electricity is billed per kWh on Monday’s statement. If a household lets bills go unpaid the game cuts service outright: “Electricity and water have been cut off! Pay your bills to restore service.”
For the look of the light itself, use Photo Mode
The controls most readers are hunting — dimmer, warmer, golden hour — live in screenshots rather than in the house: Photo Mode stops time and hands you “full control of the lighting, the time of day, the position of items, and more”, in the wiki’s wording. No equivalent is documented in Live Mode.
What nobody has documented about lighting
These are the searches with clear demand and no citable answer. No official note, no FAQ entry and no wiki article covers them, so they stay listed as unknowns:
- Whether you or your Paras can switch a specific lamp or room on and off, and what the interaction is. The electricity table proves lamps have an on state; no source documents the control.
- Auto lights — whether Paras turn lights on when a room goes dark or when the sun sets, or whether fixtures simply stay lit.
- A dimmer or intensity control for a placed light. Patch 0.1.7 changed how lamps light a room globally; it does not describe a per-lamp slider.
- Changing the colour a lamp casts as opposed to the colour of the lamp, and whether any lighting option exists in the settings menu — the settings article lists none.
Custom images
Custom patterns, custom textures and what uploading an image really changes
Searches around paralives custom furniture, custom pictures, custom textures and custom patterns mix three different questions, and only one of them is answered by a menu entry in build mode. Can you upload your own image in the base game? Yes — onto specific objects, since a named patch. Does that create new furniture? No. Is a custom texture the same thing as a custom image? Not close: one is an in-game option, the other is a mod you build or install. The two official sentences below are the entire documented basis.
“More Custom Image Assets: You can now add custom images to mugs, rugs, skateboards, curtains, cushions and flags.”
Official patch notes, 2 July 2026 — paralives.com/news and the Steam news hub, re-checked 22 September 2026.
“Custom Images on Mac: Mac players can now also add custom images to the appropriate assets.”
Official patch notes, 16 July 2026. Before this line the upload slot existed on Windows only.
Two things follow from that wording. The image lands on an object the catalogue already sells — a rug, a cushion, a mug — so it changes how that item looks, never its shape, size or function. And because the entry is called “More Custom Image Assets”, some assets already took custom images before 0.1.5; the notes never say which.
An image slot is not custom furniture
Putting your floor plan, your logo or a tile photo on a rug is a picture on an existing item. Everything else vanilla gives you is separate and just as official: the community wiki’s Build Mode article records that any object can be recoloured with the colour wheel — wall, floor and ceiling textures included — that tables, couches, counters and beds can be resized while doors cannot, and that objects flip, stack, rotate and lift with the advanced placement tool. Combining and resizing catalogue objects is how players get the furniture the shop does not sell, and the colour-code tips above are part of that craft.
Custom textures and custom patterns are a modding job
If by custom texture you mean the artwork an object is drawn with — a new wall surface, a new fabric repeat, a new garment pattern — that is content creation, not build mode. The wiki documents that workflow in its mod-creation guides, and the result ships as an item you either make yourself or subscribe to. It is also the only route to genuinely new furniture: a mesh the catalogue never had.
What people actually upload
The uploads with a real use are plans and surfaces. A floor-plan image on a customizable rug, scaled to the lot and traced over with walls, turns paper architecture into a house. A ceramic-tile or fabric photo on poster and cushion objects gets you a backsplash and upholstery the wall catalogue does not sell. Both are walked through step by step with screenshots elsewhere on this site — this page is the concept, not the tutorial.
What nobody has documented about uploads
Each patch note is a single sentence. These follow-ups have no official and no wiki answer, so they stay open instead of estimated:
- Which assets accepted custom images before 0.1.5. The wording says “More”, so at least one already did, and no source lists them.
- Any file limit — format, size, resolution or dimensions — and where an uploaded image is stored on your machine afterwards.
- Whether an uploaded image can be applied to a wall, floor or ceiling surface. Patches keep adding surface textures, including the natural ground floors in 0.1.7, but no source documents an upload slot for surfaces.
Common build mode questions
- How do you make a porch in Paralives?
- Place the walls for the porch shape, trace the outline with the separator tool, raise the floor with the blue arrow, then snap a staircase to the raised edge and widen it. There is no dedicated foundation or porch tool in Early Access 0.1.9b.
- Can you move a whole house in Paralives?
- Not yet. Rooms, walls and houses cannot be repositioned on a lot. Individual walls can be dragged to resize a room, and finished lots can be saved to the library and placed on a different lot.
- Why do my rooms glitch when I drag a wall?
- It is a known Early Access issue. Quitting to the main menu without saving and reloading the file clears it, which is exactly why autosave should be off while you build.
- How do you use the same colour on different objects?
- Open the colour wheel, copy the colour code with Ctrl+C and paste it into the code box on the other item with Ctrl+V. The pipette tool, hotkey I, copies a colour or an object you have already placed.
- How do you turn lights on and off in Paralives?
- We could not find a verified answer, and we would rather say so than invent one. The wiki’s electricity table proves lamps draw power when running (−0.013 kWh per minute), but neither the official patch notes, the wiki’s Build Mode article nor its transcript of the in-game Help text documents a switch, click or interaction for a placed light. If you can reproduce one in EA 0.1.9b, the Steam Bug Reporting forum is where wiki editors pick changes up.
- Why is my room dark — are the lights not working?
- Two causes are documented. Patch 0.1.7 (10 August 2026) revamped indoor lighting — “We have revisited how our lamps light their surroundings” — and the preview says indoor lights “don’t light up the walls as brightly”, so an older build reads dimmer by design. The other is money: unpaid bills trigger “Electricity and water have been cut off! Pay your bills to restore service.” A fixture that casts no light at all in a paid-for room has no known-issue entry, so file it as a bug instead of hunting for a setting.
- Can you change light colour or intensity in Paralives?
- The fixture, yes: lamps recolour through the same colour wheel as every other Build Mode object, including the hex-code trick above. The light itself — no documented control. Nothing published describes a colour or intensity option for the beam, and 0.1.7 changed the lighting model globally instead of adding per-lamp settings.
- Do lights cost money to leave on in Paralives?
- They are metered. The wiki’s usage table puts Lights at 0.013 kWh per minute in the Low electricity tier, and bills charge electricity per kWh, so an unlit room should meter less than a lit one. The rate is sourced; how much lighting makes up a real household bill has not been published by anyone.
- Can you make custom furniture in Paralives?
- Not as a new object in the base game — nothing in build mode adds an item to the catalogue, and that is what Workshop custom content is for. What vanilla does give you is recolouring with the colour wheel, resizing on most object types, flipping and free stacking, plus an image slot: since patch 0.1.5 you can put your own picture on mugs, rugs, skateboards, curtains, cushions and flags, and since 0.1.6 on Mac too. Combining two or three existing objects into one unit is how players make the furniture the shop never sold.
- What is the difference between a custom image and a custom texture?
- A custom image is a picture you upload inside the game onto an object that has an image slot. A custom texture is the artwork the object itself is drawn with, and replacing it is a modding workflow — the community wiki has guides for authoring textures and clothing patterns — so the result has to be installed as a mod or subscribed to on the Steam Workshop. Same word, two very different tools.
Related build guides
Full build mode tutorial
Seventeen illustrated steps from empty lot to saved house.
Build from a floor plan
Display a real blueprint on your lot and trace the walls over it.
Curved walls
Anchor points, what curves cannot take yet, and where curves pay off.
Color wheel & color codes
The dedicated guide this page's two colour tips point into — wheel scope, colour zones, hex workflow and filters, with the honest unknowns.
Cottagecore build
The uploaded-image walkthrough in practice: tile posters, cushion prints and furniture made by combining three catalogue items.
Roof tutorial
Corner roofs, skylights, dormers and flat roofs — the illustrated walkthrough, with the fixes for roofs that won't hide.
Move objects freely
Alt placement, vertical stacking with Shift and the advanced widget.
Build budget planner
Work out what your household can actually afford before you place it.