
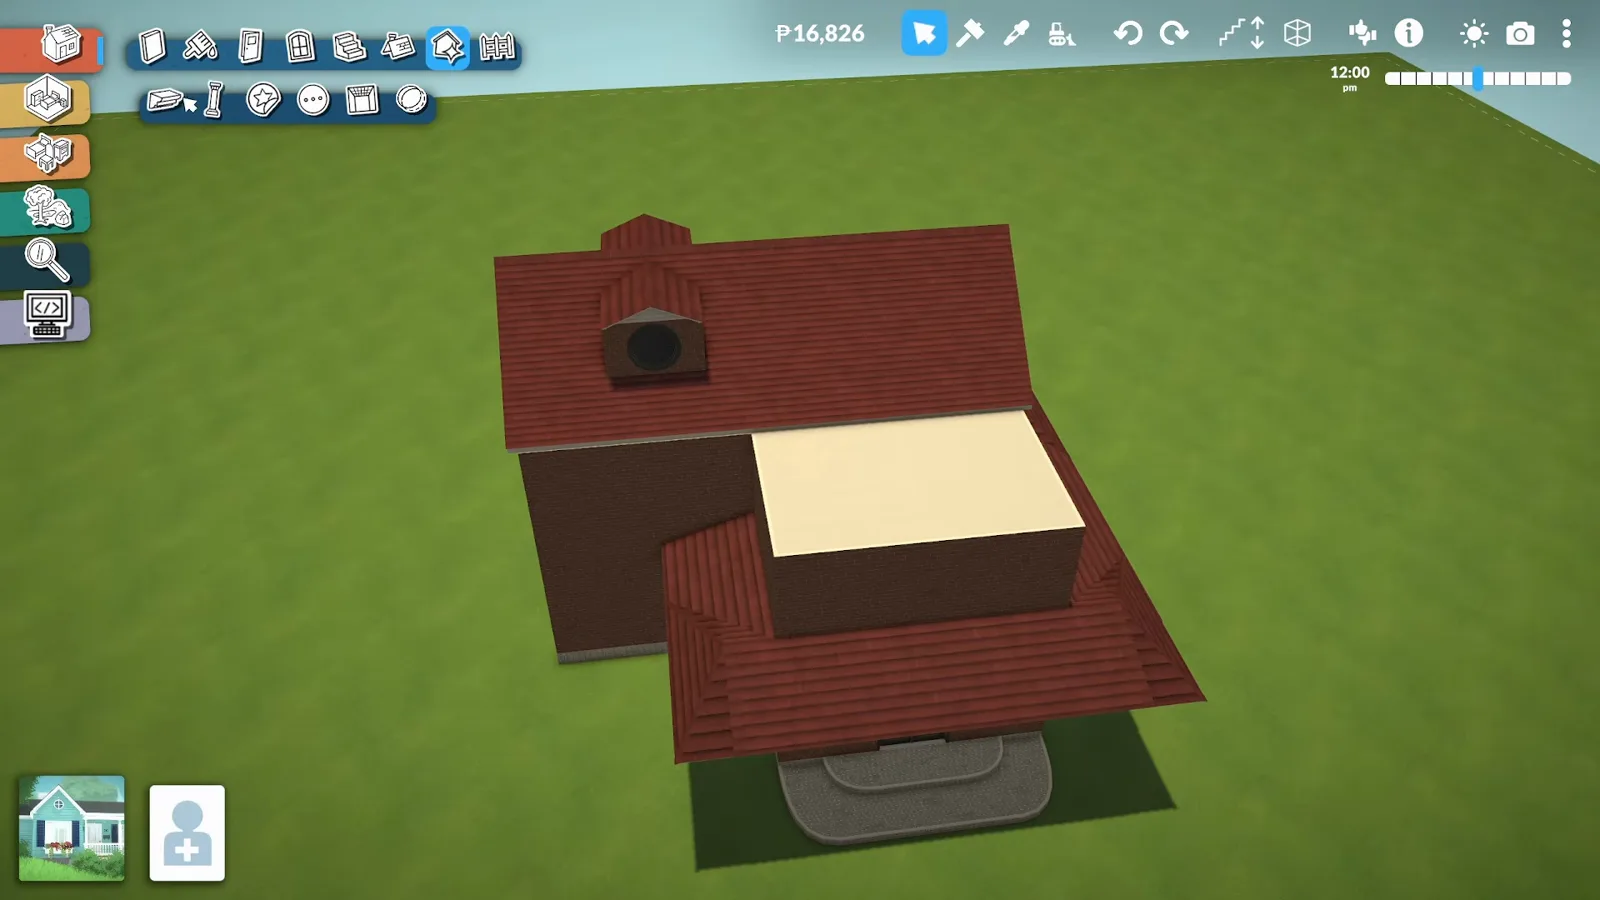
The short version
Paralives roofs are single drag-and-drop pieces with four recolourable parts, and every custom roofline is those ordinary pieces combined. The moves that matter: colour everything from one panel, drop roofs between floors with the advanced widget to stop clipping, build corners from a pyramid and a half piece, and finish with skylights, dormers or a modern flat slab.
- Every roof piece recolours in four parts — roofing, ridge, siding and rake — from one swatch panel; the plus icon mixes custom colours
- The top paneling takes paint only in paint mode's Roof section; load a wall paint, hold Alt, and click to repaint every rake at once
- Roofs show through walls when they sit on the wrong floor — place on the top floor, drop down with the advanced widget, then toggle it off
- Corner roofs don't exist as pieces: a pyramid plus a half piece, Alt to move freely, duplicate to keep the pitch identical
- Skylights are a roof cutout plus a window on a hidden half wall — do them near the end of the build, the widget makes things jump
Catalogue & colour
Know the catalogue, then colour every part
Early Access ships a respectable set of roof shapes — pyramids, mansards, cones, curved pieces and flats — but no corner pieces. One rule before you start: if a roof shape in someone's screenshot isn't in your catalogue, it's a Workshop mod, not a hidden menu. Everything in this guide is base game.
- 1
Open Roofs & Chimneys and read the shapes
The build toolbar's Roofs & Chimneys category holds every base-game roof: pyramid, mansard, cone, curved and flat pieces. Drag one out over the room and the arrows adjust height, width and pitch. Treat the catalogue as your parts list — every trick below combines these ordinary pieces.
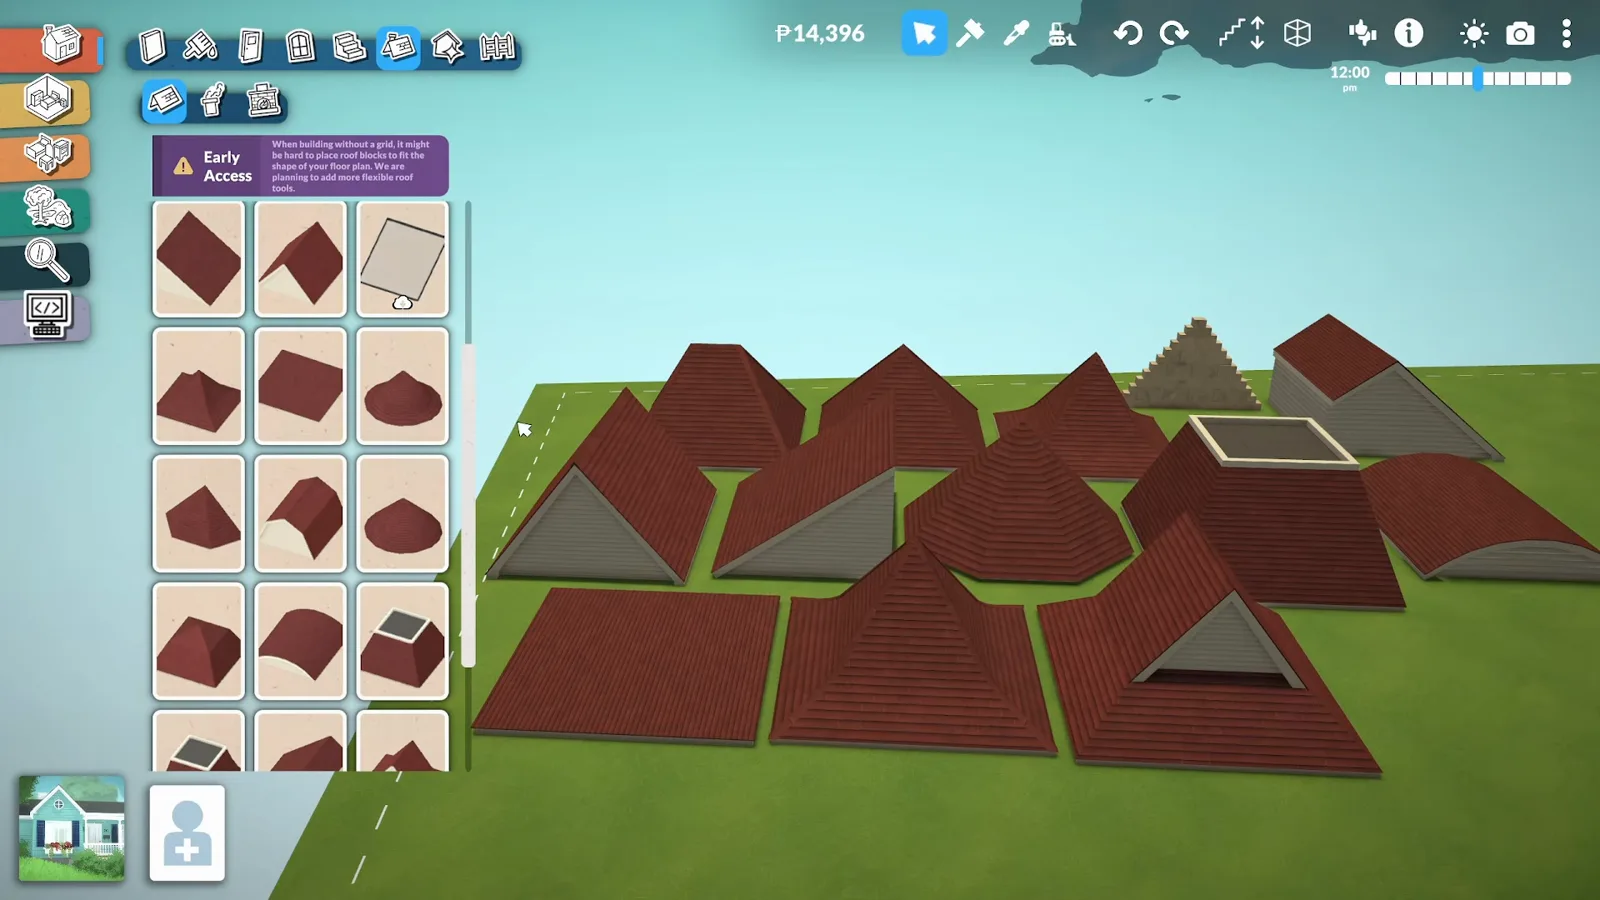
Every base-game roof shape lives in this one catalogue.Watch at 0:45 - 2
Recolour all four parts from one panel
Click a placed roof and open change item swatch. Preset swatches are one click, but the plus icon opens Style Creation, where Roofing, Ridge, Siding and Rake each take their own colour — hex codes included. The ridge is the cap along the top; the rake and siding dress the edges.
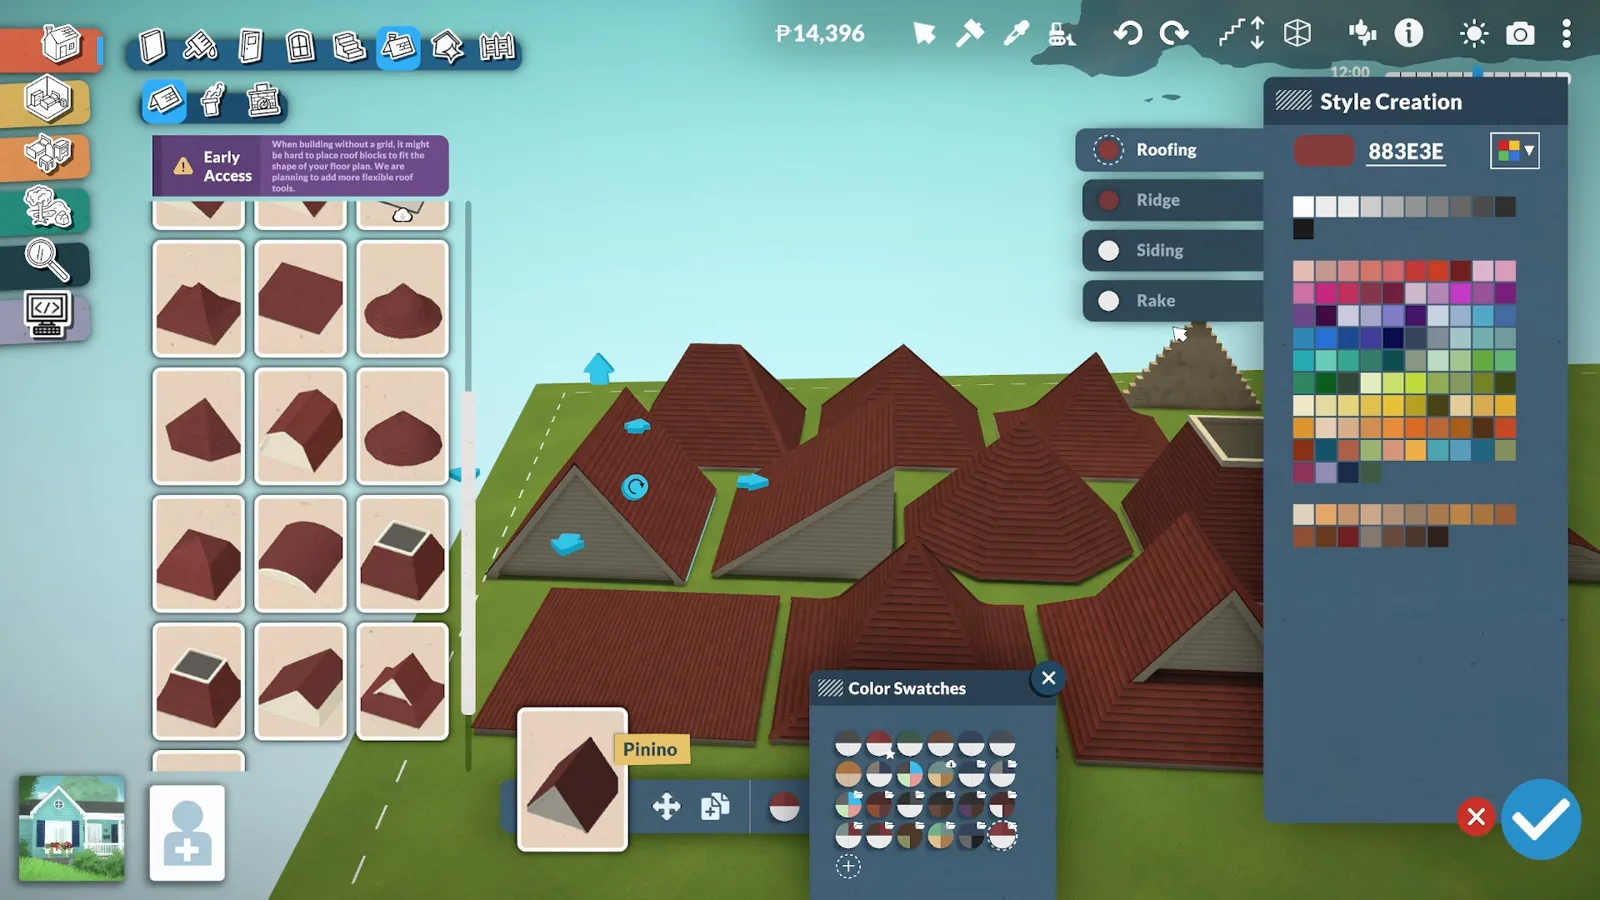
Four parts, four colours — plus custom mixes via the plus icon.Watch at 1:18 - 3
Paint the top paneling in paint mode
The top surface ignores the swatch panel. Open paint mode, find the Roof section, pick a texture and colour, then click pieces one by one — or take the brush and stroke across several roofs at once to skip the per-piece menus entirely.
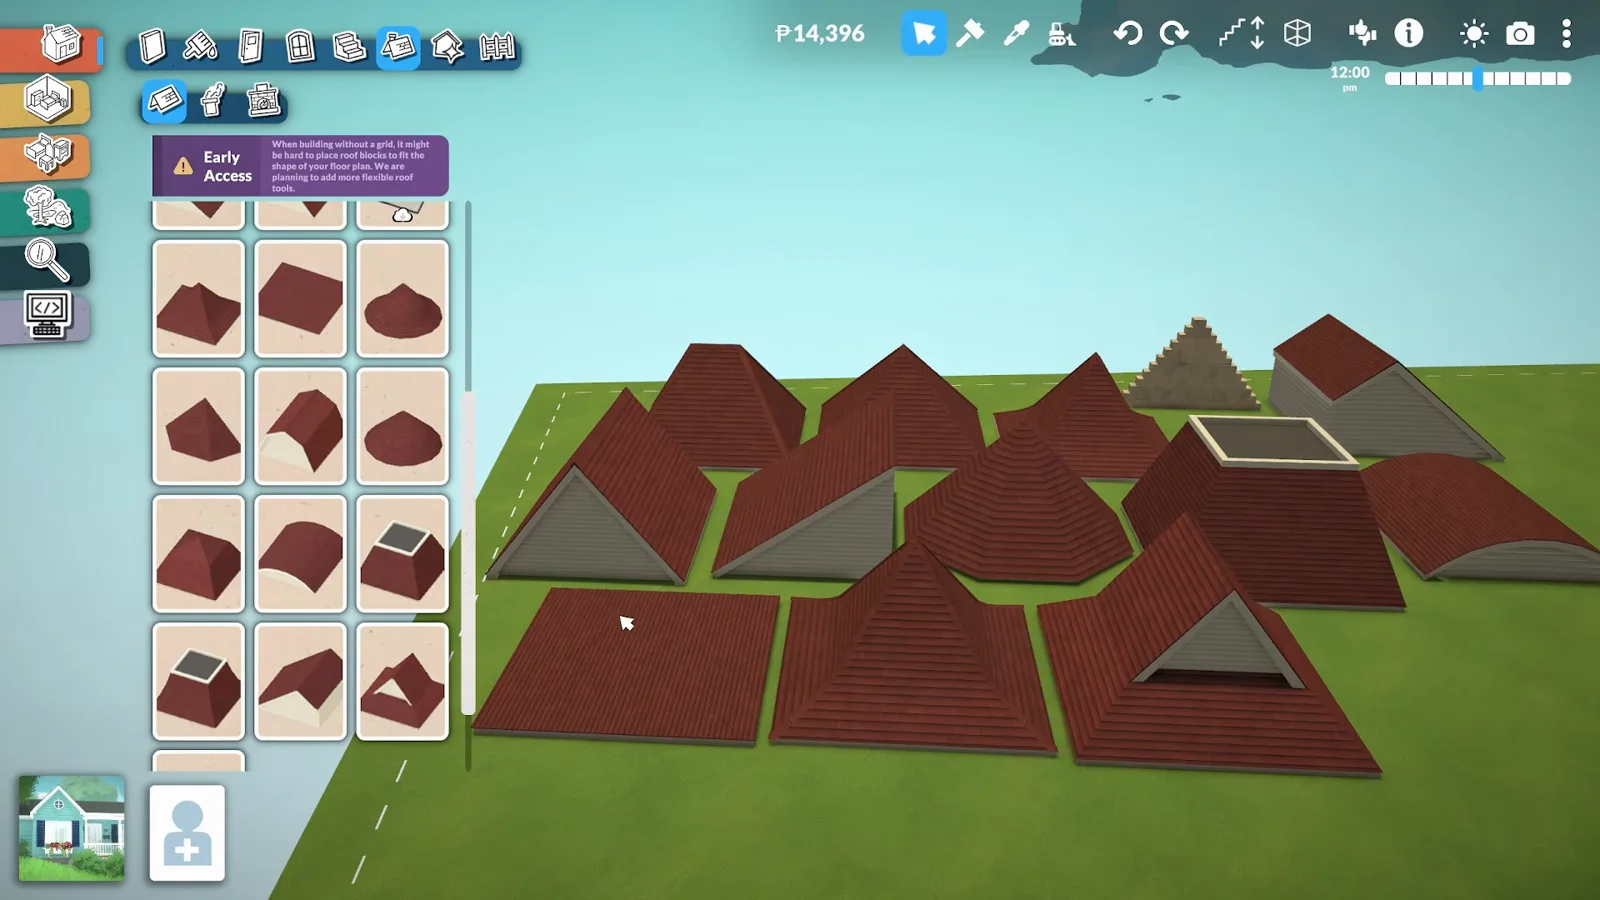
The top paneling only takes paint from paint mode's Roof section.Watch at 1:40 - 4
Hold Alt and repaint every rake at once
For trim and siding in bulk: pick a colour in wall coverings, hold Alt, and click any rake or siding — every piece you click takes that colour. It is the fastest way to unify a whole street of roofs without opening a single swatch panel.
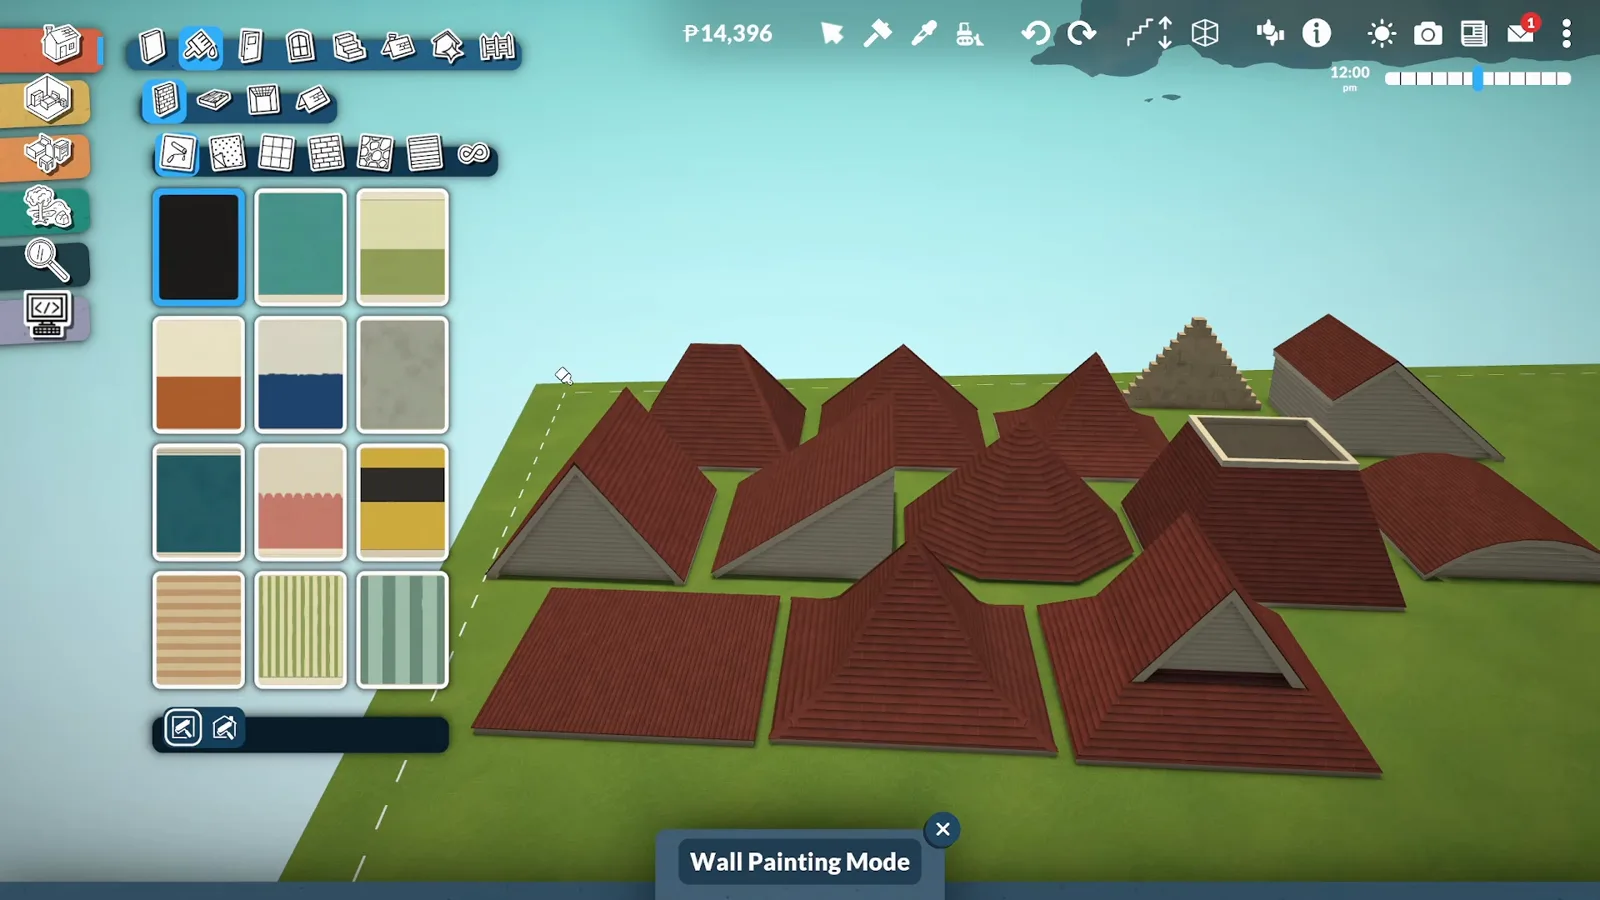
One Alt-click per roof repaints its trim everywhere.Watch at 2:15
The clipping fix
Place high, drop down, stop the clipping
Roofs anchor to whatever floor you place them on, and a piece placed one floor up pokes straight through the ceiling below. The advanced widget moves a placed roof between floors — with two honest downsides covered at the end of this section.
- 5
Place the roof on the top floor first
A roof dragged in at the wrong floor juts through interior walls. Instead, place the piece on the house's top floor, click it, and open the three-dot menu — toggle on the advanced widget. Now the piece can leave its floor.
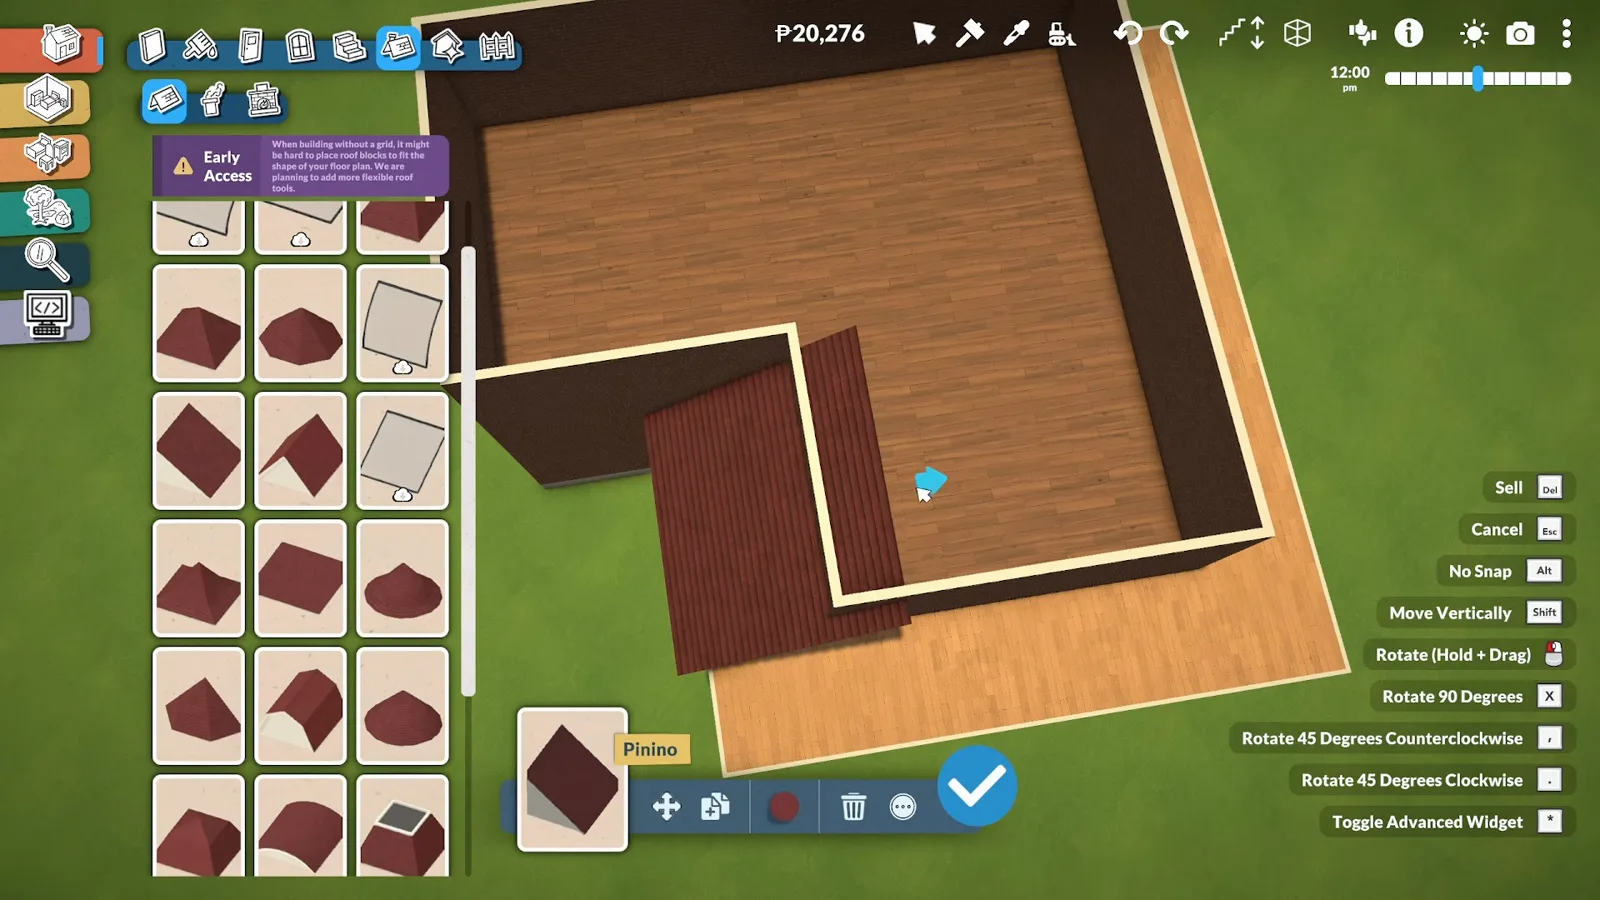
The three-dot menu hides the advanced widget toggle.Watch at 2:45 - 6
Drop it to the target floor, then toggle the widget off
Drag the piece down to the floor you're decorating and slide it flush against the wall so nothing shows inside. Then toggle the widget off. Two honest costs: the game still thinks the piece lives upstairs, so it turns invisible when you view the lower floor alone — and pieces placed this way occasionally disappear when you load the save.
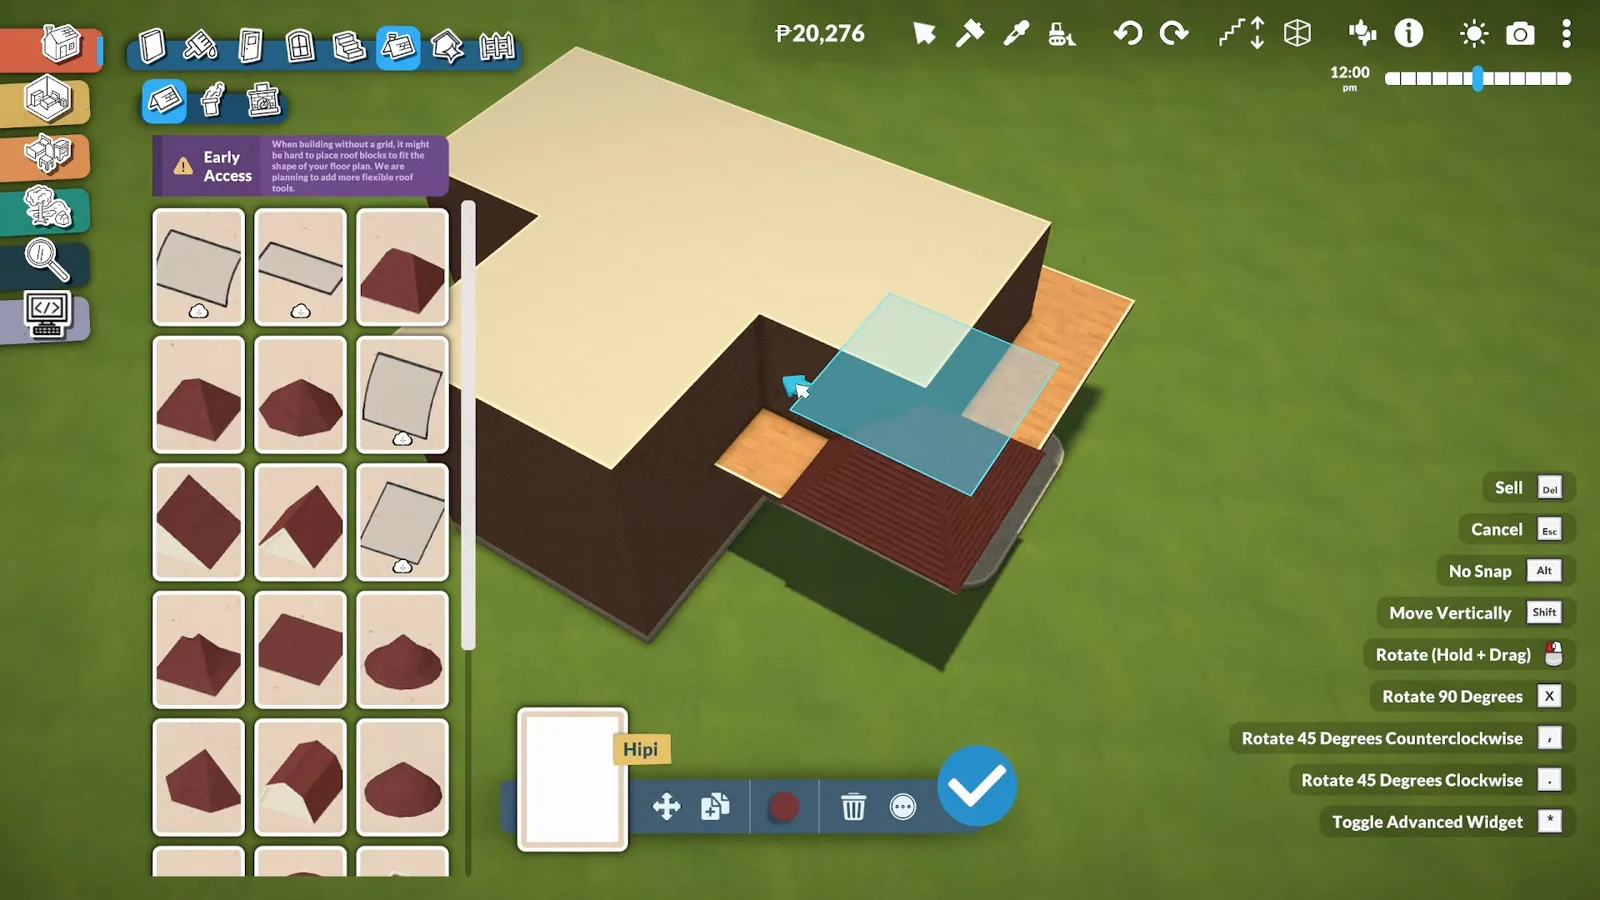
Lowered to the bedroom floor — and no longer visible inside it.Watch at 3:38
Corner roofs
There are no corner pieces — build them from a pyramid and a half
The catalogue's biggest gap. The community answer, shown end to end: a pyramid caps the corner, half pieces run down each side, and duplicate keeps every pitch identical. It is the method behind most wrap-around porches you've seen in Paralives builds.
- 7
Cap the corner with a pyramid
Drop a pyramid piece over the corner and lower the walls so you can see what you're doing inside. From here on, hold Alt whenever you move anything — free movement without snapping is what makes corner roofing possible. Work the pyramid in until it no longer shows through the room.
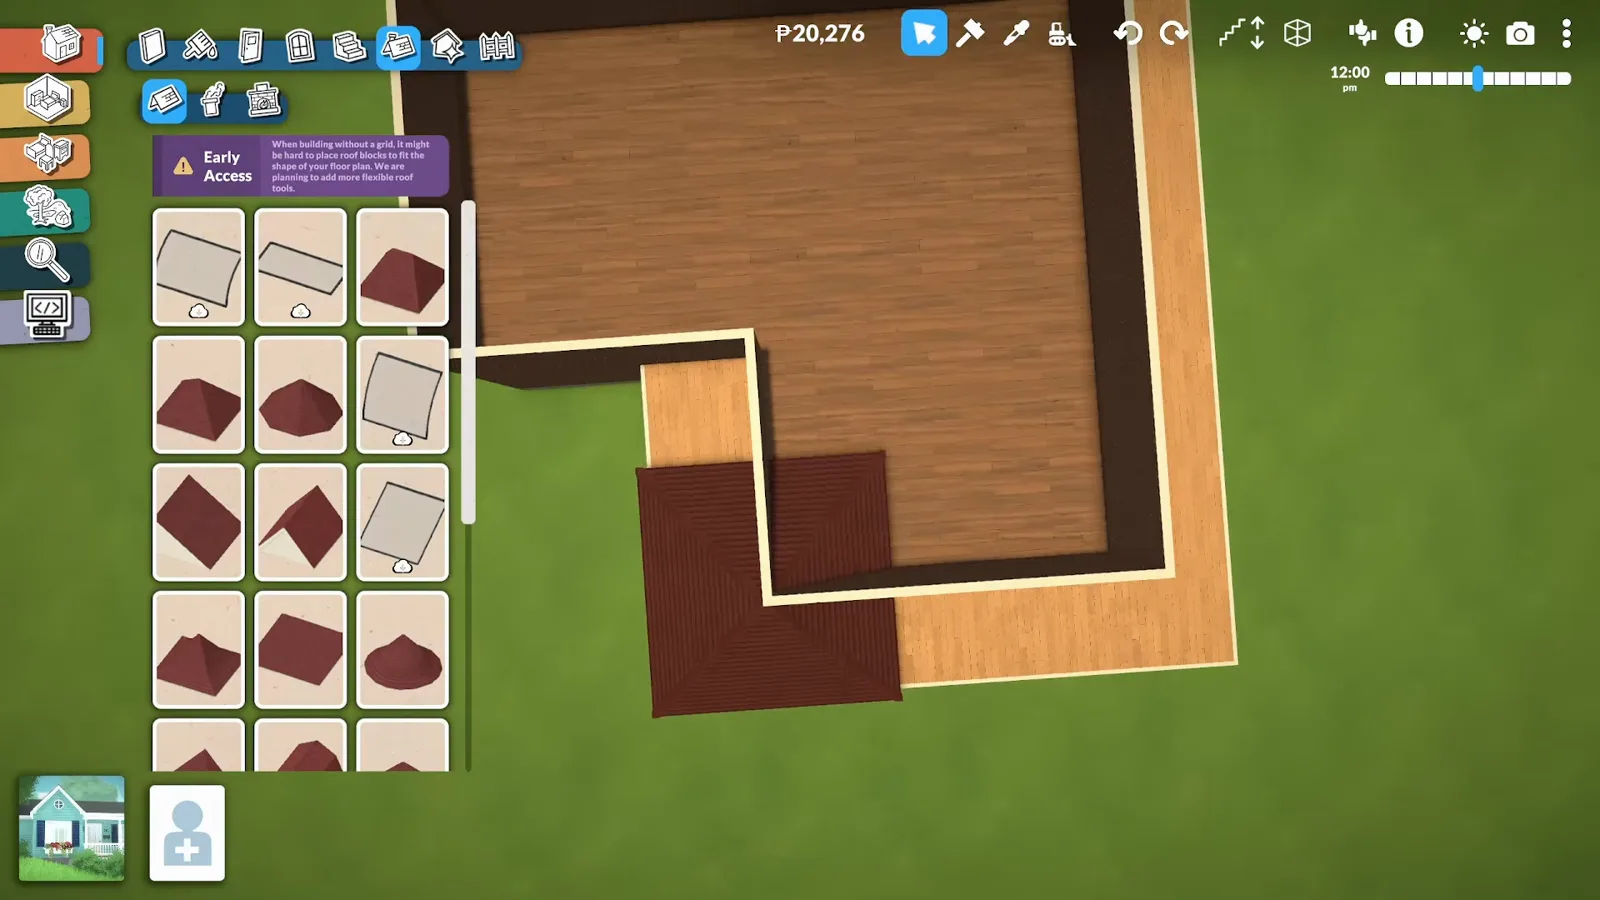
The pyramid becomes the corner cap.Watch at 4:12 - 8
Run a half piece down the far side
Take a half piece, rotate it onto the other side of the corner, and pull it in until it hides from the interior too. Drag its edge out to meet the pyramid's edge, then bring the whole piece down until the two heights read as one roof.
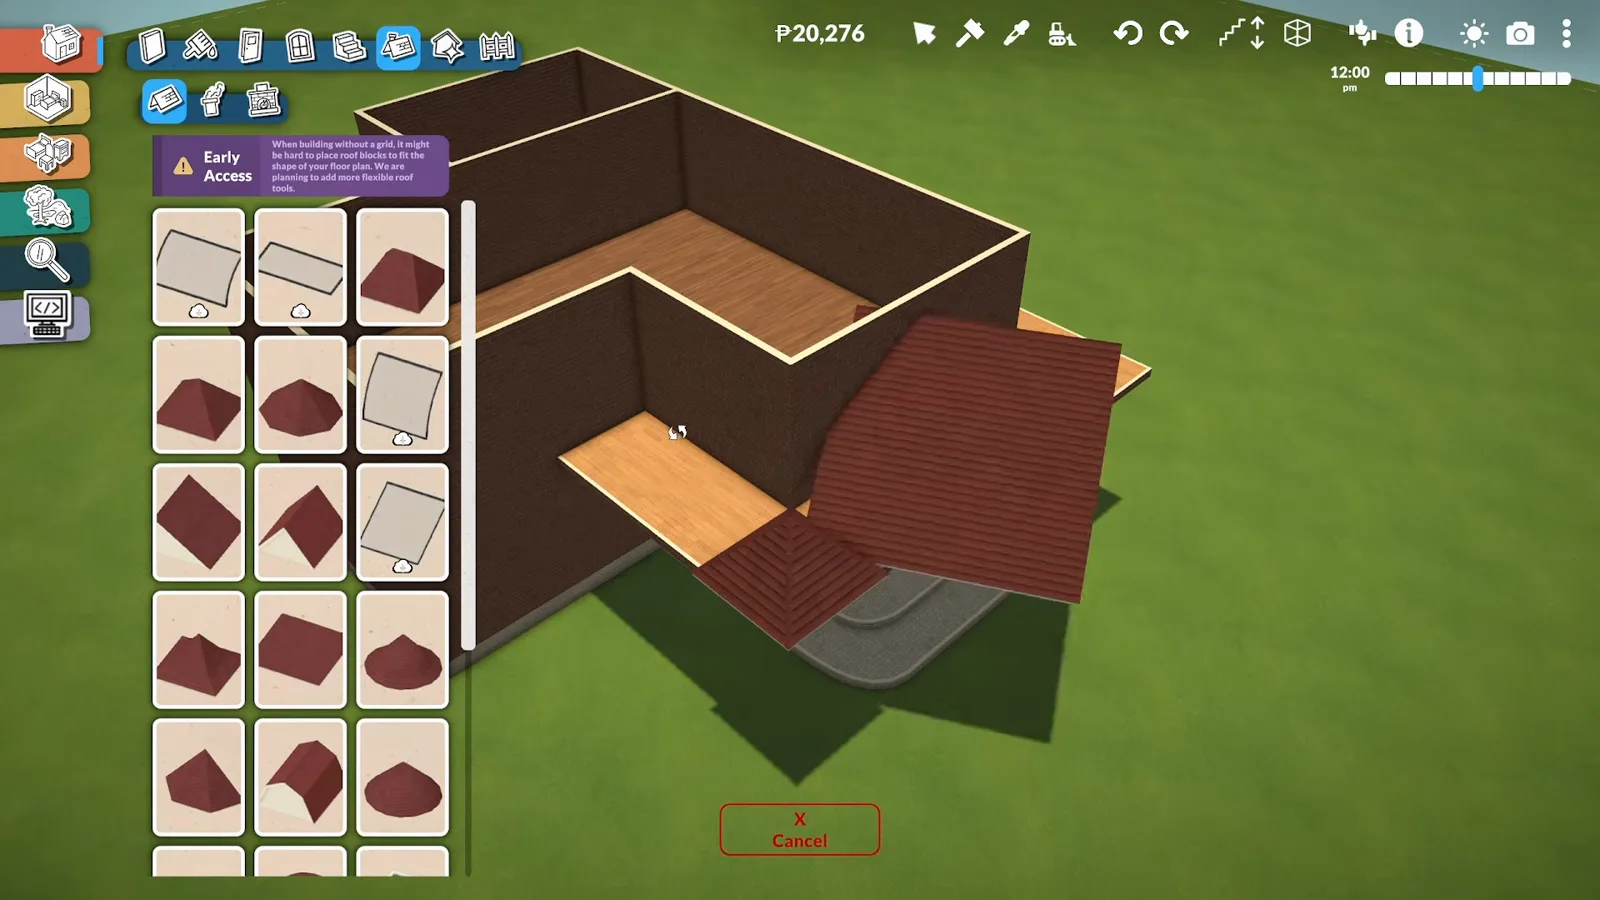
Half piece meets pyramid at the same pitch.Watch at 4:45 - 9
Duplicate, turn, and close the corner
Duplicate the half piece rather than grabbing a new one — the copy keeps the exact height. Turn copies onto each remaining side and creep them in until the peaks visually meet. Don't chase perfection: textures won't line up seam-free, and it still reads as a finished corner. Repeat around wrap-around porches.
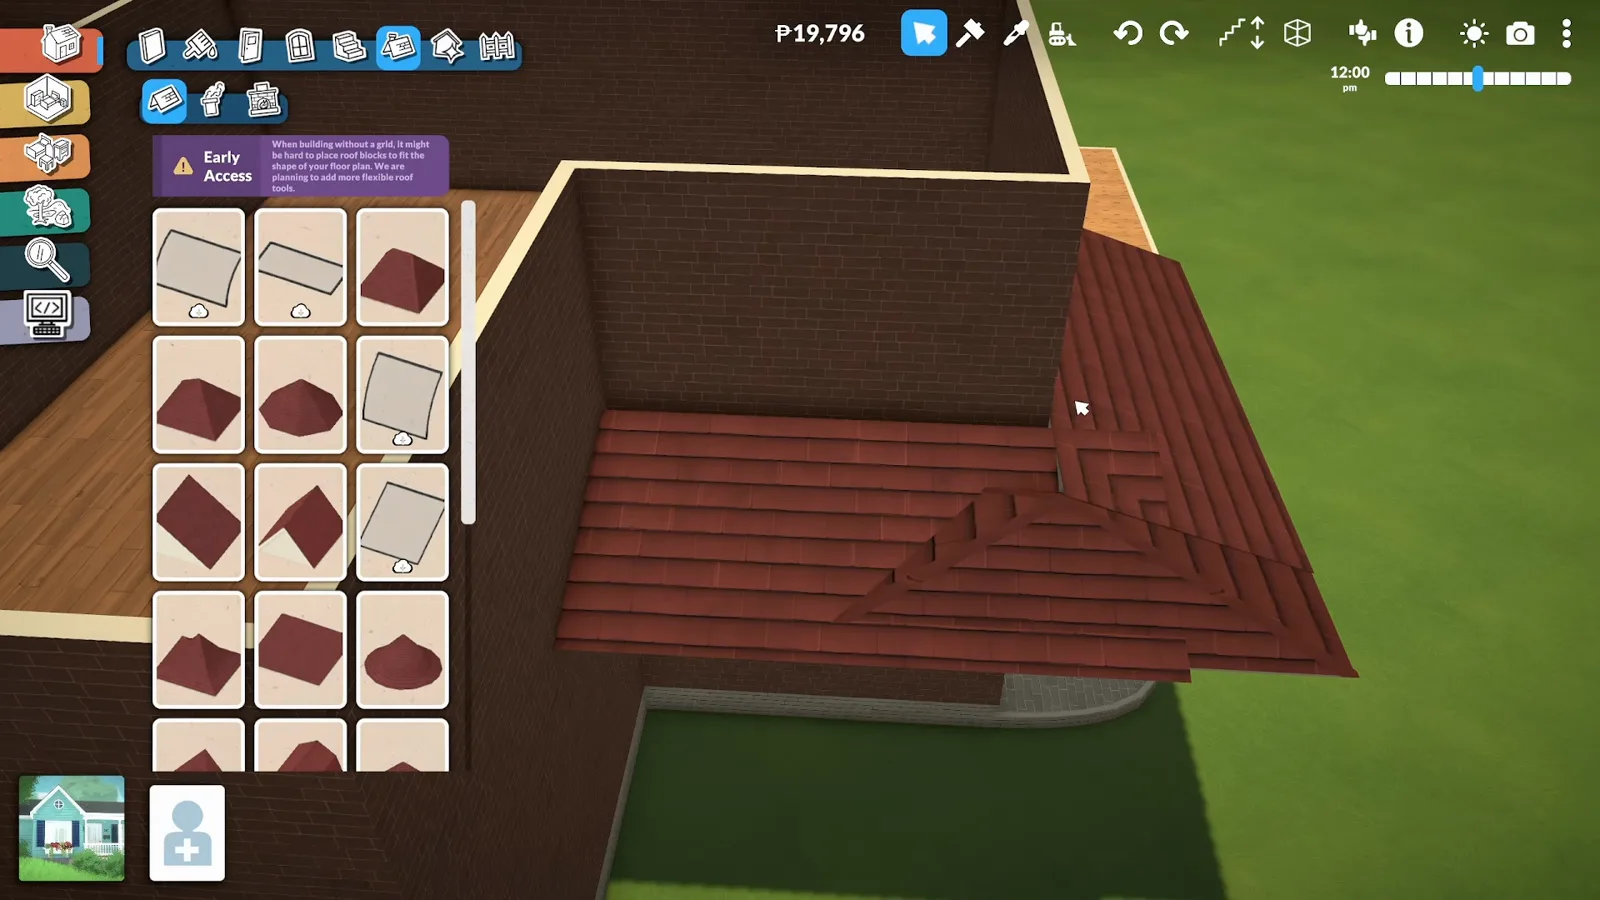
Duplicate keeps every side at the same height.Watch at 5:45
Skylights
Cut the opening first, then float the window on a half wall
A skylight is three moves: cut a hole with the separator and sledgehammer, frame it with slim roof pieces, then embed a window with the advanced widget so the interior ceiling stays whole. Do this near the end of your build — the widget can shuffle already-placed objects.
- 10
Section off the opening with the separator
Pick the skylight spot, then draw separator lines: around the walls on the floor below, and across the roof plane above. Break the marked roof section with the sledgehammer, then delete the separator walls — you're left with a clean rectangular hole.
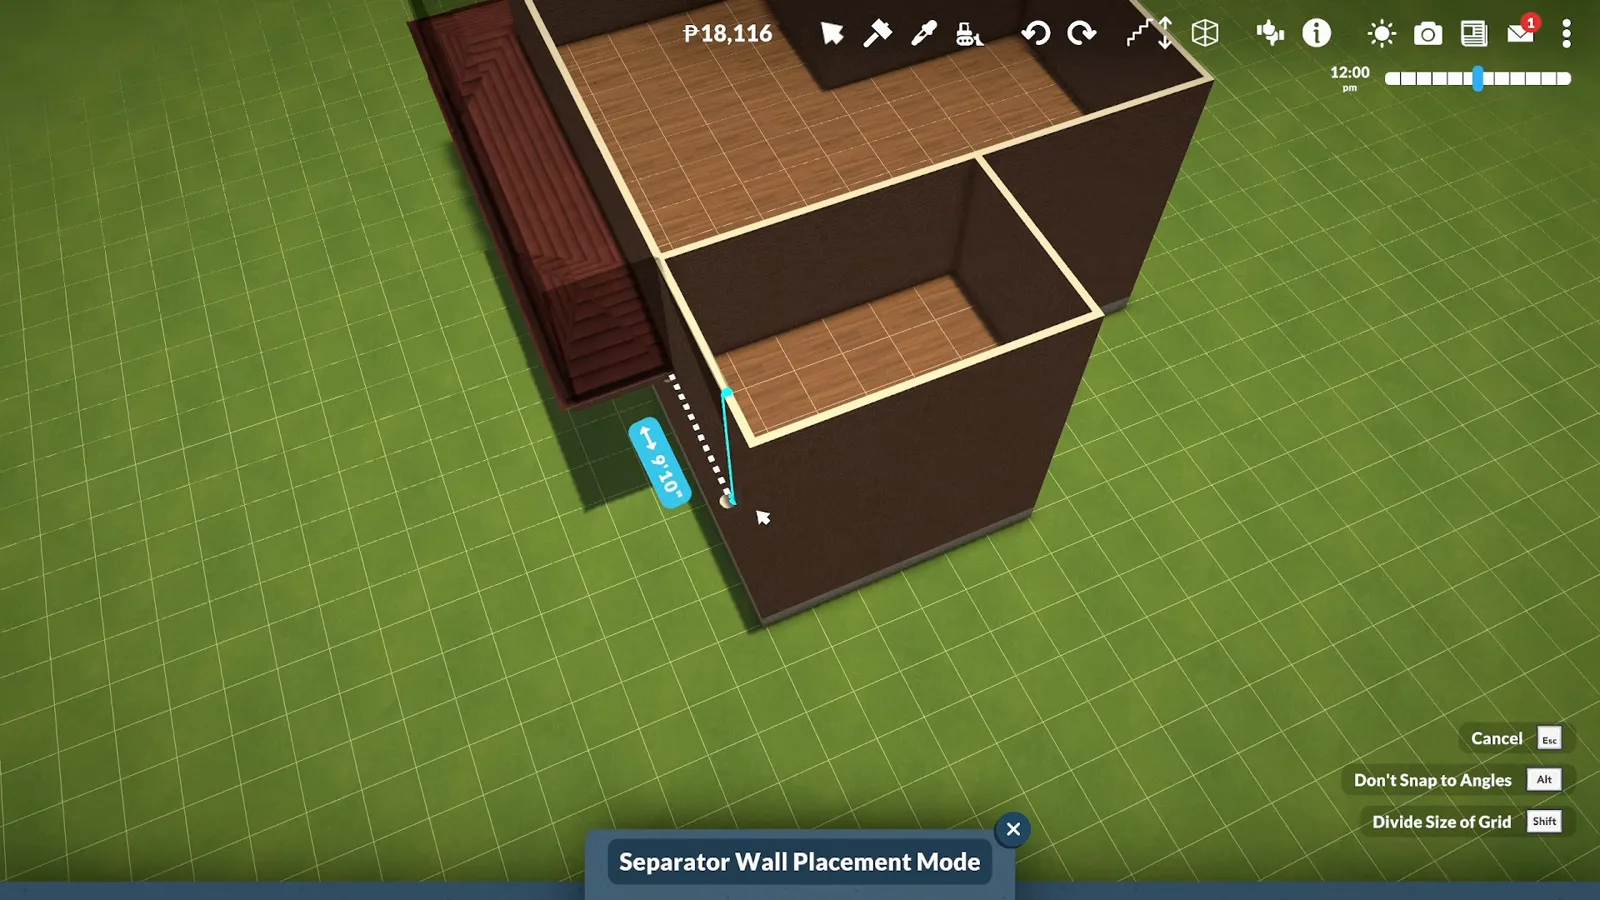
Separator first, sledgehammer second.Watch at 8:25 - 11
Frame the hole with slim roof pieces
The hole needs walls of its own. Place a roof piece at the opening's side, make it thin, connect it to the wall, and drag it up to meet the roof plane. Duplicate it to the other side and stretch the pair until they close the gap — you're building the skylight well before any glass goes in.
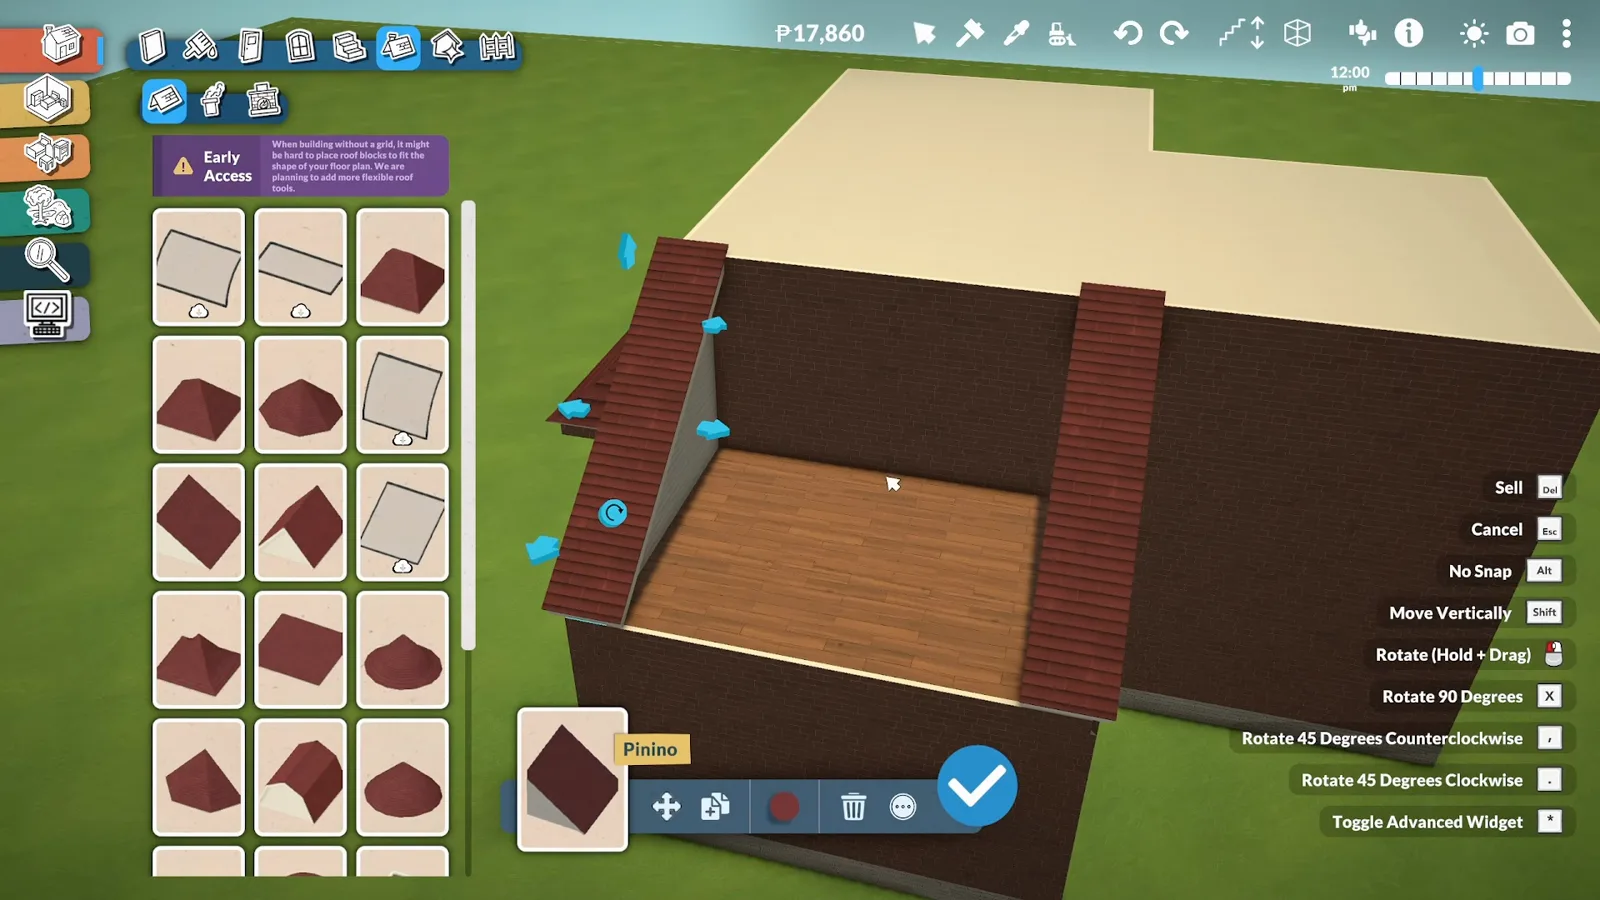
The cutout gets its own little roof frame.Watch at 9:10 - 12
Float the window on a hidden half wall
Place a half wall on the rooftop — the roof you'll add later hides it. Set a window on the half wall, toggle the advanced widget, and move the window with the arrows, stretch it with the cubes, rotate it with the rings until it fills the opening. Embedding it this way avoids punching a hole in the ceiling below. Toggle the widget off when it sits right.
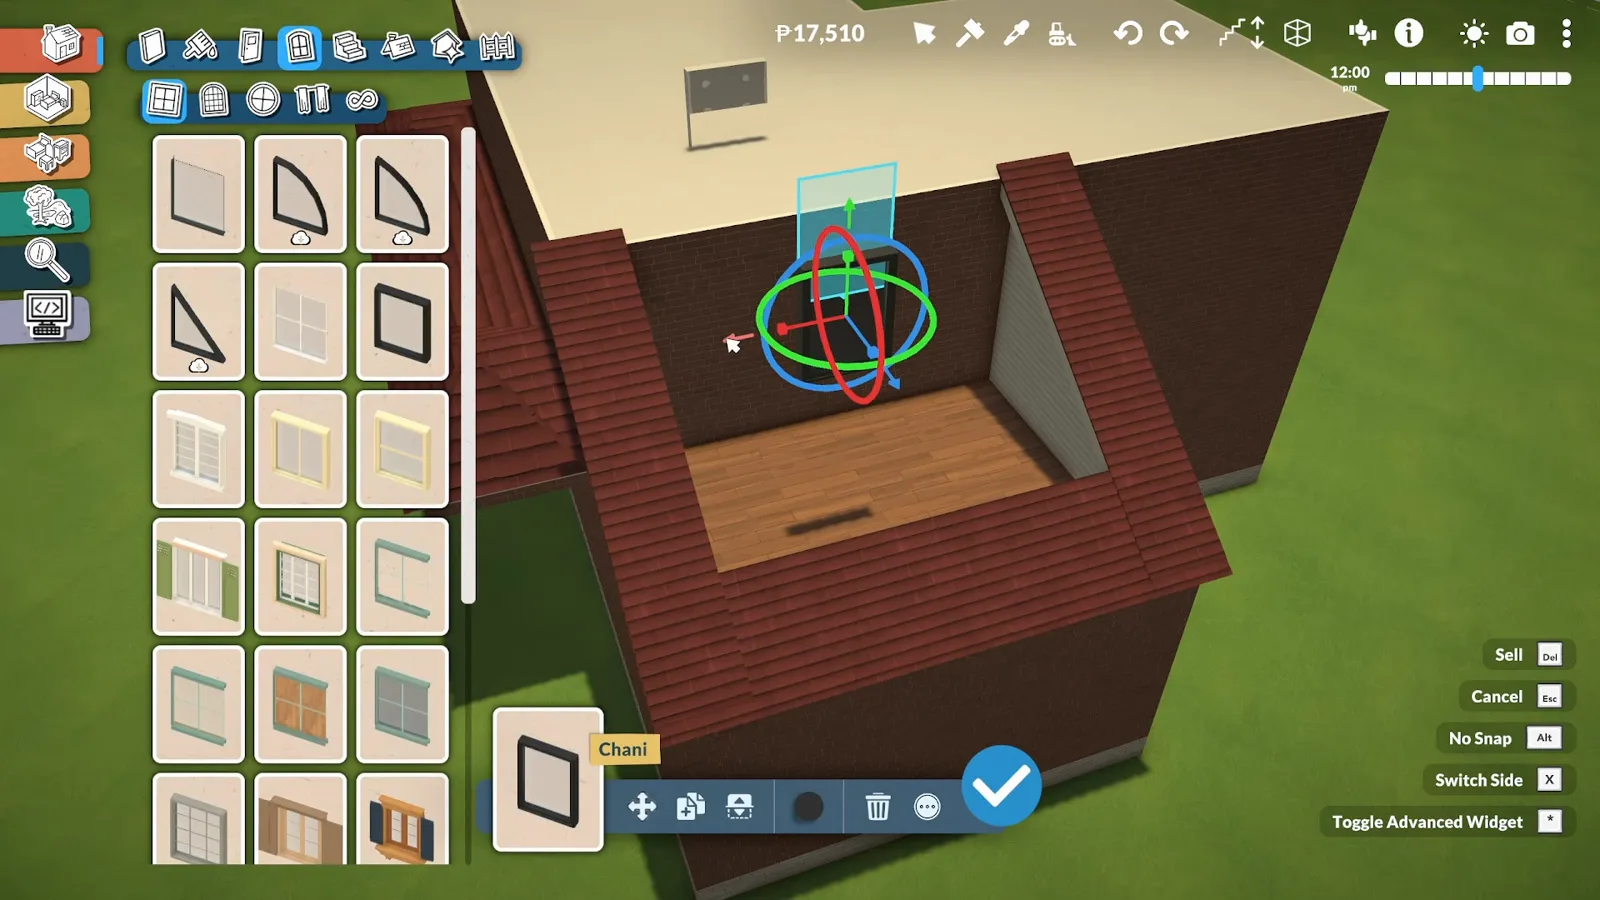
Arrows move it, cubes stretch it, rings rotate it.Watch at 10:25
Dormers
A dormer is just a room drawn on the roof
The attic window that protrudes from a roof is the least exotic trick here: you draw a real room on top of the roof plane, roof it, and glaze it with any window in the game. The snap grid is the only obstacle.
- 13
Draw a room on top of the roof
Switch to wall placement mode and draw a small room directly onto the roof plane, wherever the attic window should protrude. Keep it as close to the roof edge as you can — hold Shift to shrink the grid if the snap won't let you reach the edge.
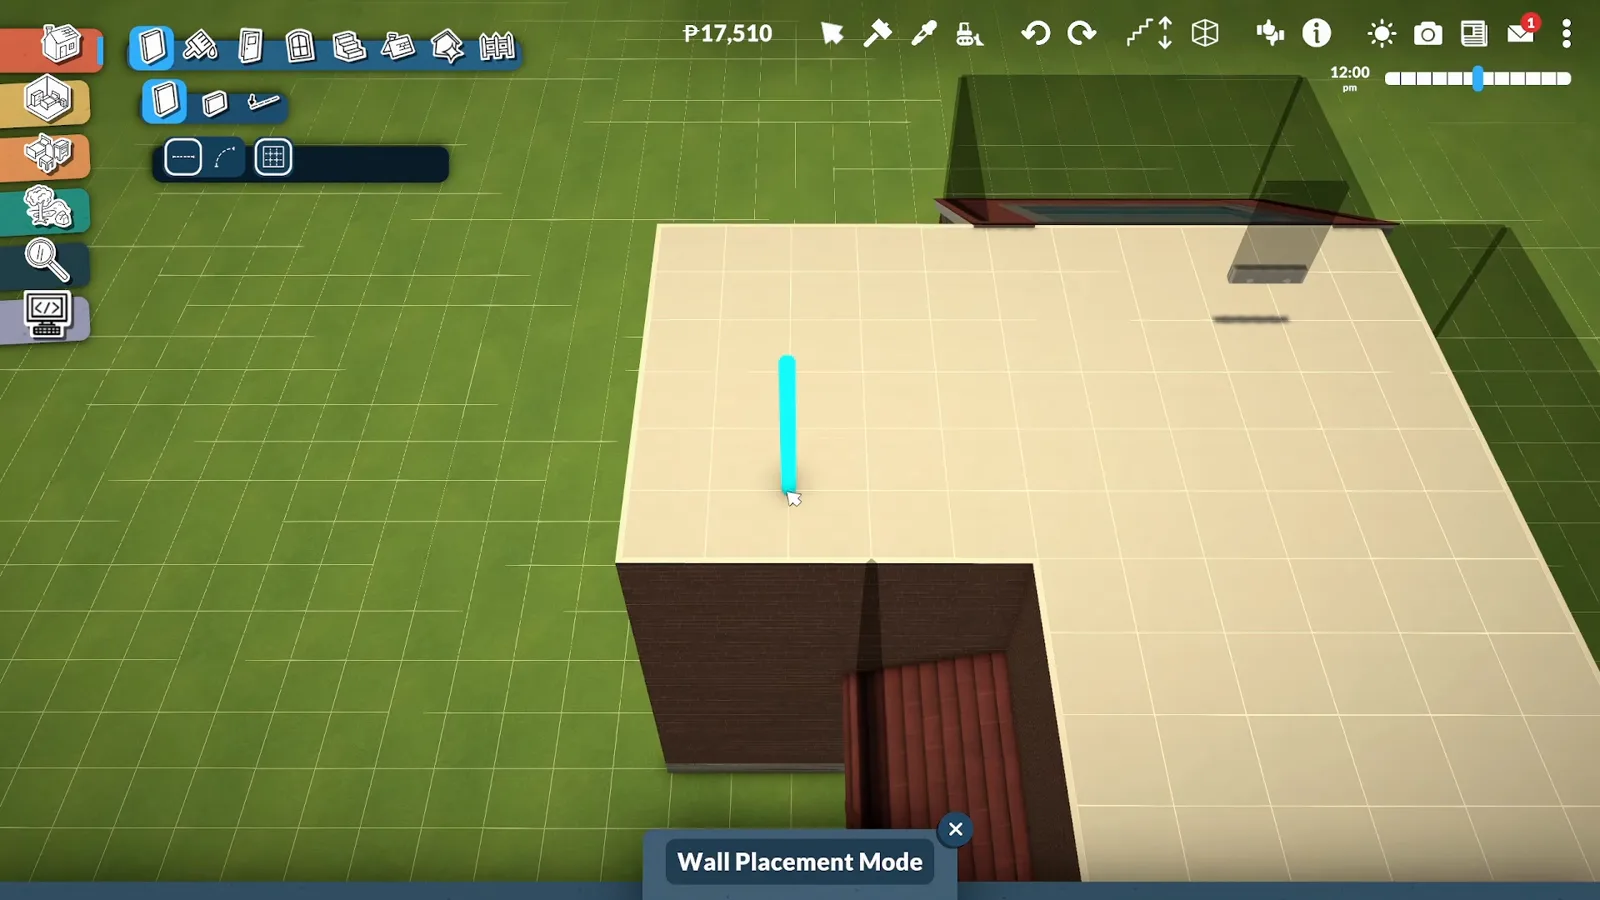
A dormer starts life as an ordinary room.Watch at 11:52 - 14
Cap it, then glaze it
Roof the little room with any piece and raise it slightly — it reads better sitting proud of the main plane. Builders top dormers with the round piece or a classic pointy cap. Finally, fit any window into the front wall and resize it freely. That's an attic window without a single mod.
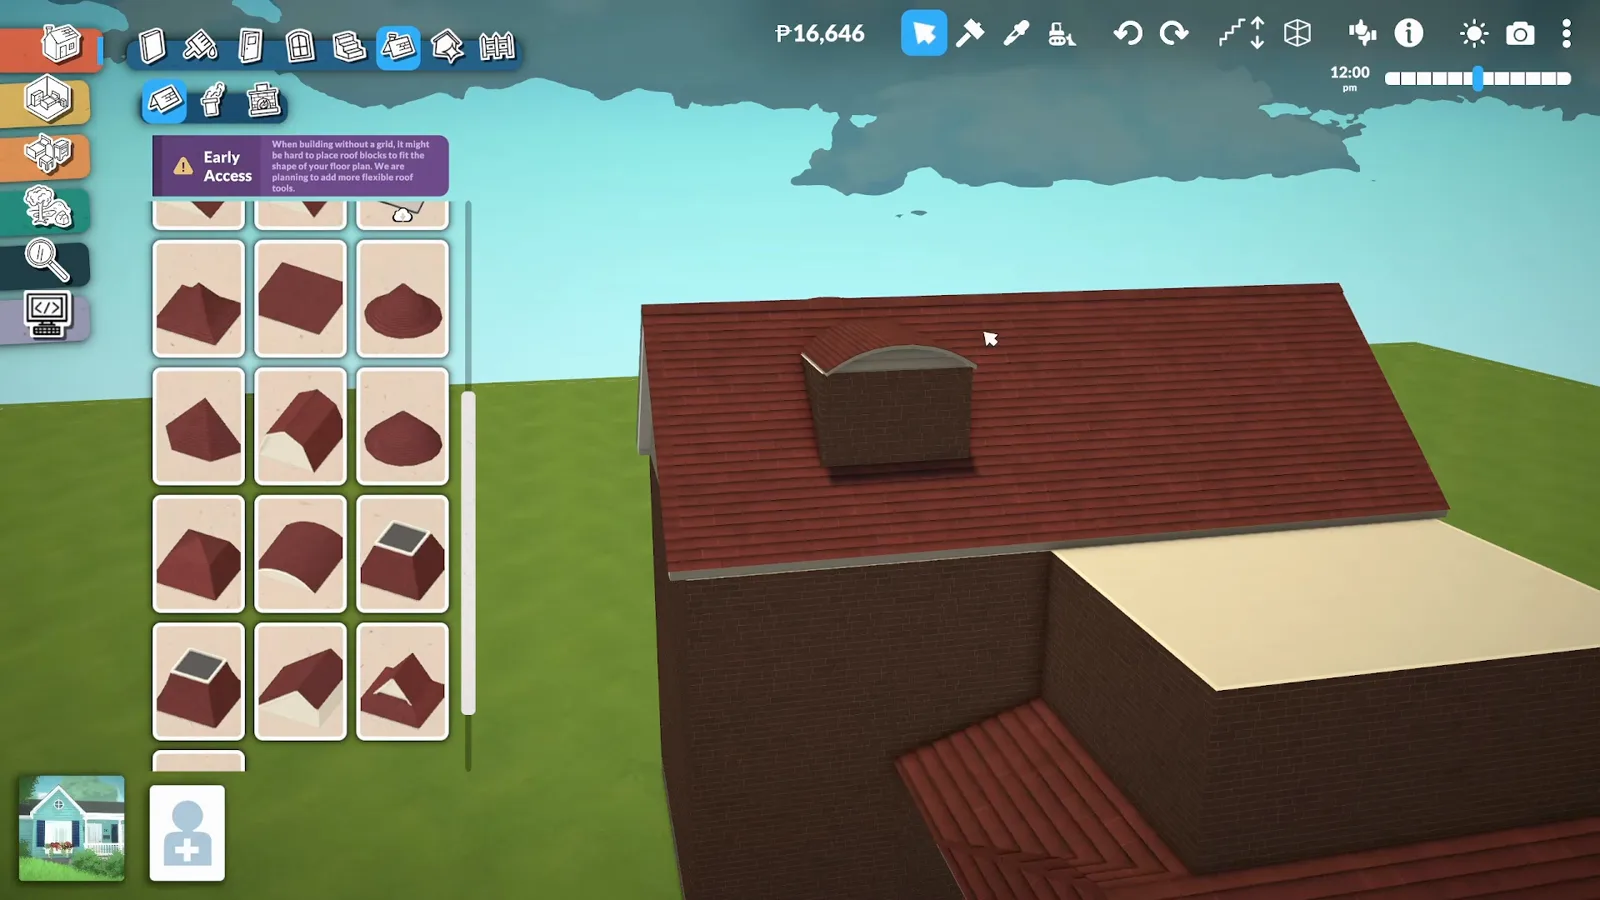
Round cap or pointy cap, any window you like.Watch at 12:40
Awkward footprints
Weird rooms are a puzzle of ordinary pieces
Octagonal bays and angled wings get no auto-roof and no special piece — you fit big pieces where they fit, slanted pieces where they don't, and accept that texture seams won't line up perfectly. It is genuinely just patience.
- 15
Fit weird rooms piece by piece
For angled wings and octagonal bays there's no auto-roof and no special part. Lay a large piece over the front, keep it touching the walls without clipping through, and bring its height down. Slanted pieces fill the back slopes; duplicate the ones that fit. If a shape fights you, try a different piece entirely — it's a puzzle, not a formula.
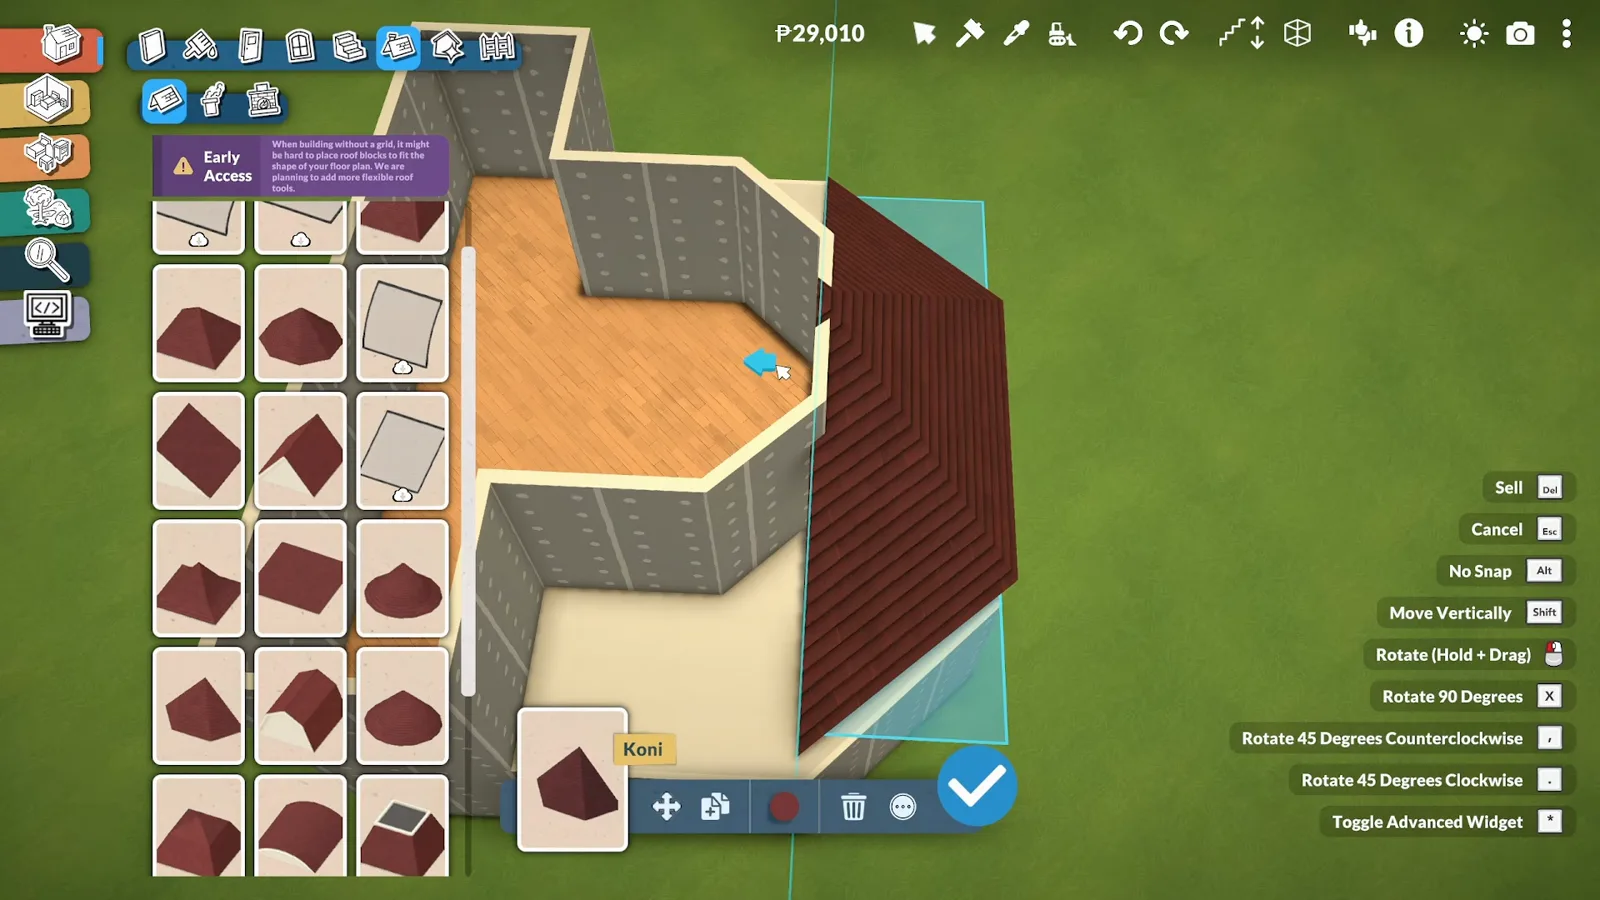
Odd roofs are ordinary pieces combined patiently.Watch at 13:50
Modern flat roofs
Skip the flat piece: a wall ring and a floor slab
The catalogue sells a flat roof piece, but the better-looking modern roof is made from walls and a floor — and its thickness is entirely your choice.
- 16
Modern flat roof: wall ring, slab, flatten
Draw a wall ring around the top of the house and bring it down so it's not tall. Then pull a floor slab up over the ring, click the floor, and press the flatten button to close the gap — a perfectly flat roof you can make thick or razor thin. The catalogue's flat piece works too; this just looks better.
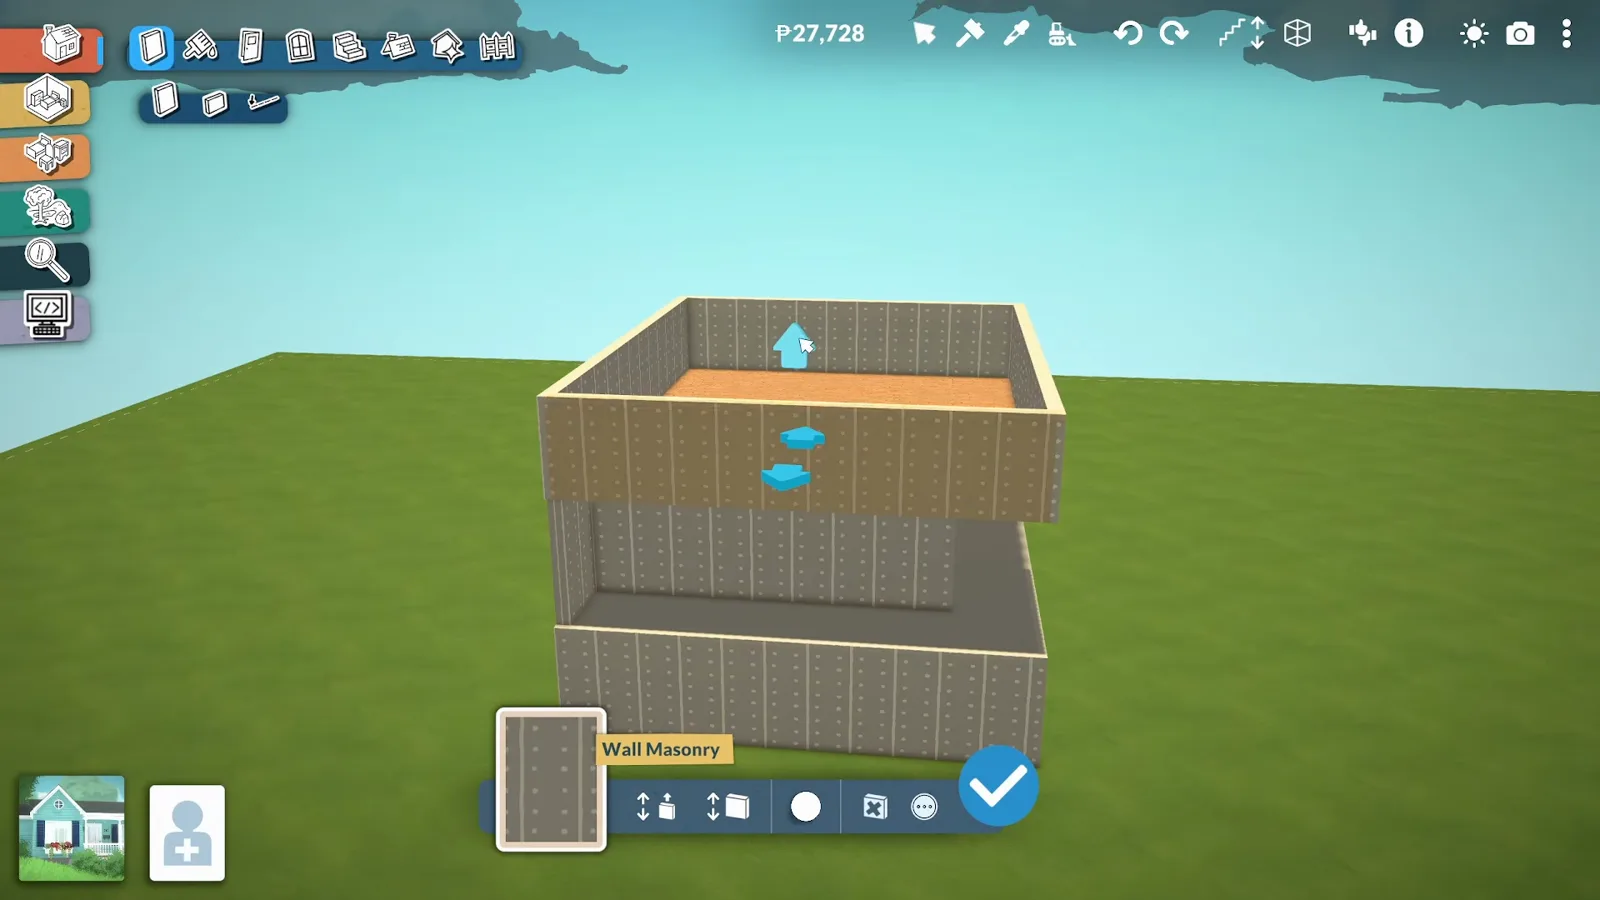
Wall ring, floor slab, flatten button.Watch at 15:50
Common roof mistakes
Four habits cause most of the broken roofs players ask about — three carried over from past fix requests, one specific to the advanced widget.
Placing the roof with Shift held
Holding Shift while placing drops the roof onto the floor instead of the ceiling, so it never hides when walls are lowered in wall view. Delete it, go up one floor, and place it without Shift so it anchors to the ceiling plane — a roof that won't disappear is almost always this.
Deleting walls before restoring the ceiling
If a room lost its ceiling, clearing the walls first can stop the game regenerating it. Select the ceiling plane and use the RestorePlatform icon, or redraw the room's walls over the existing ones so it counts as a new room.
Forcing one roof piece over a complex shape
Irregular floor plans clip badly under a single oversized piece. Combine smaller sections at matching pitches — the corner and odd-shape methods above — instead of stretching one piece over every wing.
Doing advanced-widget work early in the build
Placing more objects after widget work can make moved pieces — the skylight window especially — jump somewhere else. Build the shell and the rooms first; save skylights and dropped roofs for the end of the build.
Paralives roofs FAQ
- Why won't my Paralives roof disappear?
- It was almost certainly placed on a lower floor instead of the ceiling — often because Shift was held during placement. Delete the roof, go up one floor, and place it again so it anchors to the ceiling. Reloading the save also clears the occasional display glitch.
- How do I get my ceiling back in Paralives?
- Click the room's floor twice to select the ceiling plane, then use the RestorePlatform icon at the bottom of the screen. If that fails, redraw the room's walls over the existing ones — the game treats it as a new room and regenerates the ceiling.
- How do you build a roof in Paralives?
- Enclose the room with walls, go up one floor, open Roofs & Chimneys, and drag a piece over the room — the arrows adjust height, width and pitch. Every roof is ordinary pieces combined: this walkthrough covers colour, corners, skylights, dormers and flat roofs step by step.
- How do I stop my Paralives roof clipping through walls?
- Place the roof on the top floor, toggle on the advanced widget from the piece's three-dot menu, drag it down to the floor you want, then toggle the widget off. Know the trade-off: on that lower floor the piece turns invisible, and it may occasionally vanish when you reload the save.
- Can you make corner roofs in Paralives?
- There are no corner pieces in Early Access — the workaround is a pyramid piece capping the corner with half pieces running down each side, moved with Alt so nothing snaps and duplicated so the pitches match. It's how most wrap-around porches are built.
- Are there glass roofs in Paralives?
- Not in the base-game catalogue as of the current Early Access build. Glass roofs you see in screenshots are Workshop mods — the creator of this guide's source video maintains one. The official roof catalogue is still marked as unfinished, so expect more shapes in future updates.
- How do you make a flat roof in Paralives?
- Two ways. The catalogue sells a flat roof piece you drag like any other. The better-looking way: draw a low wall ring around the top of the house, pull a floor slab up over it, and press the floor's flatten button — you control the thickness, and the edge reads as a proper parapet.
Go deeper
Advanced transform widget
The gizmo behind the clipping fix and the skylight window — free placement, stretching and rotation for any object.
How rooms actually work
The separator tool that cuts the skylight opening also splits open plans into separately painted zones.
Half walls guide
The hidden support under every skylight window — build them, raise them and style them.
Curved walls guide
There are no curved roof pieces either — see what curved walls can and can't fake in a roofline.
Related guides
Walls guide
Fix walls that won't connect and master wall heights and visibility.
Floors guide
Paint indoor floors, outdoor patios and split-level sections — including the slab trick behind the flat roof.
Ceilings & skylights
Why ceilings vanish, how to restore them, and two working skylight builds.
Skylights
Cut a hole in the roof plane and tilt a window into it — the no-tool skylight method step by step.
Rooftop terrace
A rooftop apartment and terrace in sixteen steps — the build that deleted exactly these sloped pieces.
Build mode guide
Enter build mode, hotkeys and every tutorial index.