
The short version
Paramaker opens from the town map or the train tutorial's carriage. You fill in the ticket, sculpt body and face, dress your Para, spend seven personality points, then save the household to your library. The eight hidden features are flagged inside the steps.
- Create a New Household on the town map drops you into Paramaker - one household holds up to eight Paras.
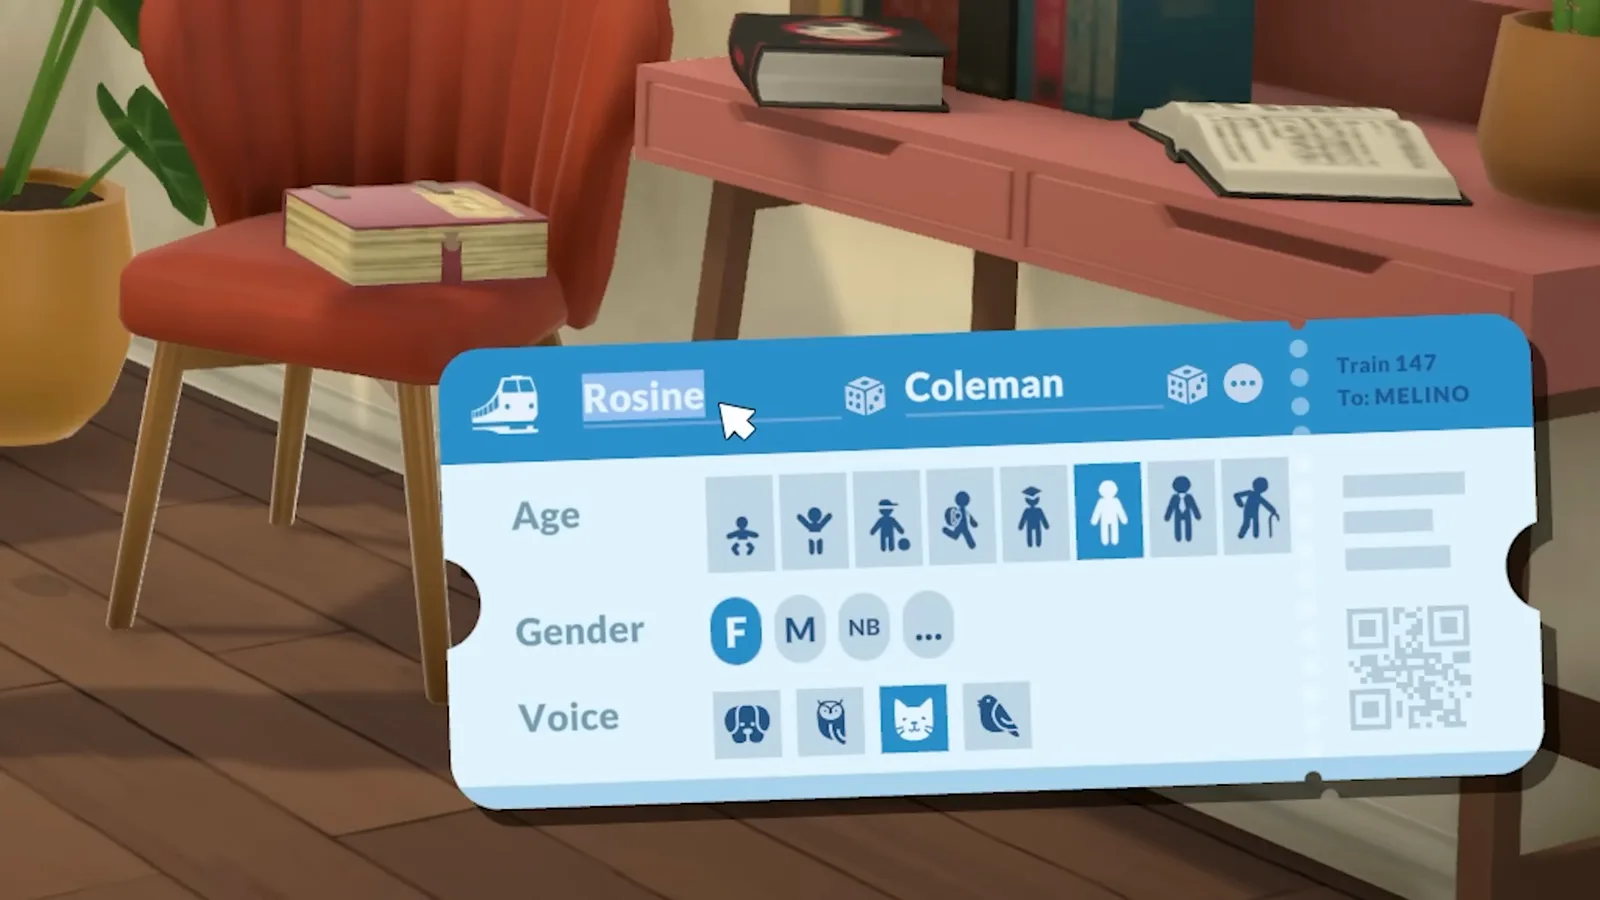
- The train ticket carries the name, gender, voice and all eight life stages from baby to elder.
- Hidden: three-dot buttons unlock nicknames, middle names, pronouns, pregnancy settings and item variants.
- Hidden: the plus at the end of any color row saves custom presets for skin, eyes, hair, makeup and clothes.
- Hidden: posture adjusts on the body sketch, and the eyes panel recolors one eye at a time.
- Hidden: outfits take printed patterns, base layers and tucked or untucked shirts.
- Seven personality points across four categories - a category left at zero causes negative outcomes.
- Wrap up with genetics, relationships and a biography, then save through the folder icon.
Part 1
Open Paramaker and set up the household
Two minutes of setup save an hour of confusion: get into the editor, understand the train ticket, and peek behind the two three-dot menus that most players never click.
- 1
Create a new household from the town map
Open the town map and press Create a New Household - Paramaker loads with an empty family roster. Still in the onboarding train tutorial? You can instead pick Create a New Household when you reach the carriage full of people. A plus icon at the bottom left of the editor adds members later, up to eight Paras per household, and portraits switch between them.
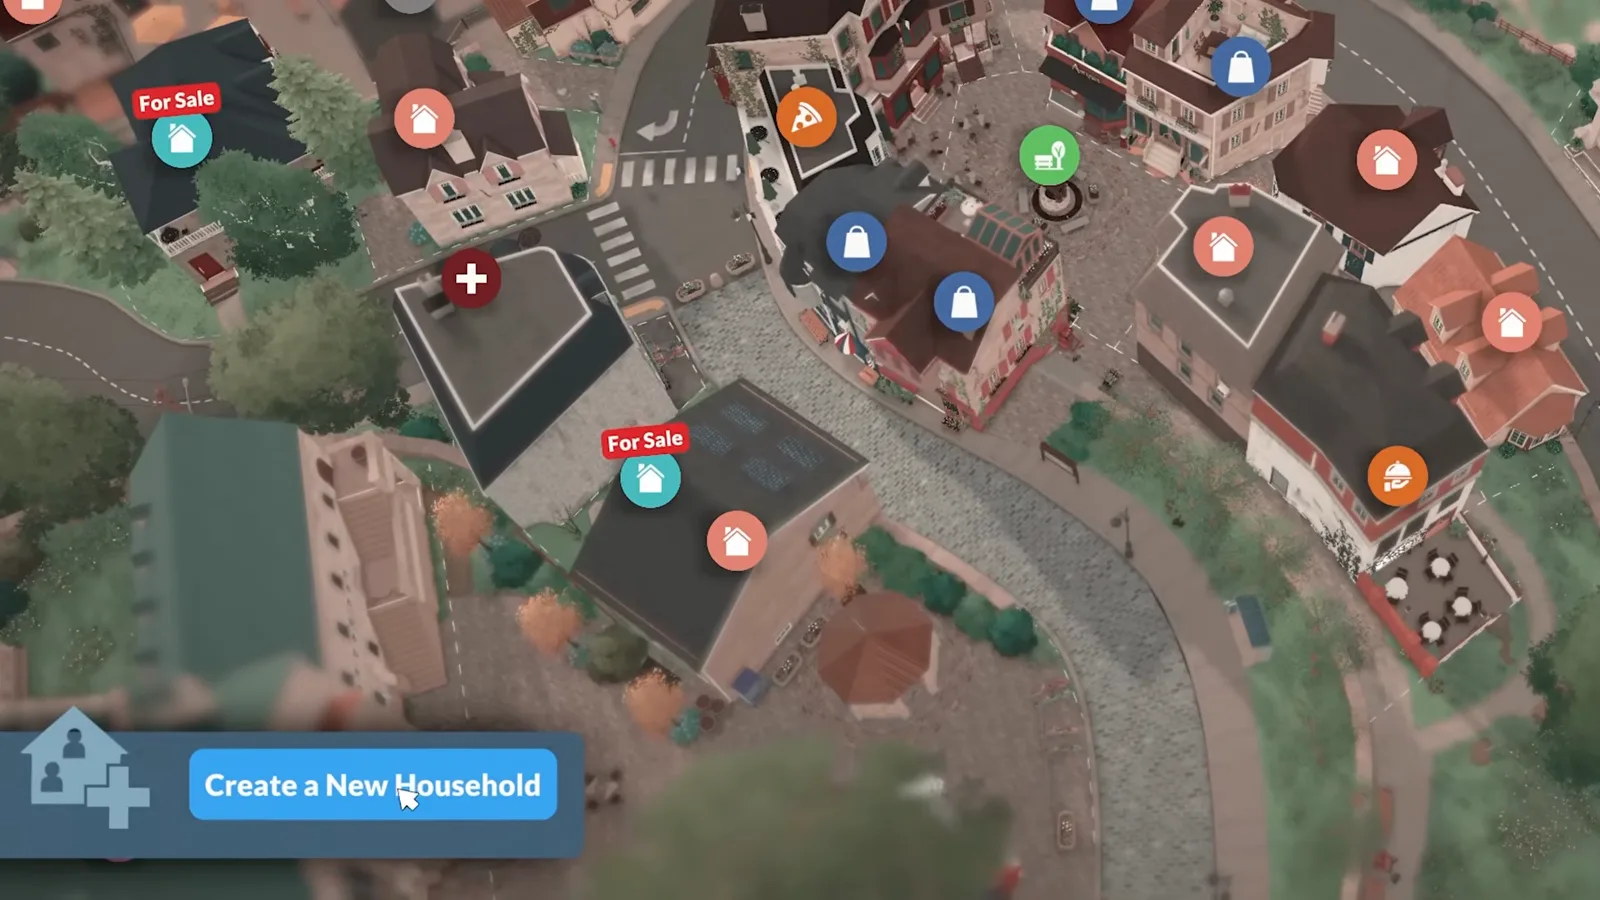
Create a New Household is the door into Paramaker, from the map or the tutorial carriage.Watch at 0:17 - 2
Fill in the train ticket
The basics live on the train ticket in the bottom right: first and last name - each with its own randomize dice - plus gender, voice and a life stage running from baby and toddler through child, preteen, teen and young adult up to adult and elder. Set the stage first; the editor adapts to it. The arrows at the top of the screen undo or redo any change you regret.
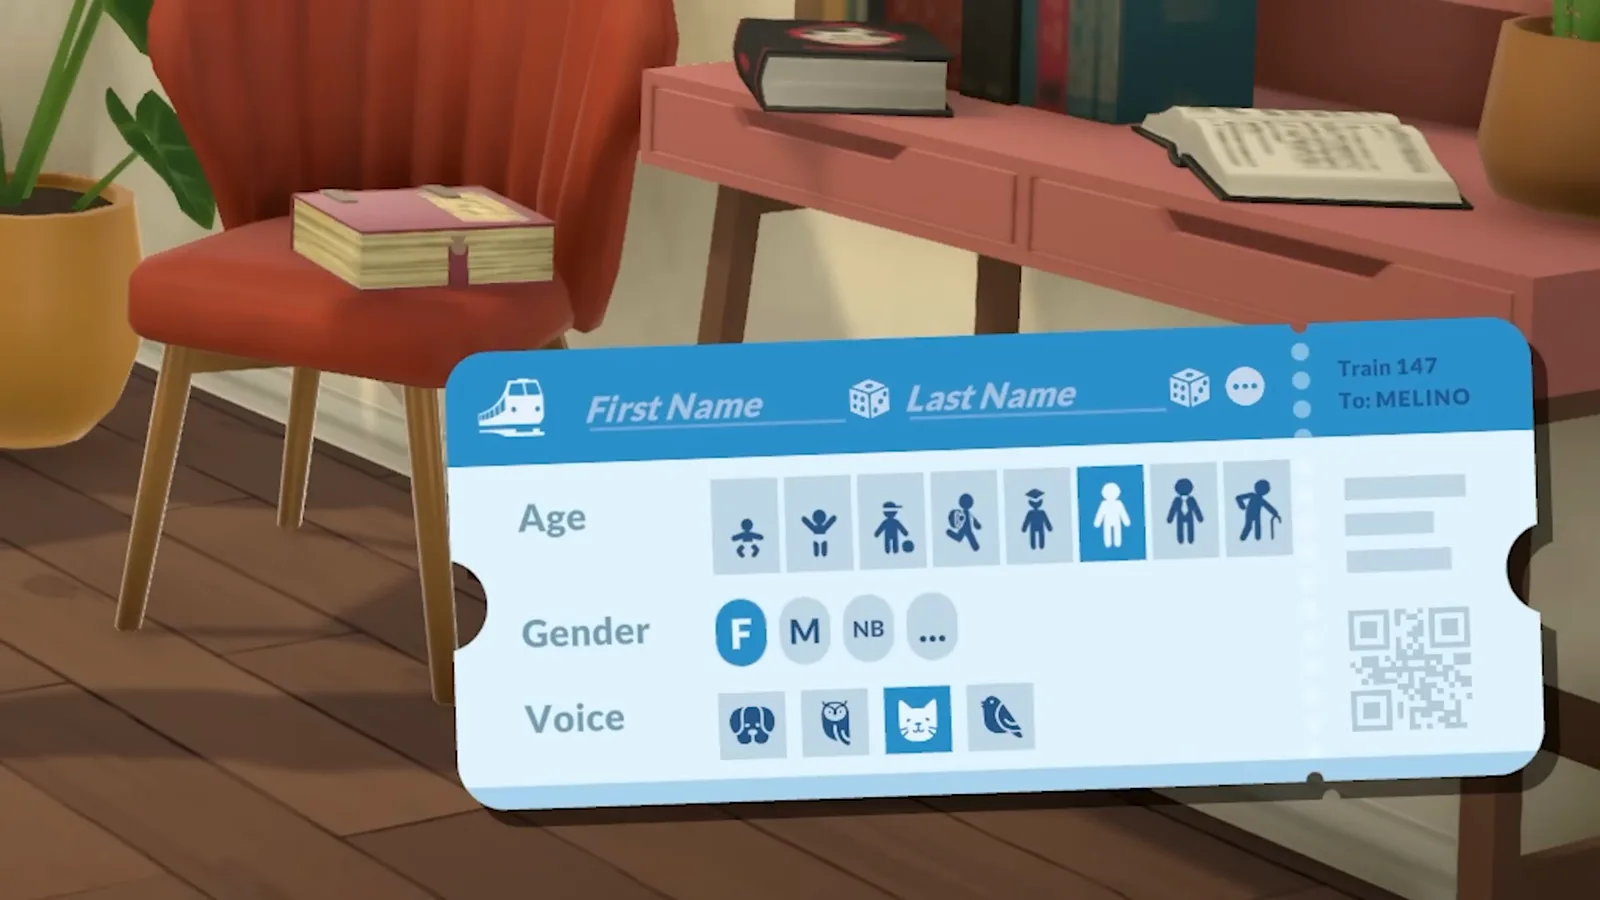
Name, gender, voice and one of eight life stages - all on one ticket.Watch at 0:35 - 3
Hidden 1: nicknames, middle names, name order
A tiny three-dot icon sits to the right of the last name on the ticket. It opens a menu where you can tick a nickname and type one in, add a middle name, or flip the display so the last name comes first. Most players never notice the button exists - it is the first of the eight hidden features in this walkthrough.
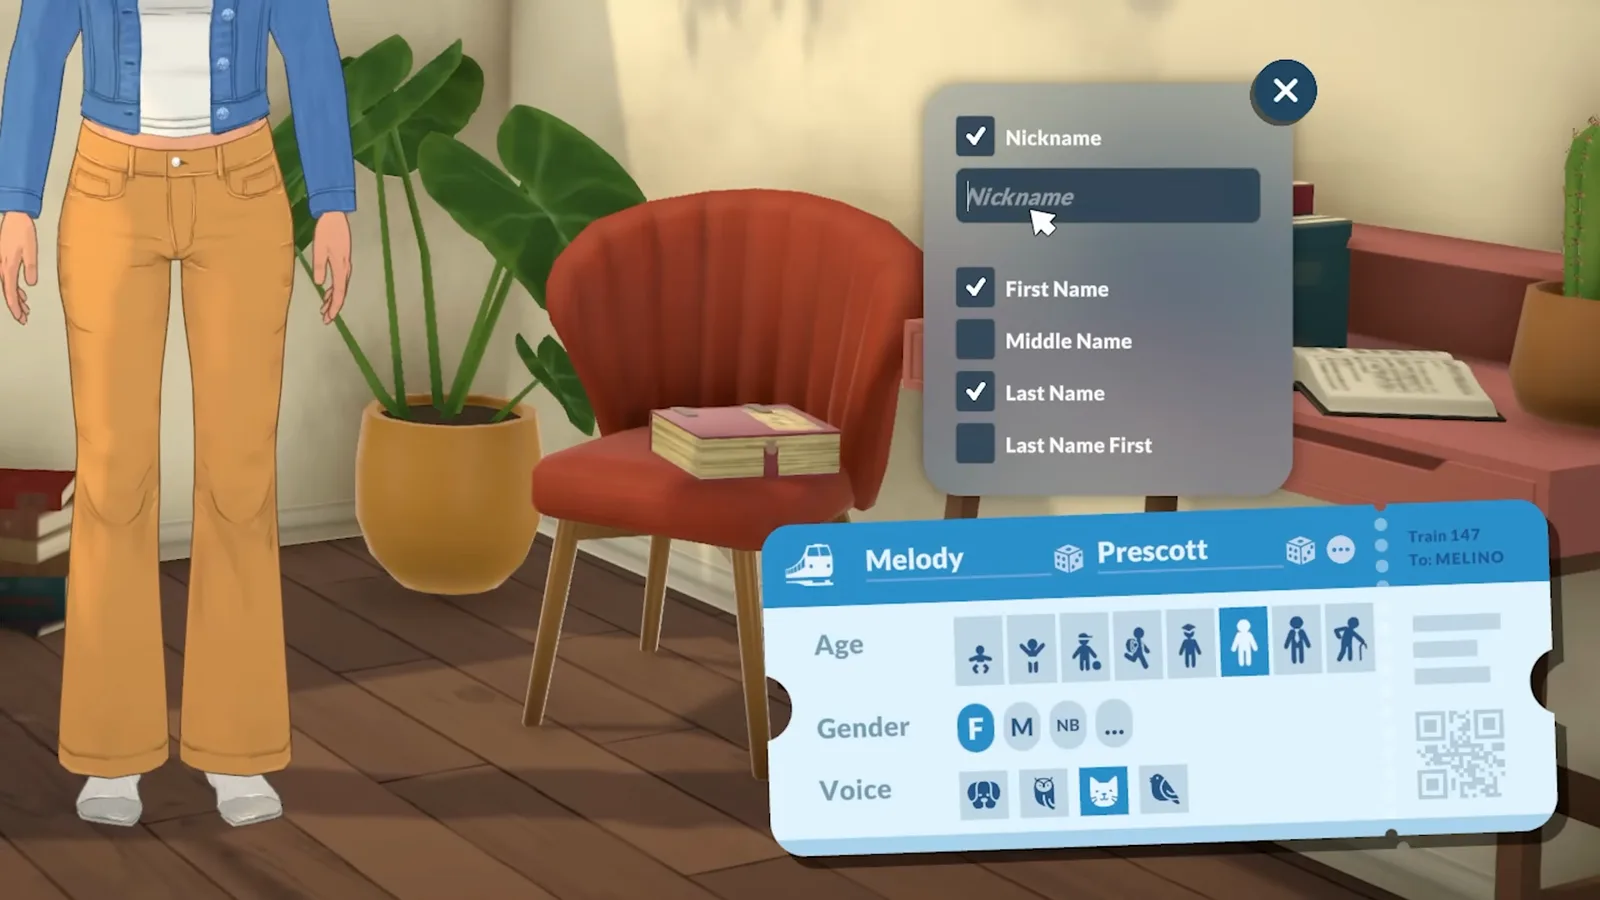
The three-dot menu next to the last name adds a nickname, middle name or surname-first order.Watch at 1:18 - 4
The gender row hides a second menu
Same hidden-feature stop, second button: inside the gender row another set of three dots opens the Advanced Personality panel. Write custom pronouns, choose whether your Para can get pregnant, get others pregnant or neither, and decide whether they can breastfeed. The panel even sets what triggers jealousy in a relationship, from seeing a partner kiss someone else to never getting jealous at all.
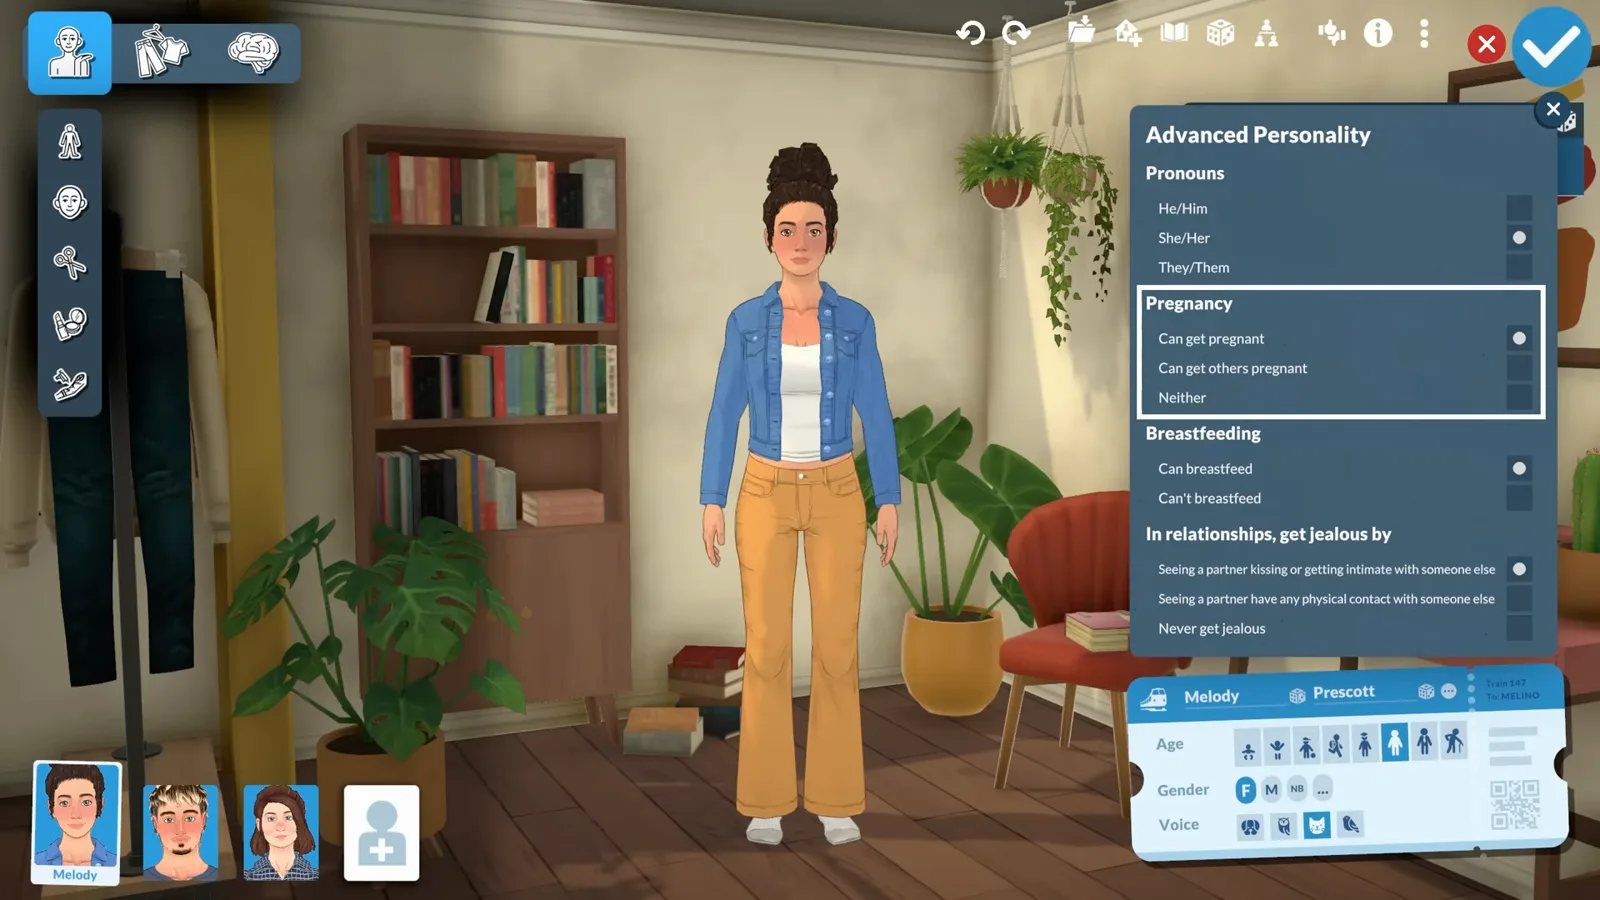
Advanced Personality covers pronouns, pregnancy, breastfeeding and jealousy triggers.Watch at 1:32
Part 2
Shape the body, skin and face
Paramaker's sculpting lives in three places - the color palettes, the body sketch and the face diagrams - and each one hides its own extra feature.
- 5
Hidden 2: brew your own color presets
On the Body tab, scroll the skin swatches to the end and press the plus - Style Creation opens with a color wheel for mixing a brand-new preset. Advanced Mode splits the color into parts like highlights, shadows, blush, lips and palms; untick it to pick one flat color and let the game shade the rest. The same plus returns later for eyes, hair, makeup and clothing.
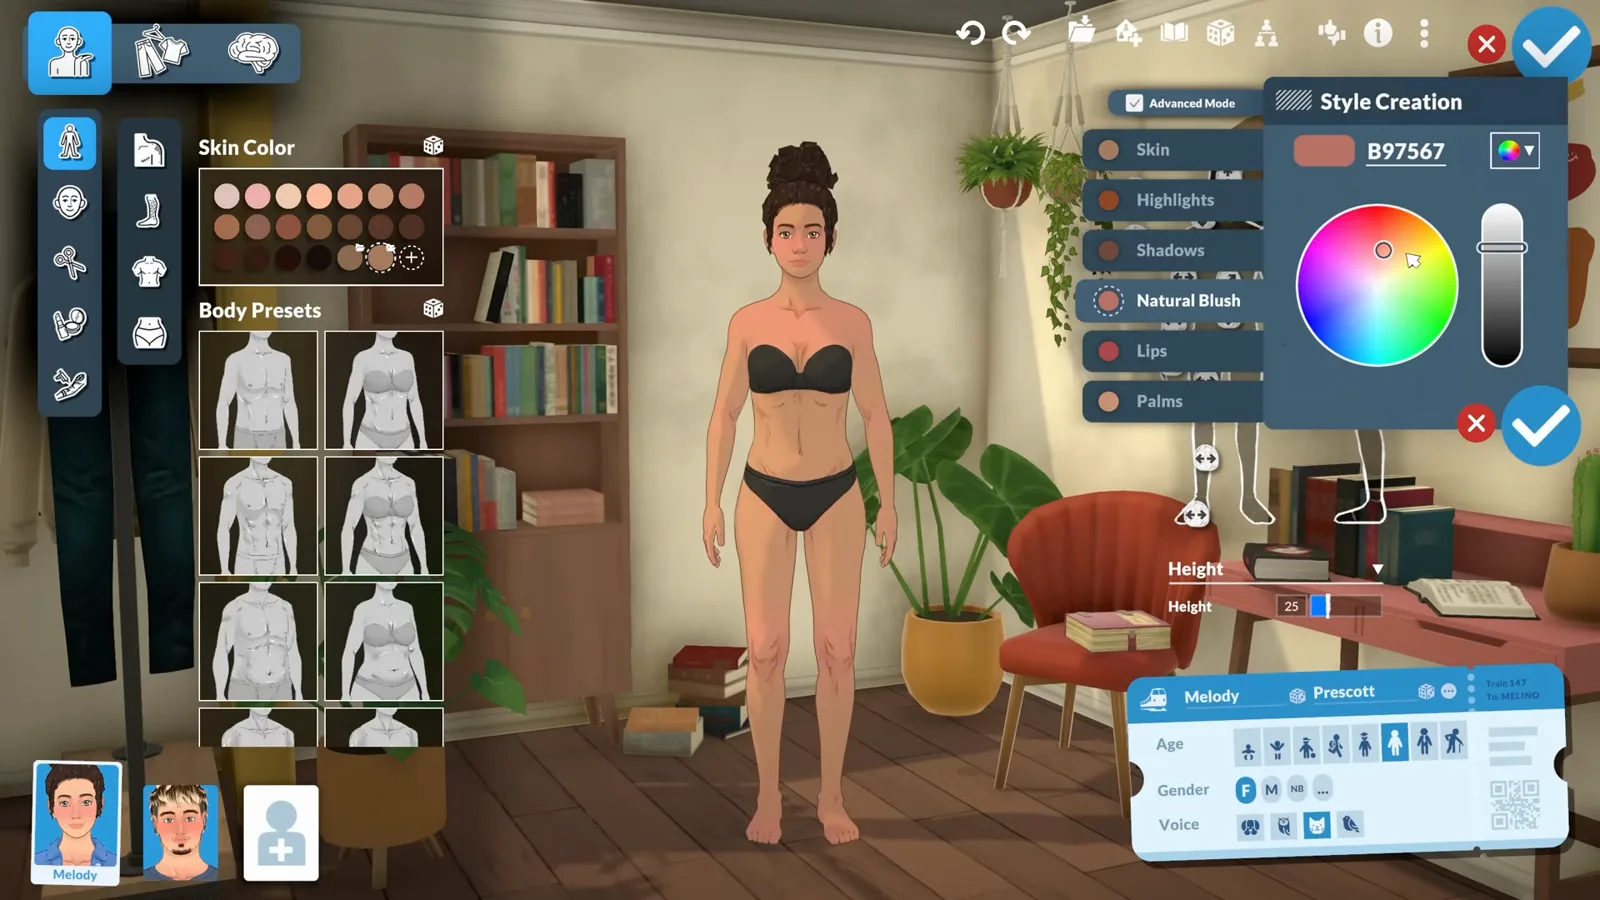
Style Creation starts in Advanced Mode; untick it for a single flat color.Watch at 3:37 - 6
Height, muscles, body fat - and posture
The sketched figure to the right of the Body tab is a full sculpting diagram. The topmost arrows set your Para's height, two buttons on the left drag overall muscle definition and body fat up or down, and the remaining handles refine single parts such as calves. The button with the circular arrows - hidden feature three - adjusts posture, so two Paras can carry themselves differently even with identical bodies.
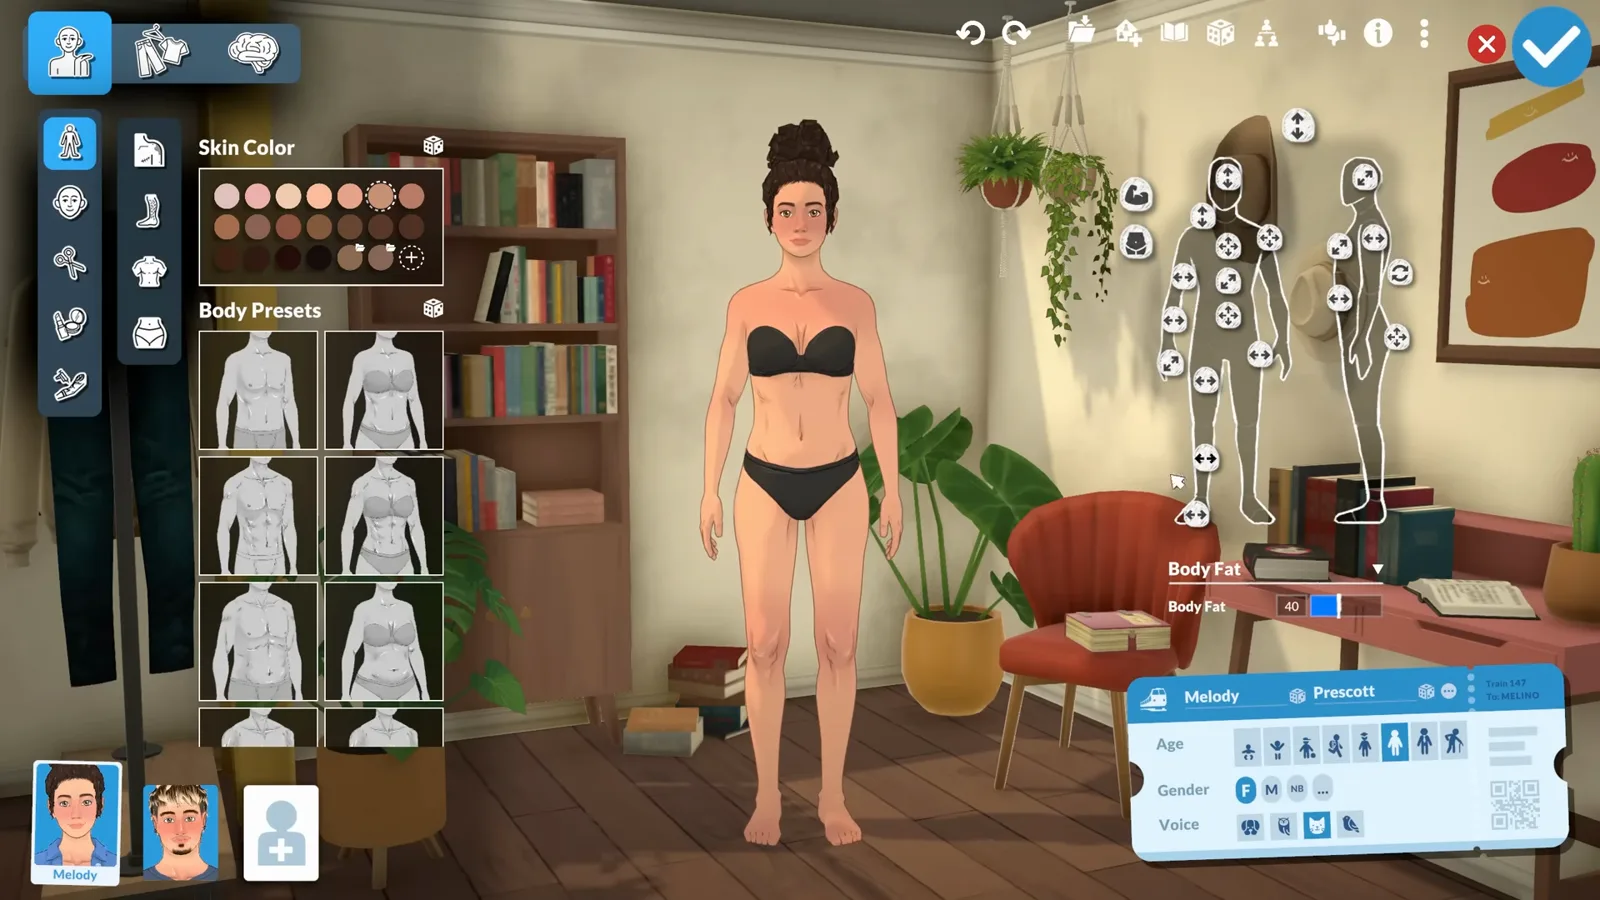
The mannequin sketch handles height, muscles, fat and the easily missed posture dial.Watch at 4:16 - 7
Hidden 4: two eyes, two colors
In the eyes panel, the split-square icon next to the dice expands into two target buttons - one per eye - so you can recolor them separately and give your Para heterochromia. New eye colors save through the same preset system. Around it sit subpanels for eyebrow shapes, eyelashes, teeth under the mouth section, and facial hair that matches the hair color until you untick the match box.
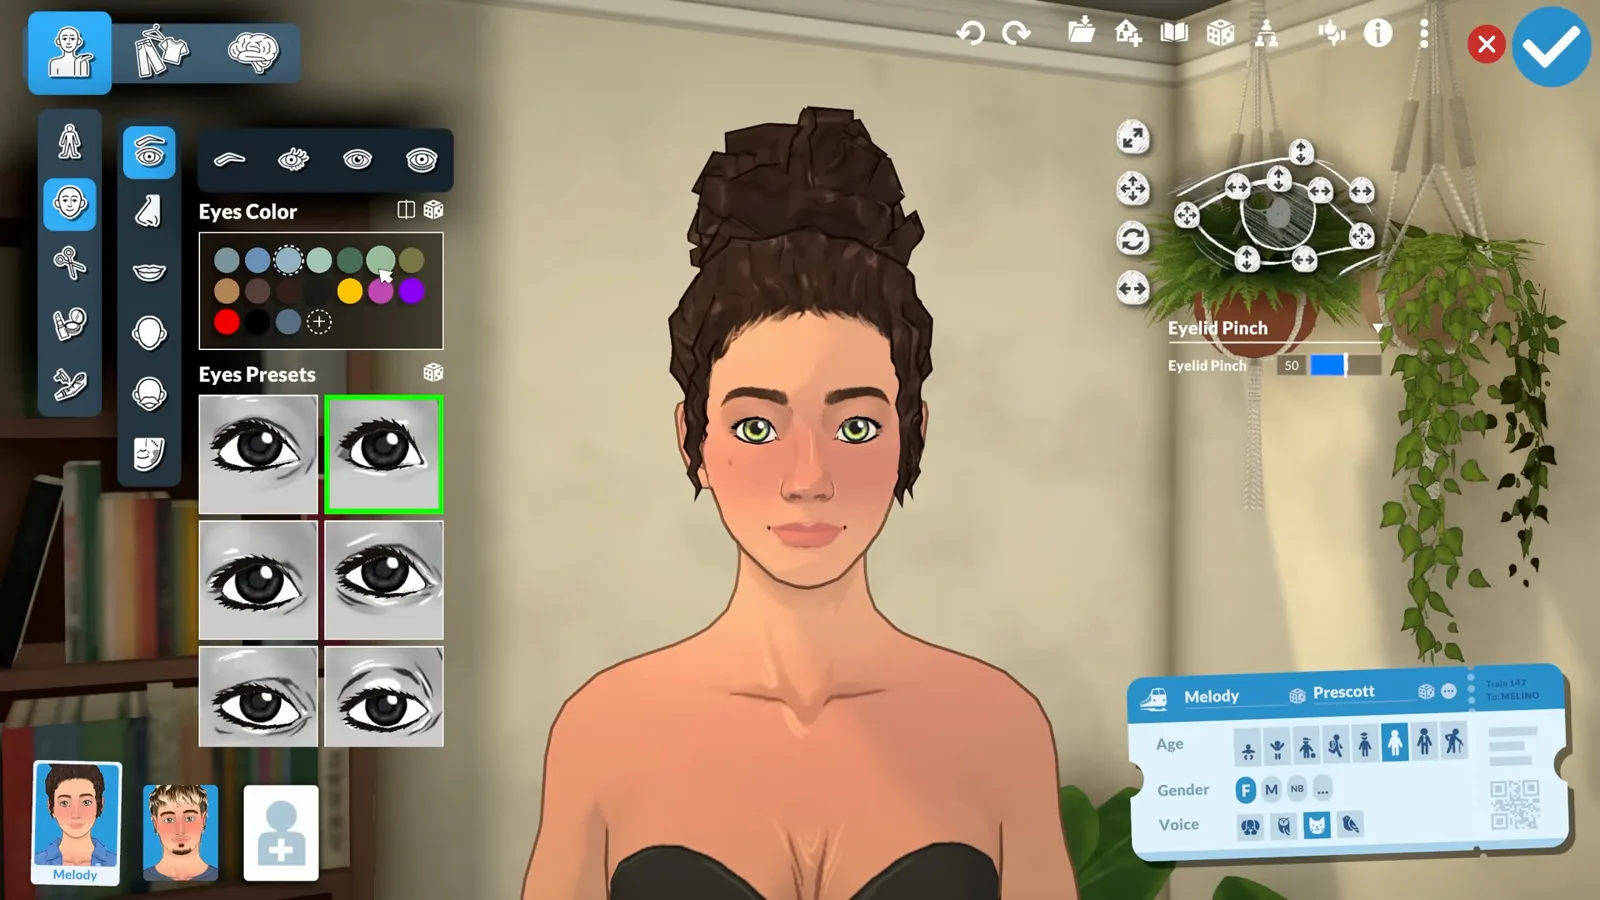
The split-square button next to the dice targets the left or right eye for recoloring.Watch at 5:21
Part 3
Tattoos and a full wardrobe
Clothing is where Paramaker goes deepest: tattoos you can drag into place, patterns printed on fabric, layers under jackets and shirts that tuck in.
- 8
Place tattoos with a positioning tool
Pick a body area from the row of part icons, choose a design, then give it a color. The four-arrow button opens a positioning panel: drag the tattoo anywhere on the body and fine-tune it with the Position, Rotation, Flip and Scale sliders. Watch for the three-dot icon on a tattoo tile - hidden feature five - which means the design has extra variants.
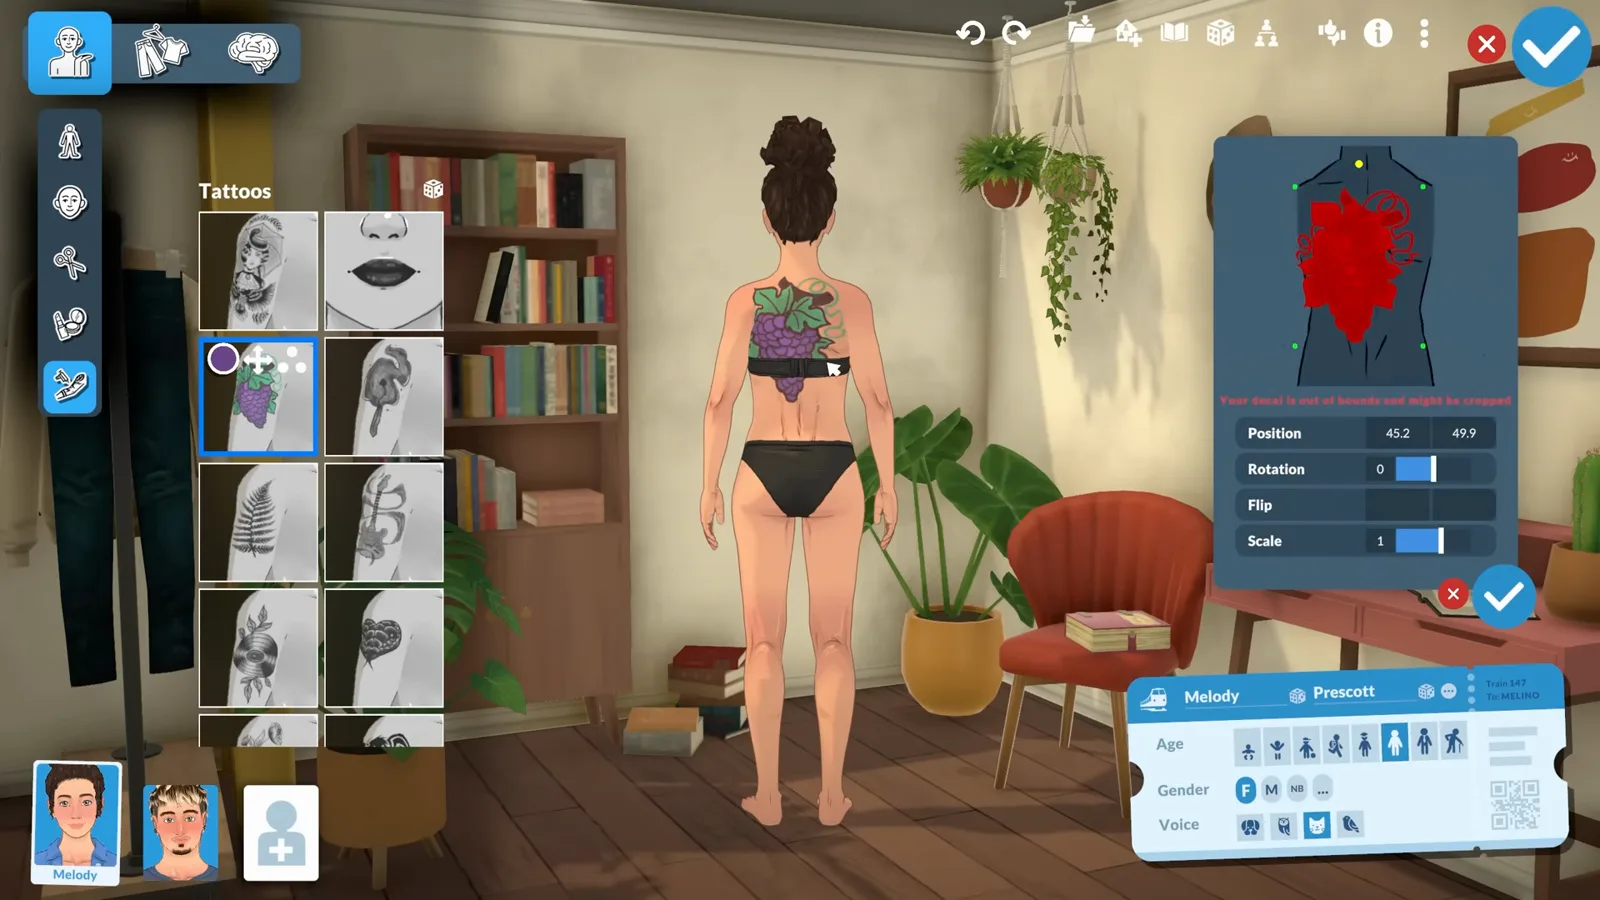
The positioning panel moves, rotates, flips and scales the tattoo; three dots on a tile mean more variants.Watch at 7:37 - 9
Hidden 6: print patterns on clothes
Every clothing color wheel does more than flat colors: the large square to the left of the main color circle opens a Choose a pattern board with checks, stripes, waves and florals. Combine it with per-part swatches - this jacket colors its fabric and its buttons separately - and one garment can carry a whole color scheme.
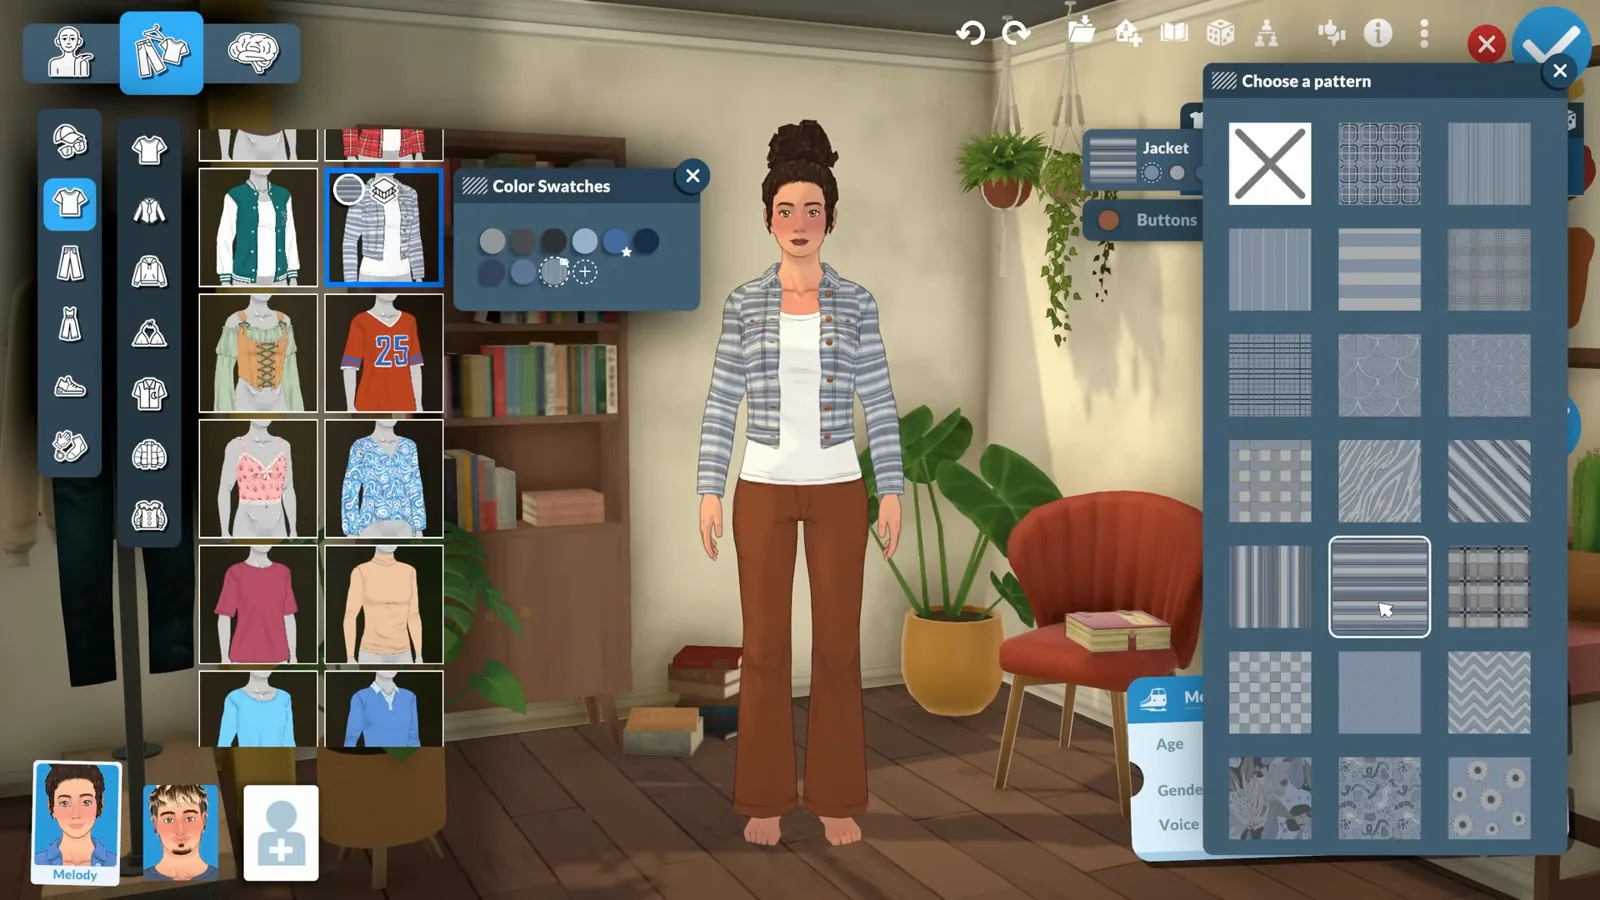
Choose a pattern sits left of the color circle and prints plaid, stripes, waves and more onto the garment.Watch at 9:21 - 10
Hidden 7: wear something underneath
Outfit tiles that show three stacked squares accept a base layer underneath. Click the icon and a tray of tanks, tees and shirts slides out - pick one and it sits under the jacket or hoodie your Para already wears. It is the fastest way to turn one cardigan into several distinct outfits.
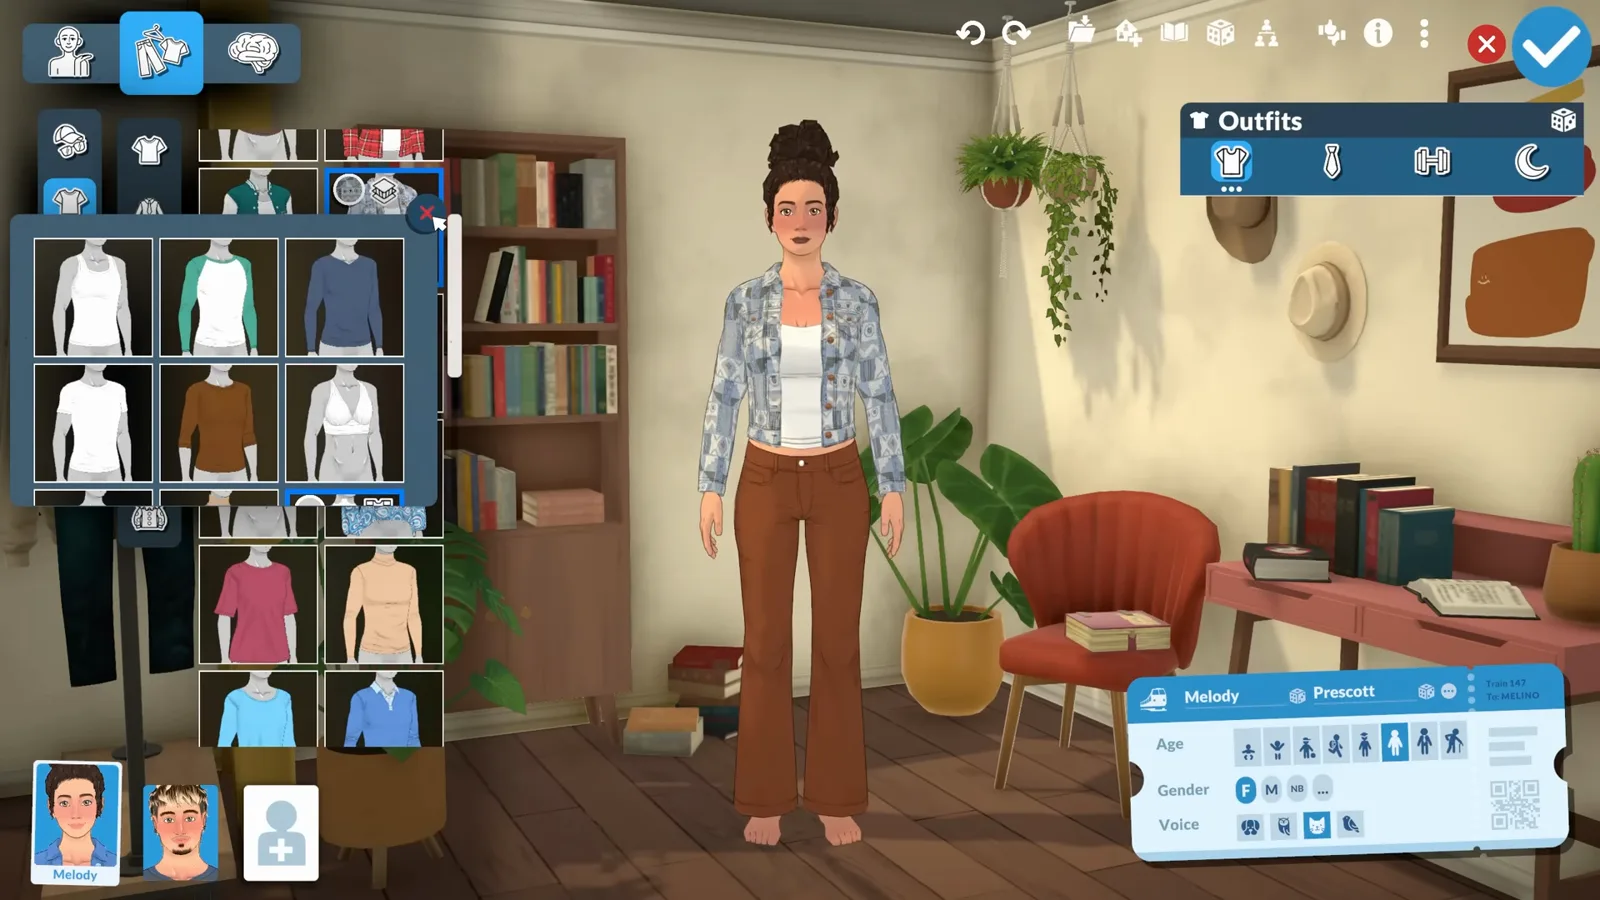
Three stacked squares on a clothing tile mean the outfit can take a base layer underneath.Watch at 9:44 - 11
Hidden 8: tuck or untuck any shirt
The last hidden feature needs pants: when your Para wears them, shirts with a small t-shirt-and-pants icon toggle tucked or untucked, and the tooltip on the tile says exactly that. Clothing itself is fully non-binary - every outfit fits every Para - while glasses, facial piercings, jewelry, nails and underwear live in the sub-panels above and below the main catalog.
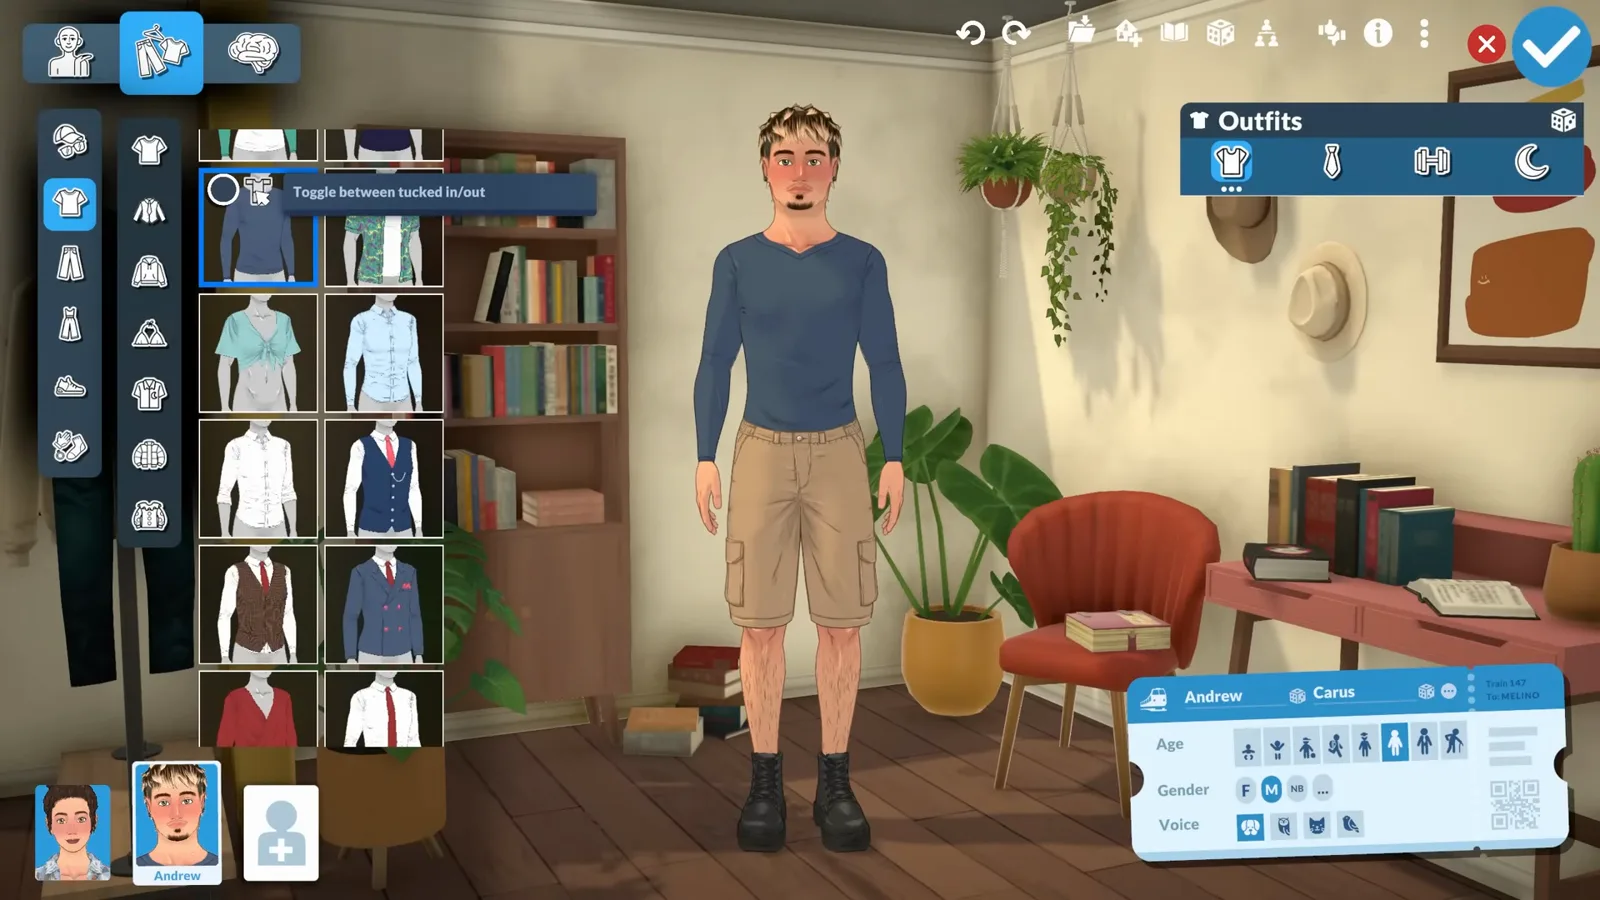
The Toggle between tucked in/out tooltip appears on shirts while your Para is wearing pants.Watch at 9:53
Part 4
Personality, genetics and saving
Looks are half a Para. Points, vibes and talents give them character, genetics can grow a child from two parents, and the toolbar sends the finished family into your game.
- 12
Spend seven points, pick vibe, perk, talent
The rightmost tab at the top left opens personality. Seven points split across Physique, Mind, Creativity and Charisma - and a category left at zero shows a warning triangle, because it leads to negative outcomes. Below the bars, choose a vibe (a general mood trait), a social perk and a talent; a deliberate good-at-nothing option exists too. The Lifestyles section toggles vegetarianism and sets sleeping and cleaning habits.
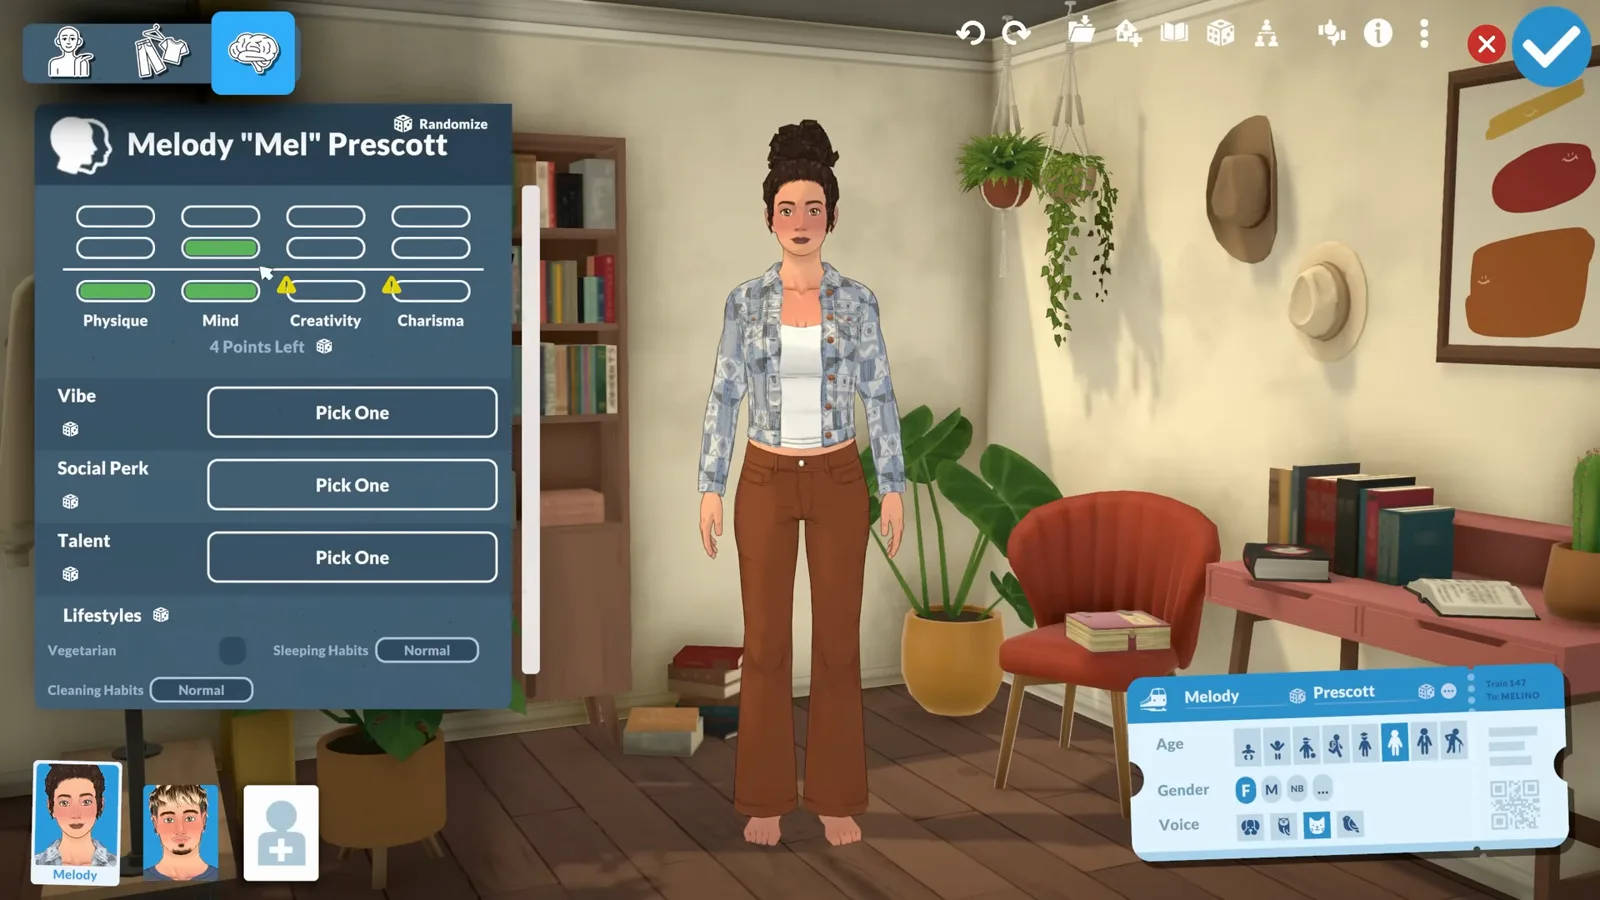
Seven points, four categories - warning triangles mark categories left at zero.Watch at 10:41 - 13
Grow a Para from two parents
When adding a household member, choose Create From Genetics instead of an empty Para. Pick two parents, set gender and life stage, then reroll Randomize until the face, height and body structure look right - clothing comes out random, so expect a wardrobe pass afterwards. Confirm with the big blue check and the child joins the roster like any other Para.
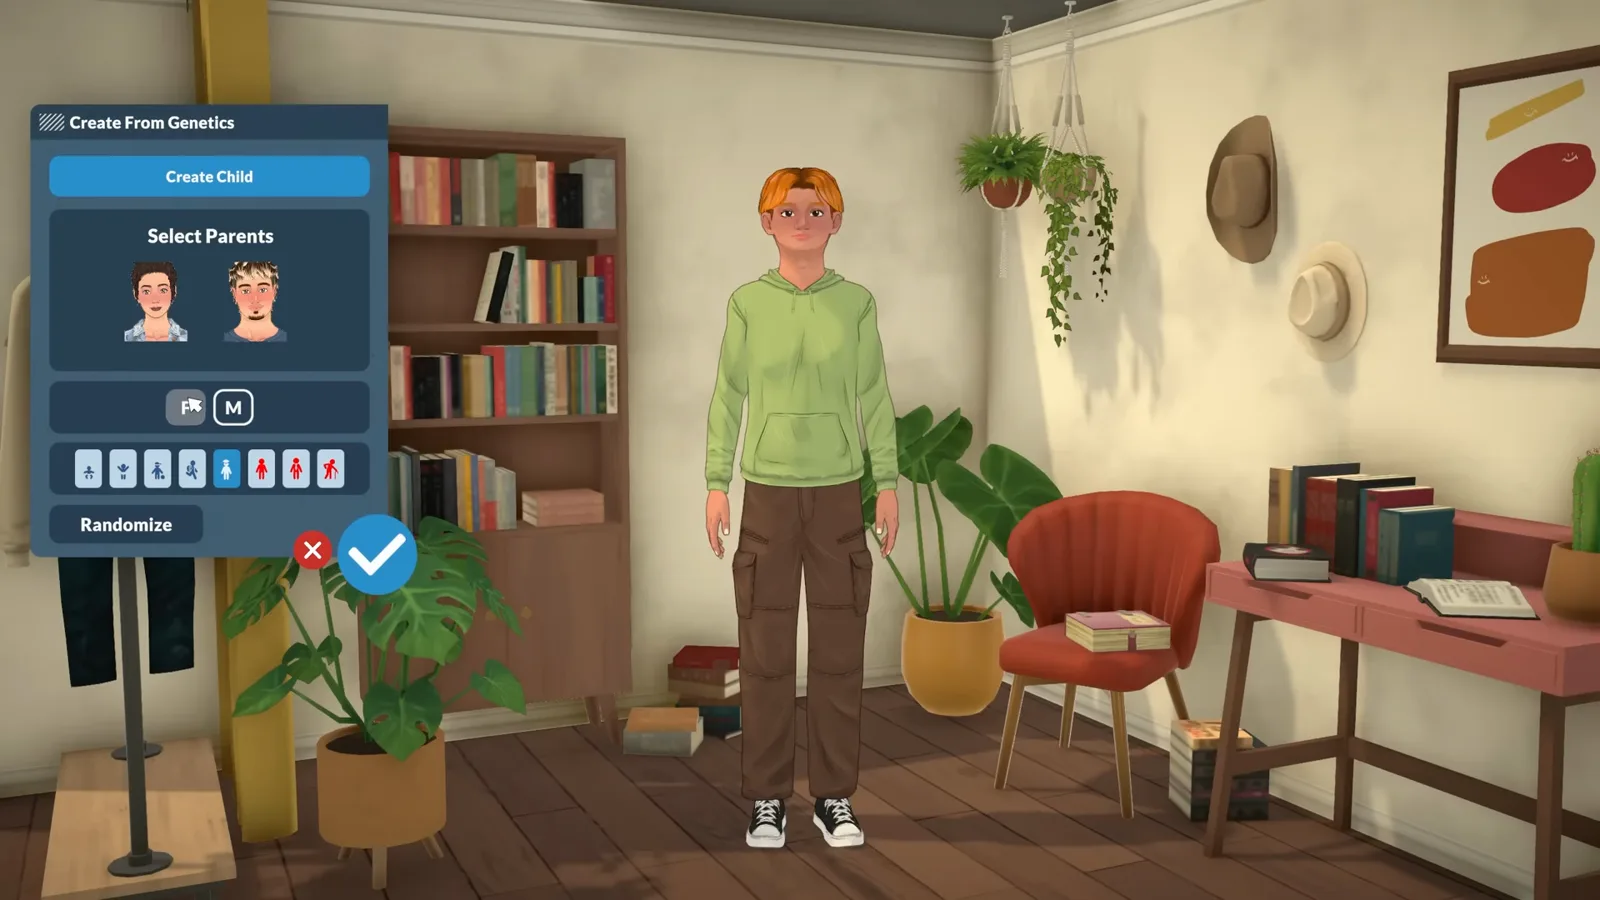
Select Parents, set gender and life stage, then reroll until the inherited face works.Watch at 11:29 - 14
Biography, relationships and the library save
Before leaving Paramaker, the family-tree icon in the top toolbar links your Paras with relationships - editing there is flagged as early access and still feels rough, and a right-click backs you out. The book icon beside it opens a biography for the whole household. When everything sits right, the folder icon saves the household to your library and the large blue check confirms it, sending you on to choose a lot.
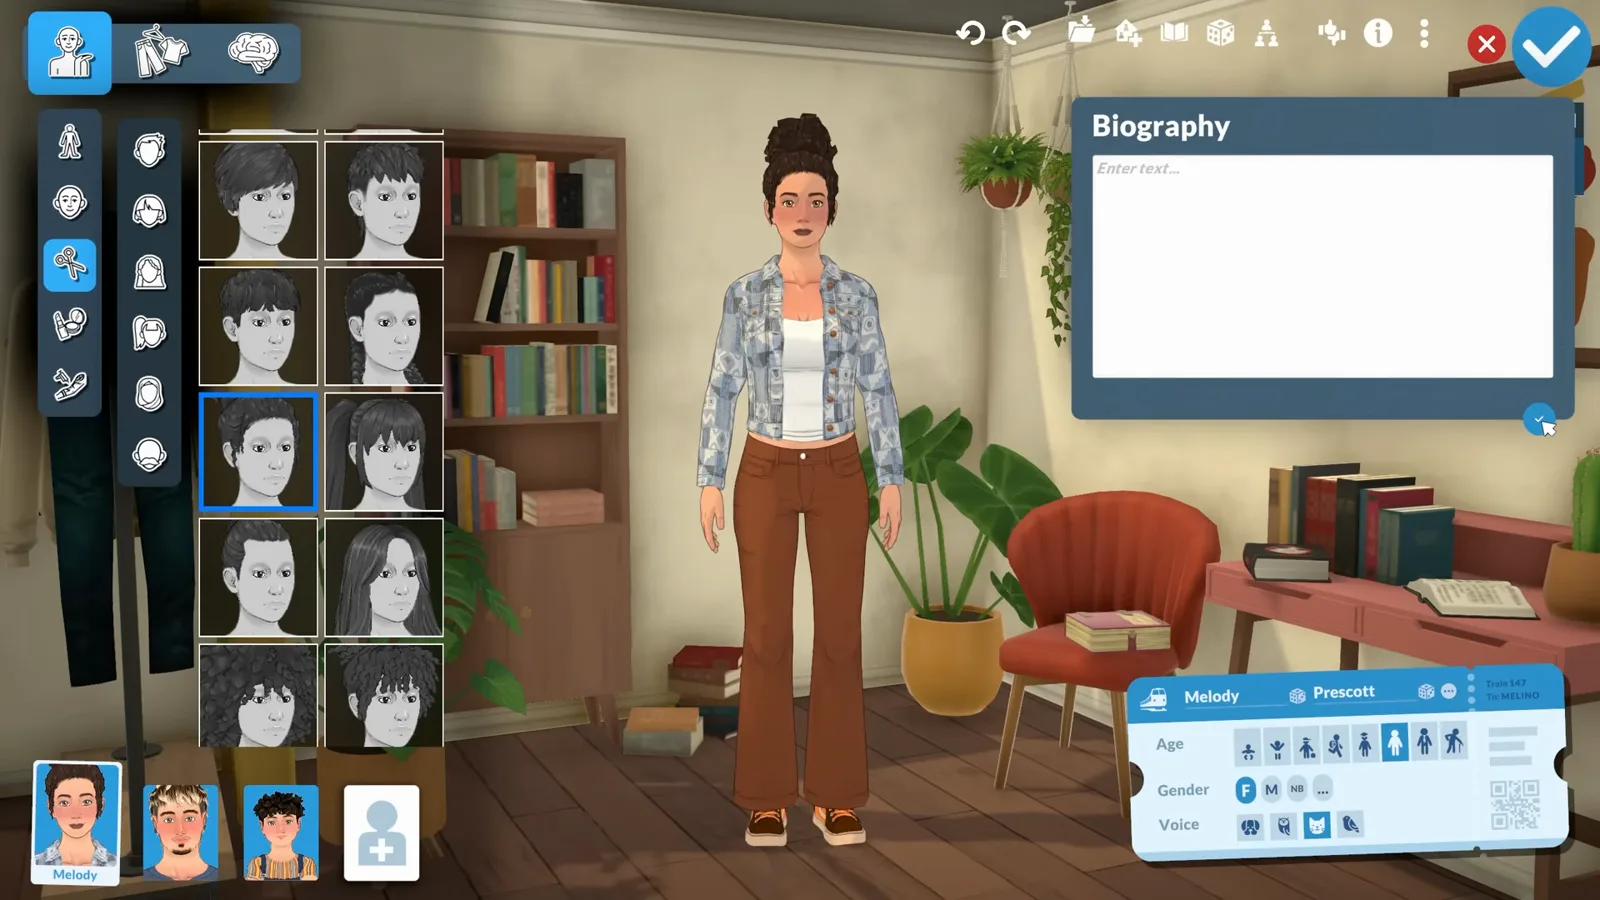
Write the household biography, then save the family to your library from the folder icon.Watch at 12:45
Rotating your Para in the Paramaker
There is no rotate button to look for: press on your Para and drag, and they turn with the cursor — one smooth horizontal drag takes them from a side profile round to facing you. The camera stays where it is while the model turns, and the scroll wheel zooms in for close-up work on eyes, nose or jewellery. It is the same editor with the same controls whether you open it from Create a Household or from editing an existing Para.
Use the angles deliberately. Nose-bridge and profile-facing sliders read best from the side, and the face panels carry an in-game guideline marking which sliders want a profile view and which want you head-on. The dotted gizmo that appears around an eye or the nose moves that one feature only — dragging it never turns the whole Para.
Two boundaries worth knowing. The X, comma and period keys that rotate objects in Build Mode are object controls there, not Paramaker controls — nothing you press turns your Para; only the drag does. And no official source names which mouse button the drag uses (verified on 0.1.8b footage at 6:04 of MuirlySims' Paramaker deep dive — the gesture is confirmed, the button is not). If one button does not grab your Para, try the other.
Paramaker tutorial FAQ
- How many Paras can one household hold?
- Up to eight. Add members with the plus icon at the bottom left of Paramaker, switch between them by clicking their portrait cards, and delete one by hovering the portrait and pressing the red X.
- Can you create a Para from two existing parents?
- Yes - Create From Genetics lets you pick two parents, set gender and life stage, and reroll until the inherited face, height and body structure look right. Clothing comes out random, so plan a wardrobe pass afterwards.
- Does clothing depend on your Para's gender?
- No. Every outfit and hairstyle in Paramaker is non-binary, so any Para can wear anything from the full catalog without unlock conditions.
- How do you save the Para you just made?
- Click the folder icon in the top right toolbar to store the household in your library, then confirm with the large blue check - the game moves you on to choosing a lot for the family.
- How do you rotate your Para in Create a Household (the Paramaker)?
- Drag on your Para and they spin with the cursor: one horizontal drag takes them from a side profile to facing you, while the camera stays still. Scroll to zoom. The X, comma and period keys you may know from Build Mode rotate objects there — the Paramaker has no rotate key, only the drag. Verified against 0.1.8b footage; the specific mouse button is not documented.
- Can you zoom in on your Para's face in the Paramaker?
- Yes — the scroll wheel zooms the Paramaker camera, which is how creators shoot eye and make-up close-ups. There is no dedicated magnifier for the smallest details, so for nails or rings the practical route is to finish the Para and check them in live mode. Creators also report a current early-access quirk: adjusting height while zoomed all the way in can glitch the screen until you zoom back out.
Keep reading
Paramaker appearance guide
Every body and face slider in Paramaker, tab by tab, with what each one changes.
Paramaker identity guide
Names, pronouns, voices and life stages on the train ticket, explained in depth.
Para personality guide
What vibes, social perks and talents actually do once your Para is in the game.
Editing a Para after creation
How to change looks, personality and relationships after the household is saved.
Paralives beginner's guide
New to the game? Start here before diving deep into Paramaker.
Hidden Paramaker features
All eight easily missed Paramaker features, each with its own quick explainer.