
The hacks at a glance
Every hack below comes from Geekism's advanced build tutorial, each one demonstrated on screen. A word on intent, because the search terms overlap: these are construction techniques, not cheat codes — if you want the console commands, that's our cheats hub; if build mode itself is new, start with the tutorial; and for workflow advice that saves you a rebuild, read the tips page instead.
- Three dots on a catalogue card hide extra shapes — cupboards and vines both carry variants.
- The separator tool splits one wall into two finishes, with no visible seam.
- Floor slabs rotate: two 90° buttons plus a free-angle control.
- Cushions double as snack packaging; one picture-frame cushion accepts your own images.
- Thick wall + plain window + a Kikaki panel = a built-in shower niche.
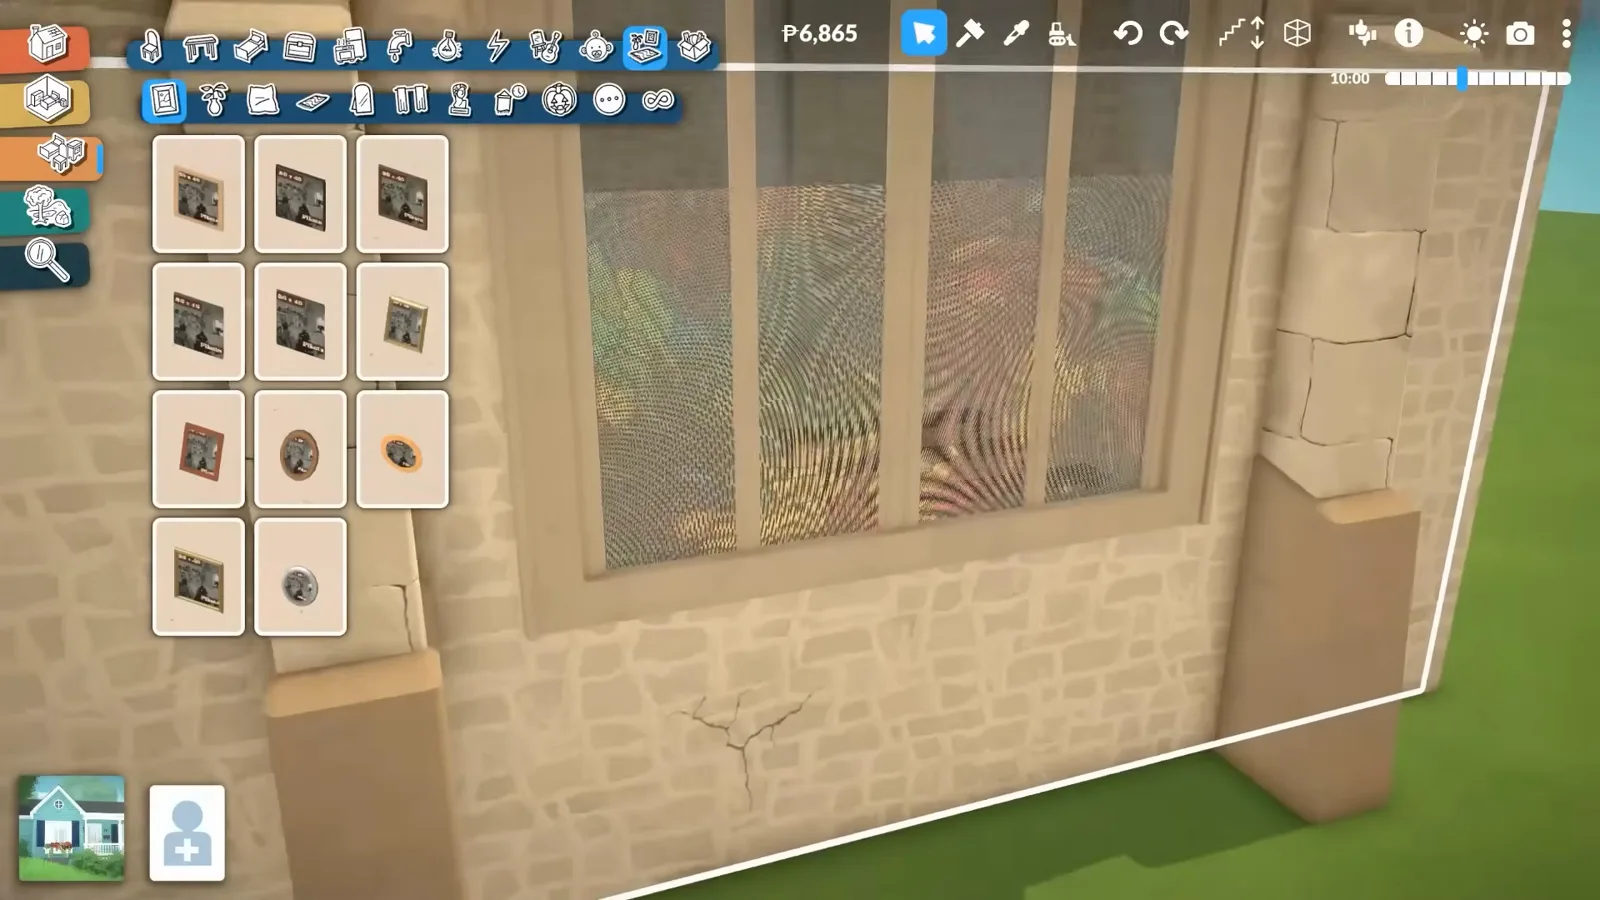
- A transparent PNG on the flat poster frame fakes stained glass.
- Leave a roof gap and clone a window into it for a skylight.
- Half walls and Kikaki panels convert roof space into a real attic — build it last.
Start here
Catalogue moves hiding in plain sight
Three techniques Geekism re-demonstrates because, weeks after launch, the comments prove players still miss them. Nothing here is new to this video — that is the point: the game hides these moves well.
- 1
Open the three dots on a catalogue card
That cupboard you want with the drawers? It is probably the card you are looking at. Click the three white dots on a card — Mili Counters & Cabinets here — and the same piece offers every variant: drawers, tall units, open shelving. Handles and colours come after placing. Vines do it too: Chepi ships in two types, each with several shapes. Geekism's habit worth stealing: check any new piece for the dots before declaring the game doesn't have one.
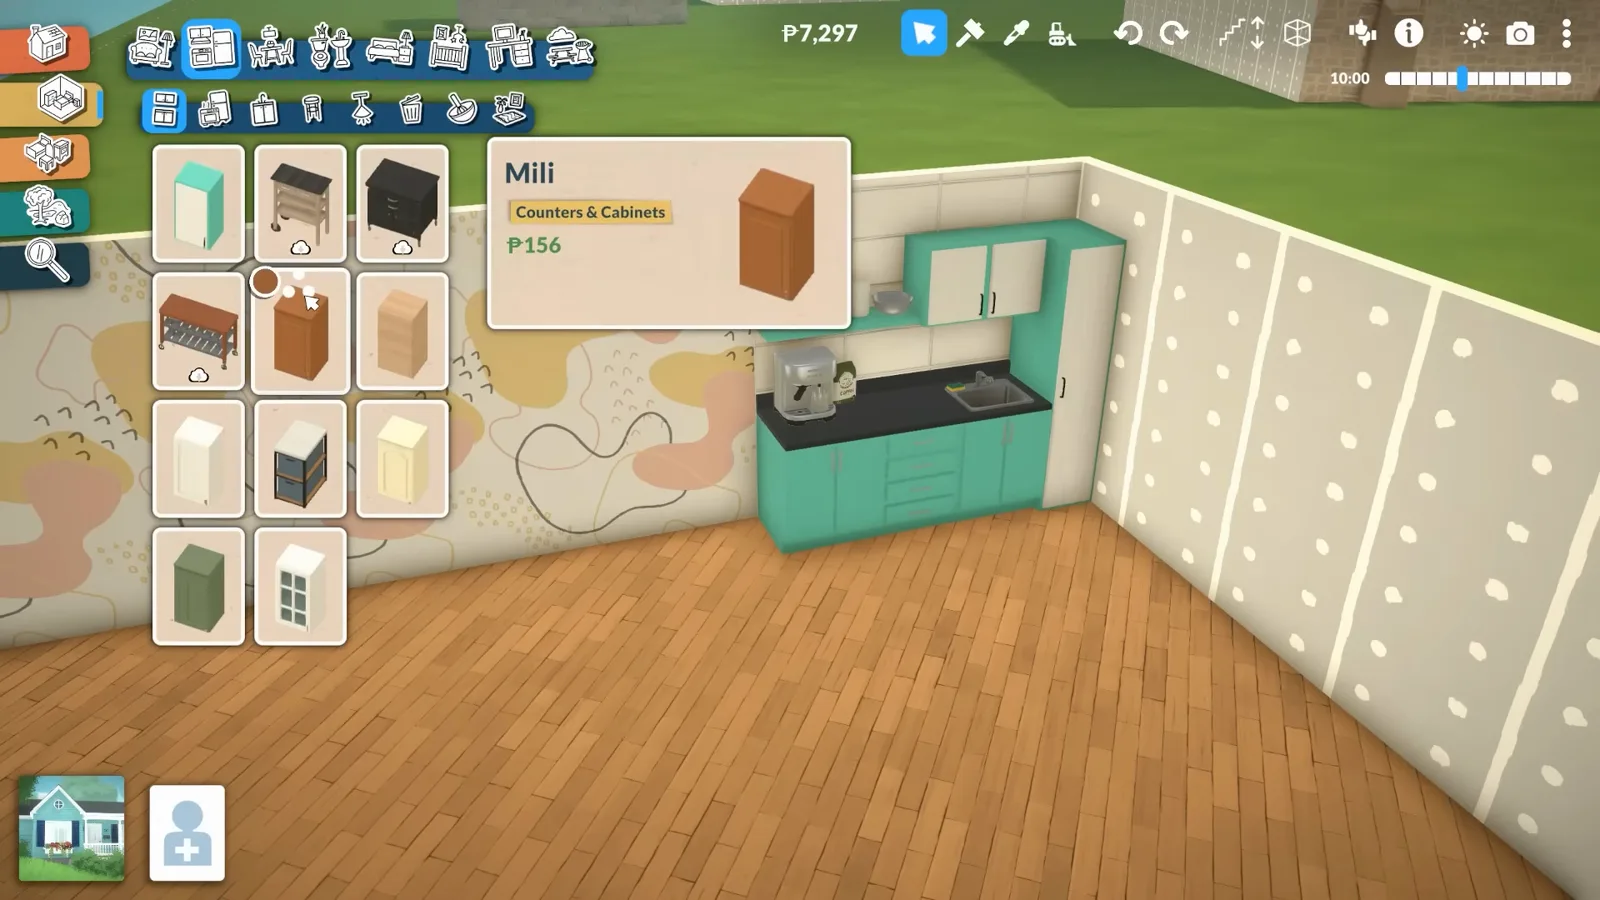
One card, every cupboard — the dots are a catalogue within the catalogue.Watch at 0:42 - 2
Split one wall with the separator tool
Tile behind the counters, wallpaper everywhere else — on the same unbroken wall. The separator lives under the three-dots menu on the Walls tool: it draws an invisible divider that only shows up in wall mode and behaves like a corner, so each side takes its own finish. The same move powers split floor heights elsewhere on this site — the separator divides walls, floors and ceilings alike.
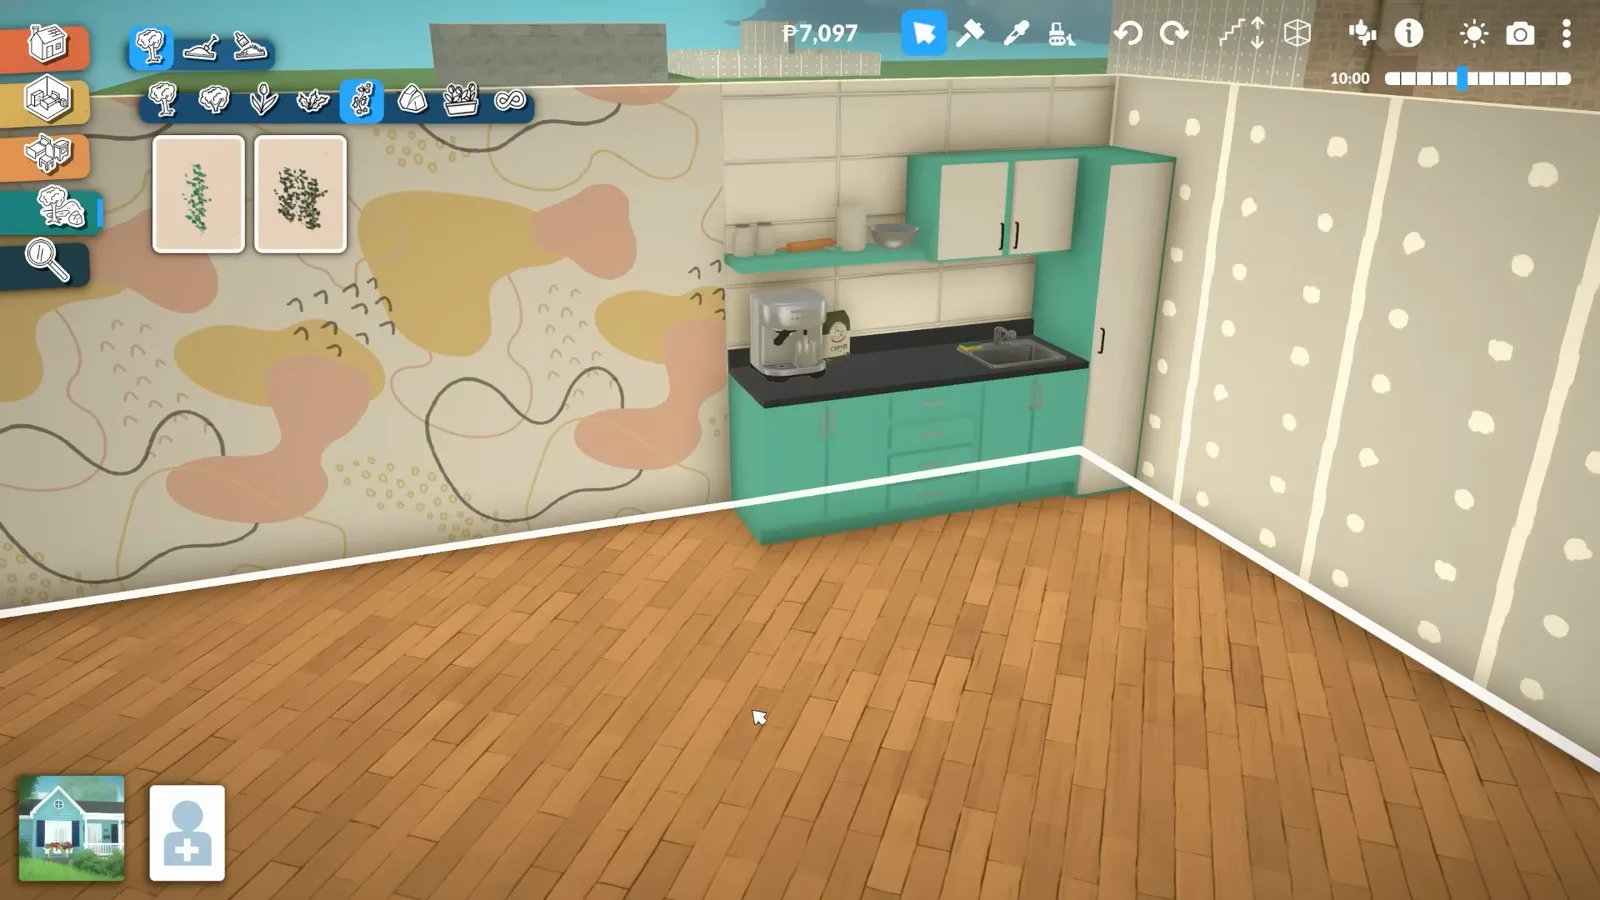
Two finishes, zero seam — the divider itself never renders.Watch at 1:40 - 3
Rotate floor planks to the wall they belong to
Click a floor slab and Paralives offers two 90° buttons plus a free-angle control for the direction the boards run. Odd-shaped rooms anchor the grain to the wrong wall by default, which is why the laminate in the demo read as an accident. Spin it until the planks follow the longest run — the demo also lays a diagonal floor entirely with the free angle.
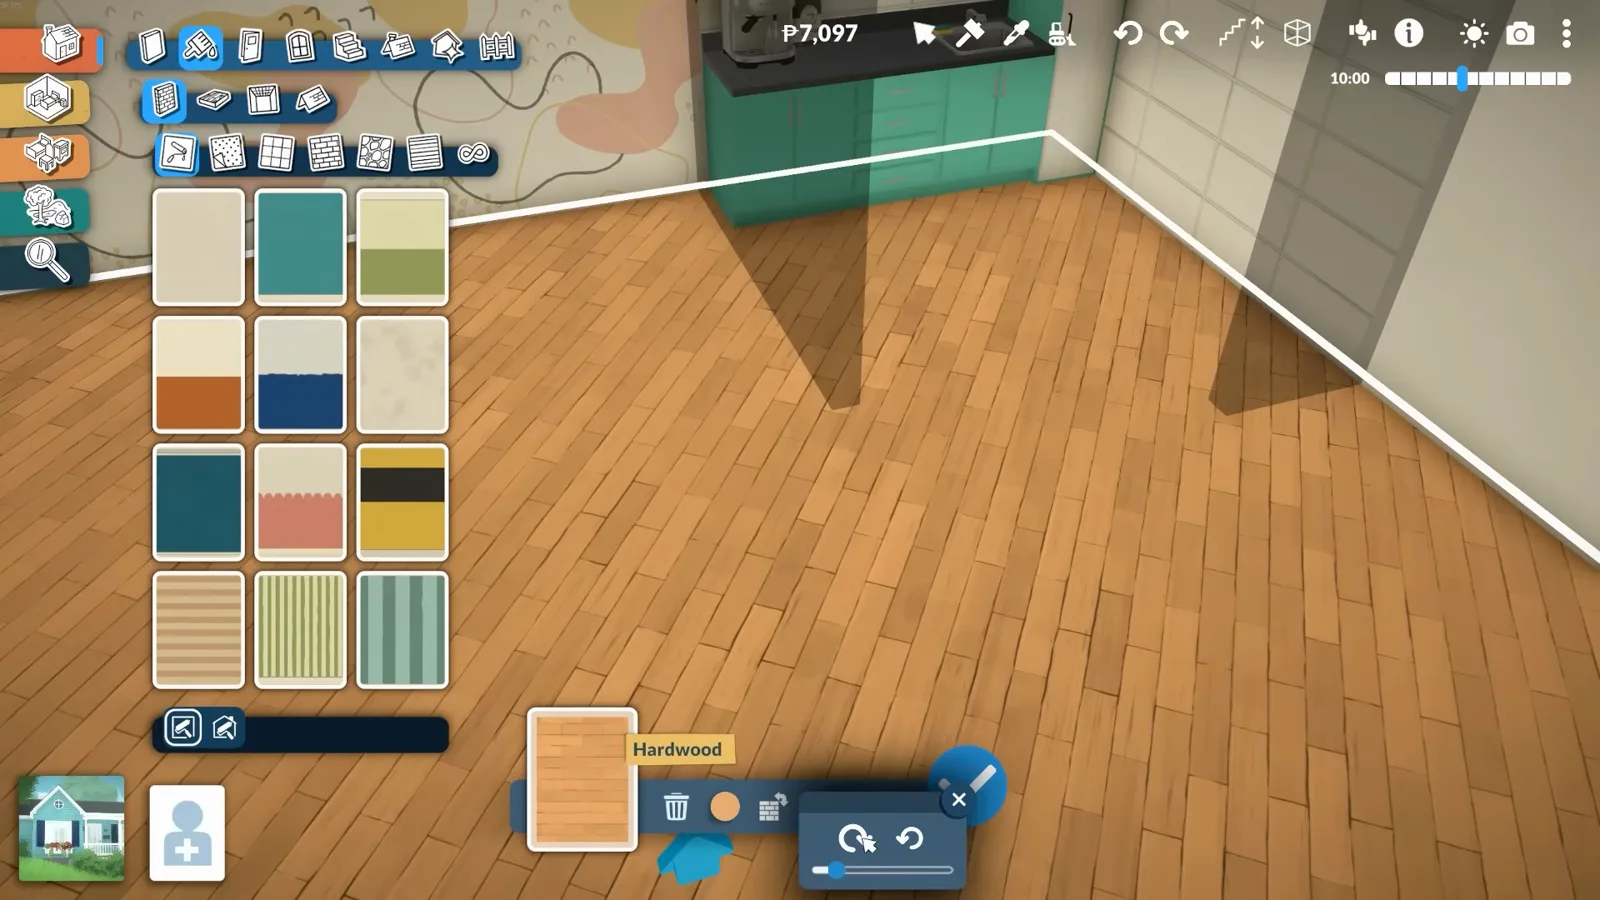
The grain follows the wall you point it at, not the room's origin.Watch at 2:28
Import and illusion
Your own art, inside the game
Paralives imports images onto objects with picture slots, and transparency survives the trip. Everything in this section is vanilla — no mods, no custom content downloads.
- 4
Turn cushions into snack packaging
The chip bags and popcorn on this shelf are neither mods nor downloads — they are cushions from the Decorative section, a repurpose Geekism credits to Poindexter on Facebook. Scroll the cushion catalogue with packaging in mind and the clutter options double. The lesson generalises: when the game lacks a prop, find the object category that rhymes with it.
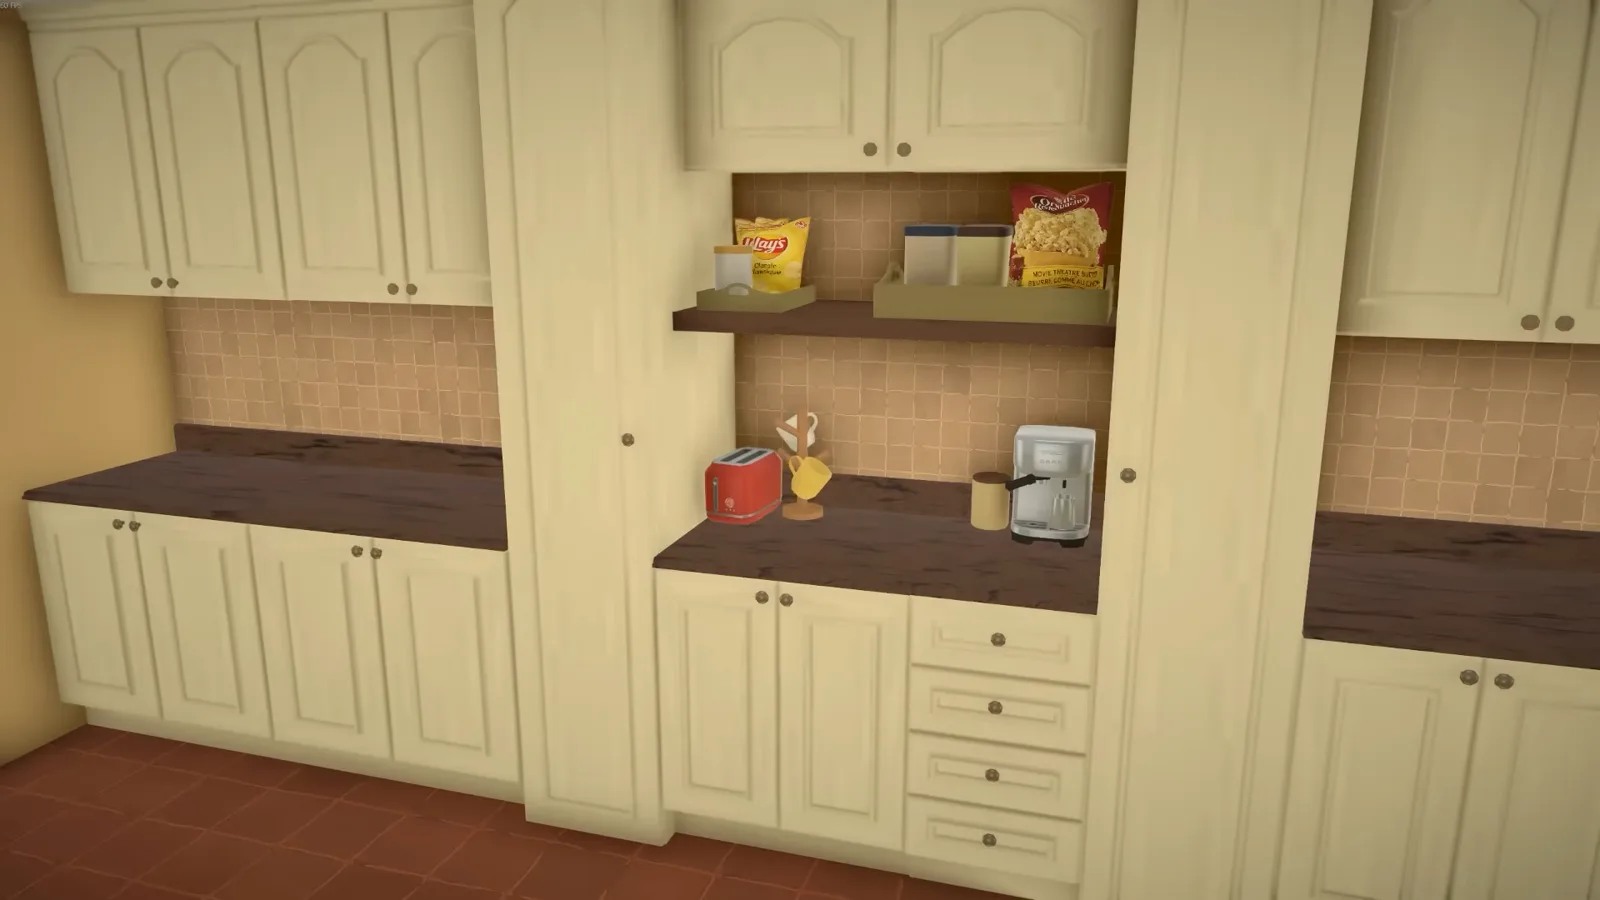
Snack packaging with no downloads: cushions, re-read as props.Watch at 3:02 - 5
Put your own art on the picture-frame cushion
One cushion in that section is functional like a picture frame — it carries a real image slot, the black-and-white print in the demo. Load it with in-game art or your own file: the official 0.1.5 patch notes confirm custom images on cushions, mugs, rugs, skateboards, curtains and flags. Keep the source image square; the slot stretches whatever you give it, so scale until the proportions read true.
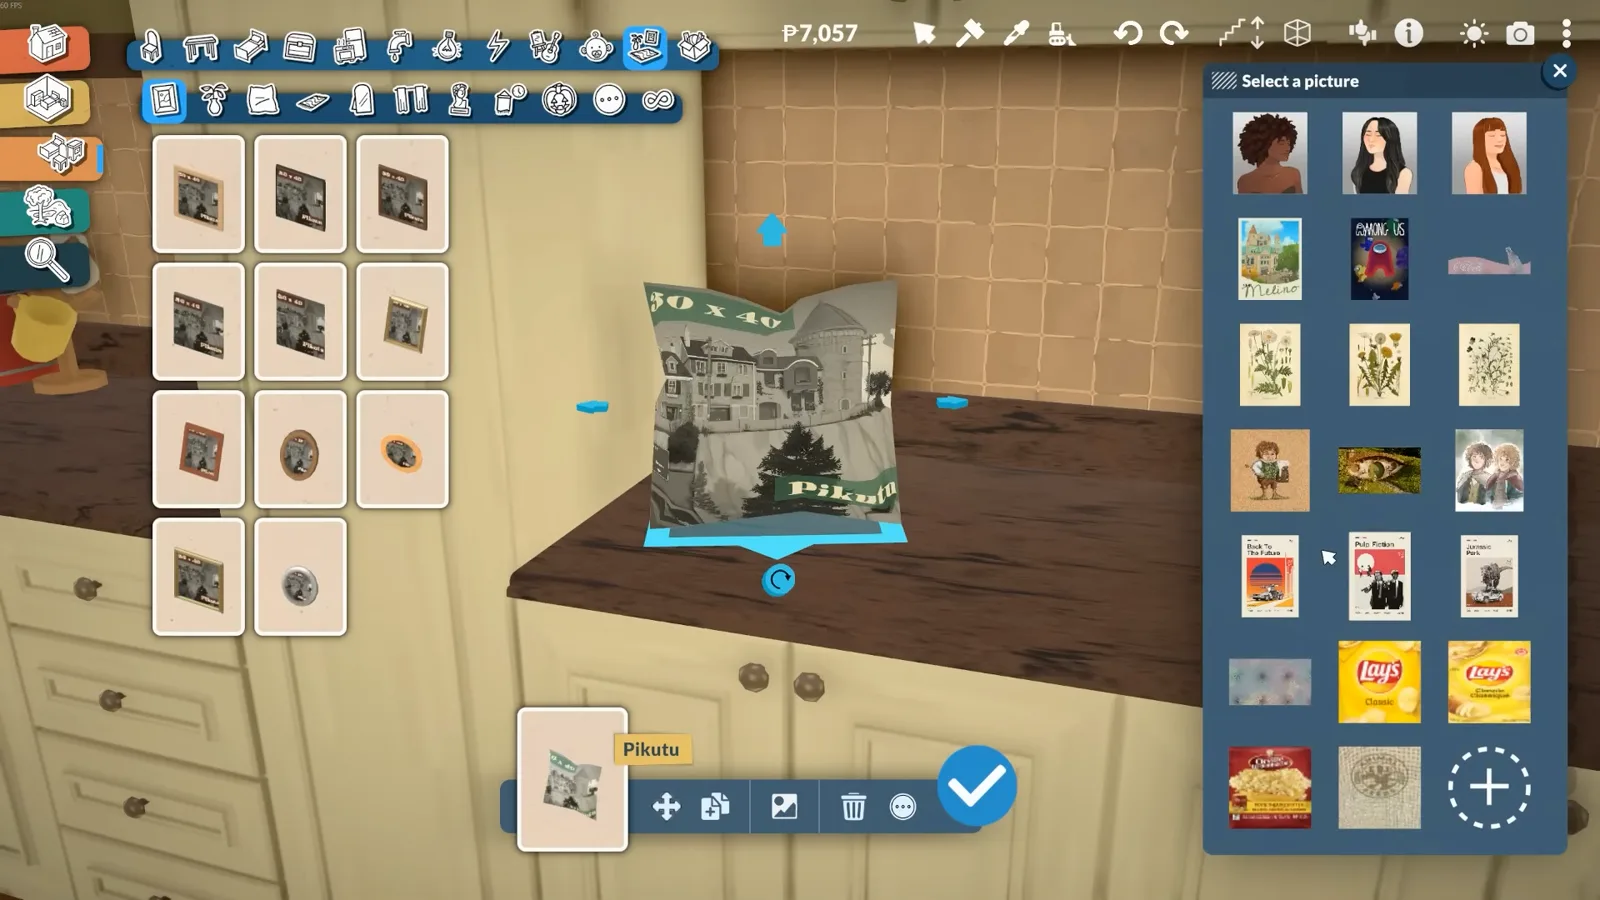
A vanilla image slot hiding in the cushion section.Watch at 4:02 - 6
Fake stained glass with a transparent PNG
Credited to Jovial Jolly on Reddit. Import a PNG whose art leaves most pixels clear, put it on the flat, depthless poster frame, then sink it just behind a window's glazing bars with the advanced move tool. The game's own wall-crack decals — one visible on the stonework below — are exactly such PNGs. One honest catch, in Geekism's words: partial transparency does not currently work, so the image makes every other pixel clear instead, which reads like the vinyl decals shops paint on their windows.
Every other pixel, clear: the closest the game gets to stained glass.Watch at 11:52
Community hack — credit Poindexter
A built-in shower niche from a thick wall
The trick that looks most like paid custom content: a recessed, tiled shower shelf. The recipe is a very thick wall, the plainest window in the game, and panels that hide the glass.
- 7
The payoff: a shower with a built-in niche
The finished hack, credited to Poindexter: what reads as joinery is a very thick wall, a window sunk into it, and panels hiding the glass. Nothing in the catalogue sells a recessed shower shelf — that is why the trick travels. The big room around it is demo scaffolding; in a real build the niche goes straight into a bathroom wall.
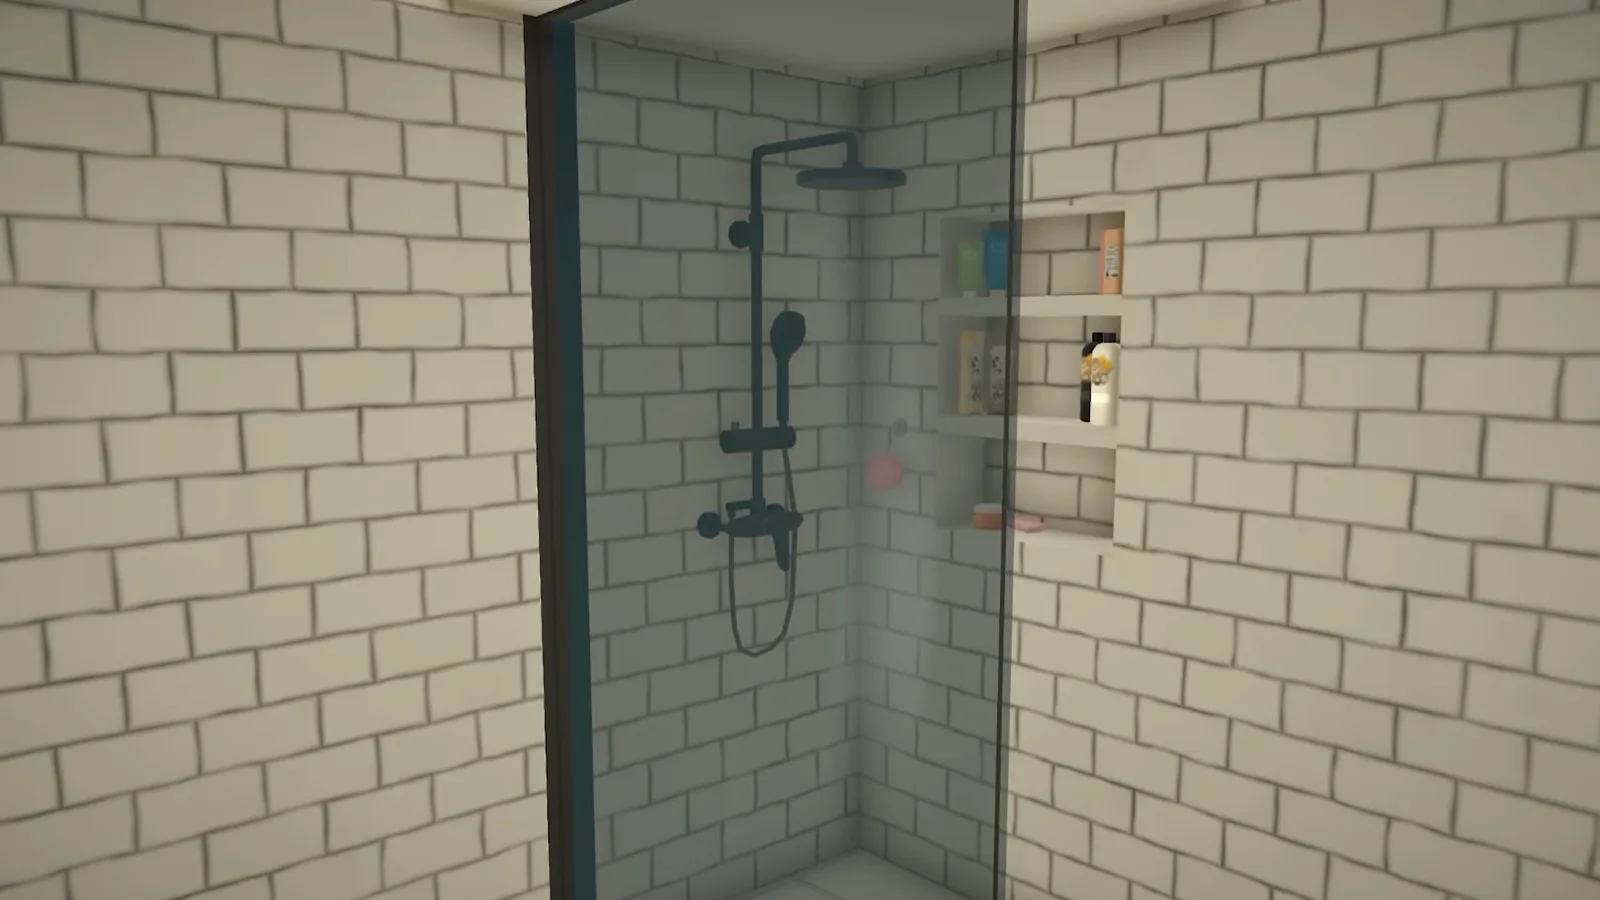
No niche product exists — the recess is assembled from four tricks.Watch at 5:18 - 8
Sink a plain window into a thickened wall
Thicken a wall with the wall tool, tile it, then place the plainest window you can find and drag it to size. Two clean-up moves from the demo: drag the window past the wall face and the wall's cut edge disappears, and pull it flush to the top before dragging out so the frame line vanishes too. Flip the window so the glass sits at the back, out of the recess.
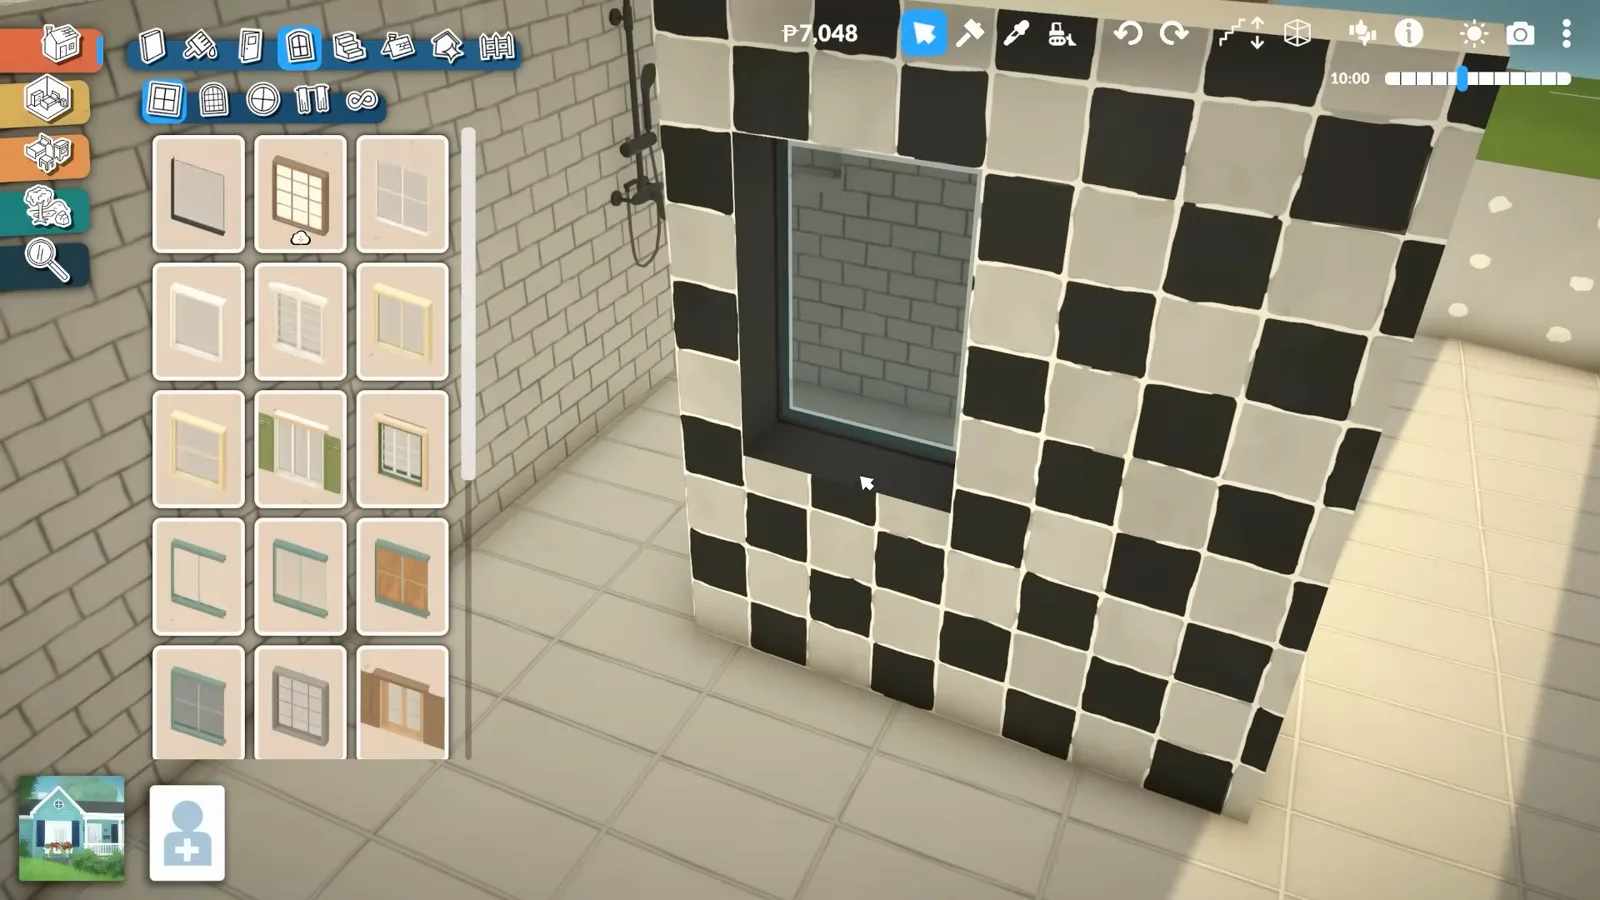
Drag past the wall face to shed every edge the game would draw.Watch at 7:22 - 9
Line the recess with a Kikaki panel
The Kikaki panel — Build mode, Architectural Details, Miscellaneous, a section Geekism says most players never open — closes the back of the recess. Move it with the advanced move tool (* (numpad) or the three-dot menu). Then, in wall paint mode, Alt + left-click (pipette selected) to copy the wall's finish onto the panel so the niche reads as one pour of tile. The demo's catch: single-swatch finishes transfer, but the black-and-white checker would not — the wall's pattern carries two swatches and the panel takes one.
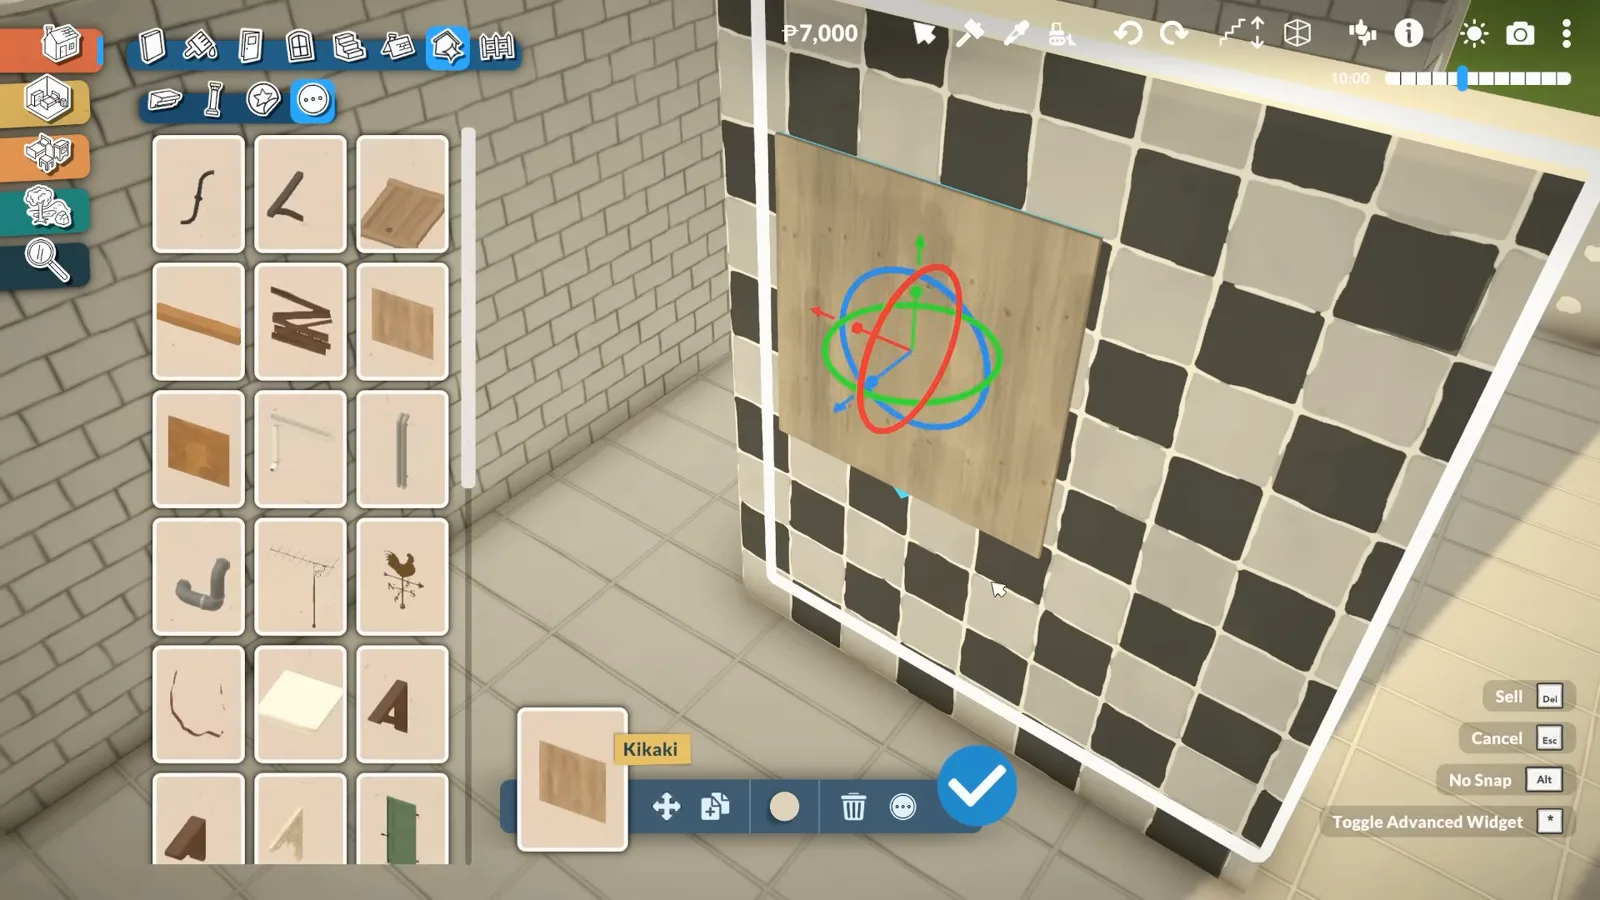
Kikaki, wall-paint clone, done — a niche that matches the room.Watch at 8:02
Community hack — credit Pixelated
Skylights from a roof gap and a cloned window
Paralives has no skylight tool, but a window dragged into a roof gap reads as one. The craft is in dodging the hole a moved window leaves behind — and in neatening the seam afterwards.
- 10
Stop two roof planes short and glaze the gap
The simple skylight, already circulating before this video — Geekism credits Pixelated's tutorial. End each roof plane short of the ridge, then fill the gap with a window resized to span it. This artist studio runs one full-width glazed strip and reads as architecture, not workaround. For the other school — separator square, deleted ceiling, tilted gable windows — our skylight guide details three methods step by step.
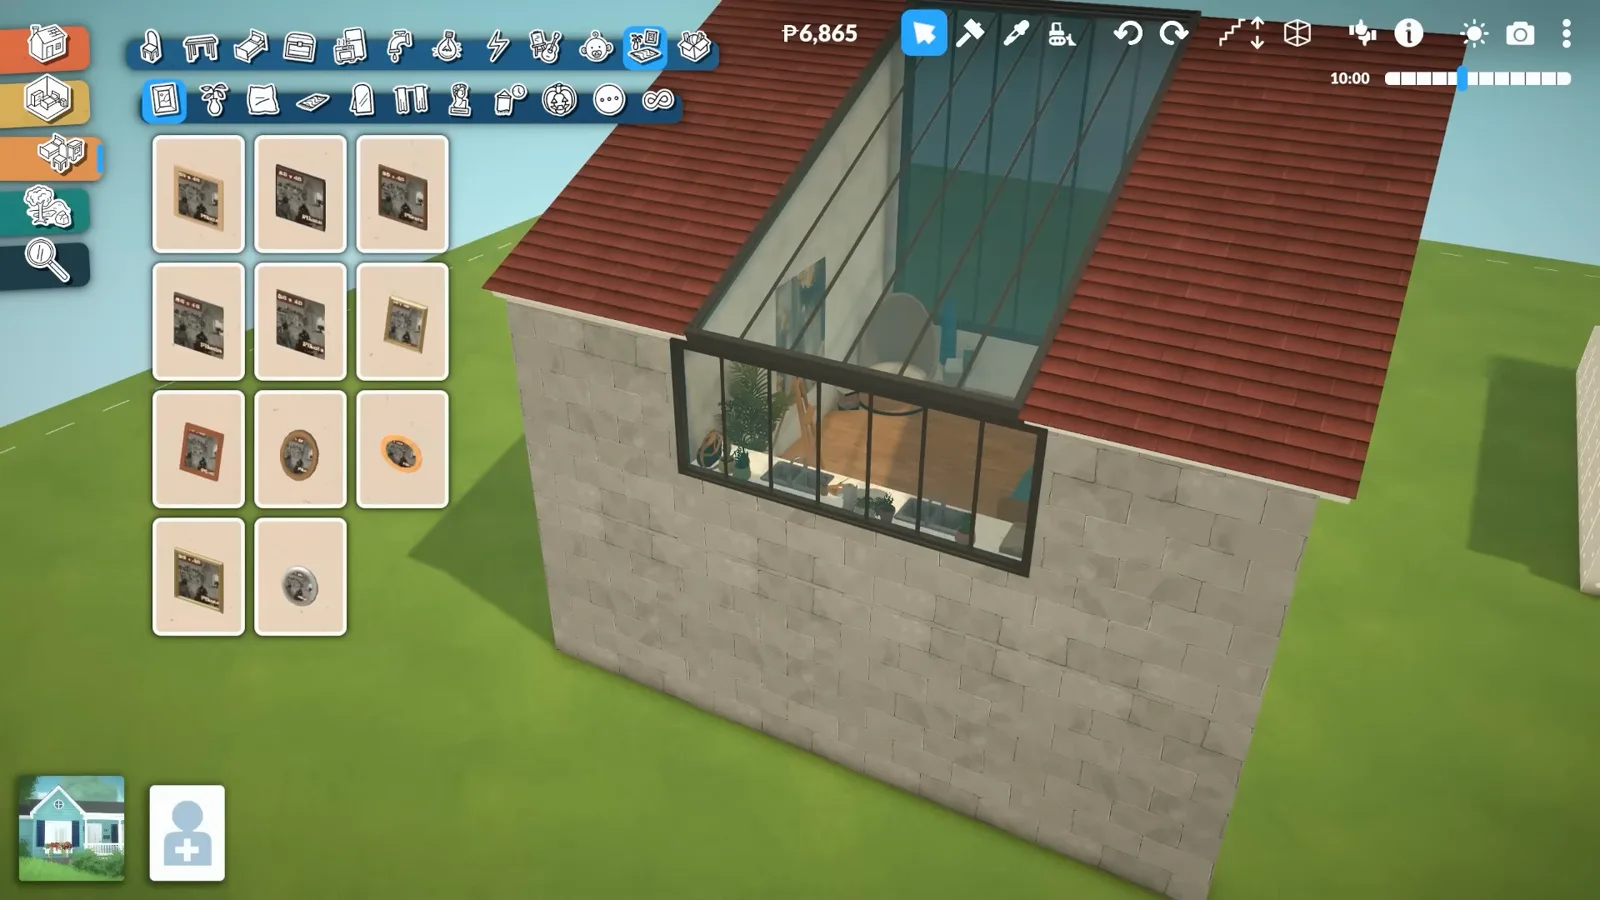
The gap is the skylight; the window is just the glass.Watch at 12:25 - 11
Clone the window from a hole that already exists
Moving a window off a wall leaves a permanent hole where it stood — so make that first hole somewhere useful. In the demo the big window at the back becomes the donor: click it, shrink the clone below its size, and drag it off with the advanced move tool. No new hole appears, because the donor already made one. Angle it into the roof gap, Alt (hold) to seat it exactly, then tie the seam up with a beam or trim piece.
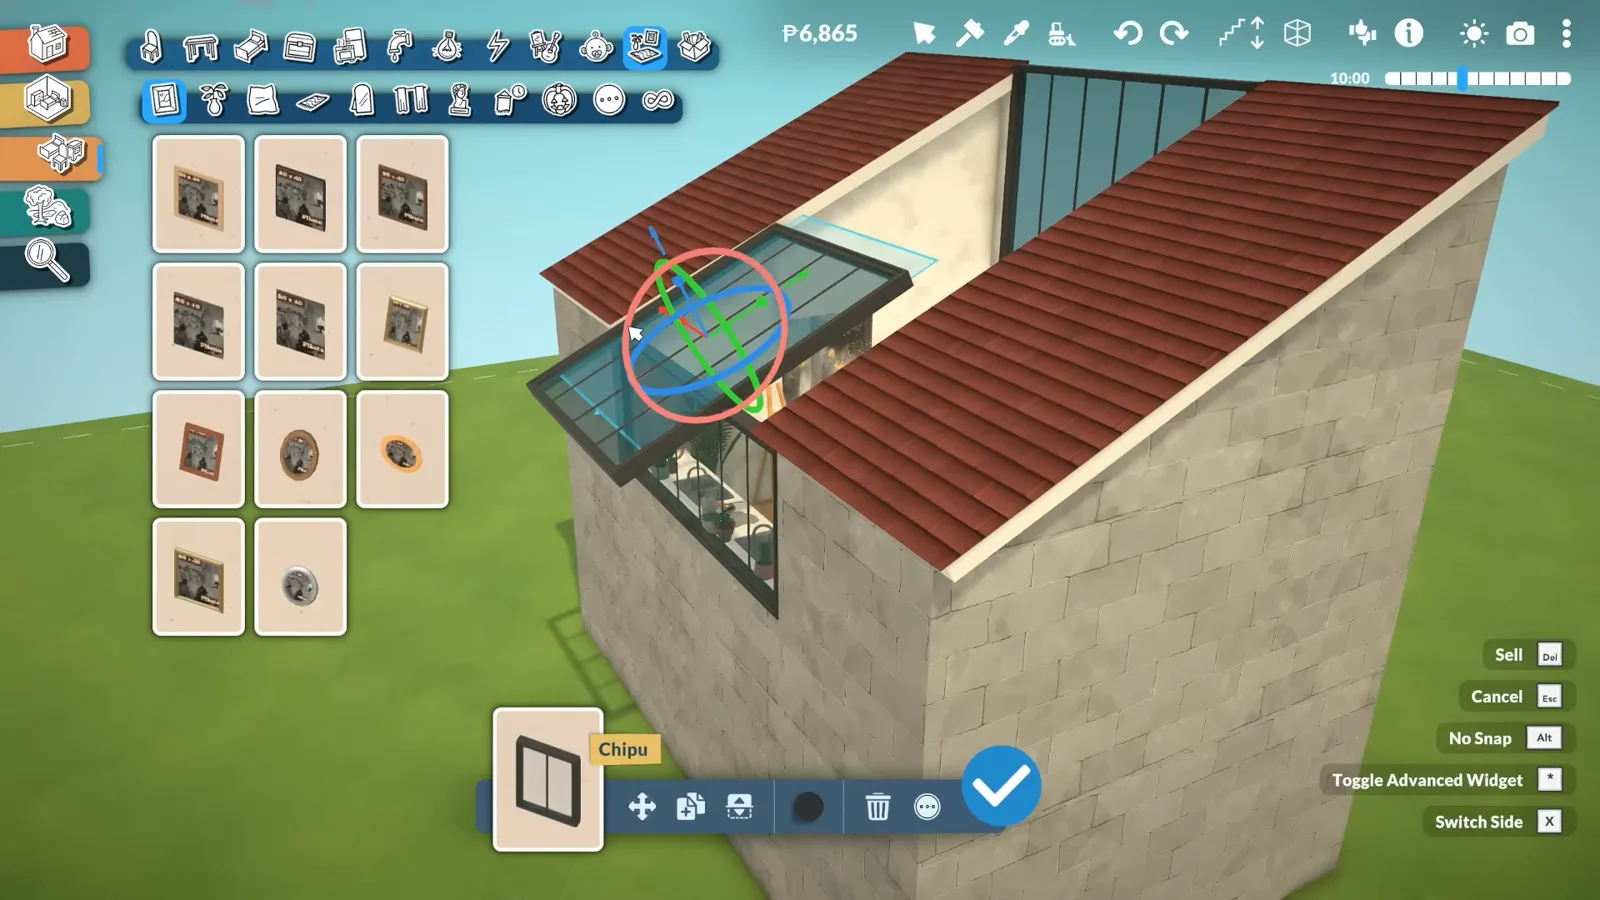
Donor window, clone, gap — no new holes along the way.Watch at 14:02
Community hack — credit I am not real
The attic conversion: expert tier, real jank
A full bedroom inside the roof plane, with sloped walls and working skylights. Geekism shows it because this video is about pushing build mode — and warns that it is the most fragile technique on this page.
- 12
The goal: a real bedroom inside the roof
Geekism shows the finished attic first because the build order is the whole game here: a bedroom with walls that follow the roof slope and skylights that drop daylight onto the bed. Credit to I am not real on Reddit, who worked out several routes to this; the half-wall method below is the one Geekism calls the most elegant — and the most fragile.
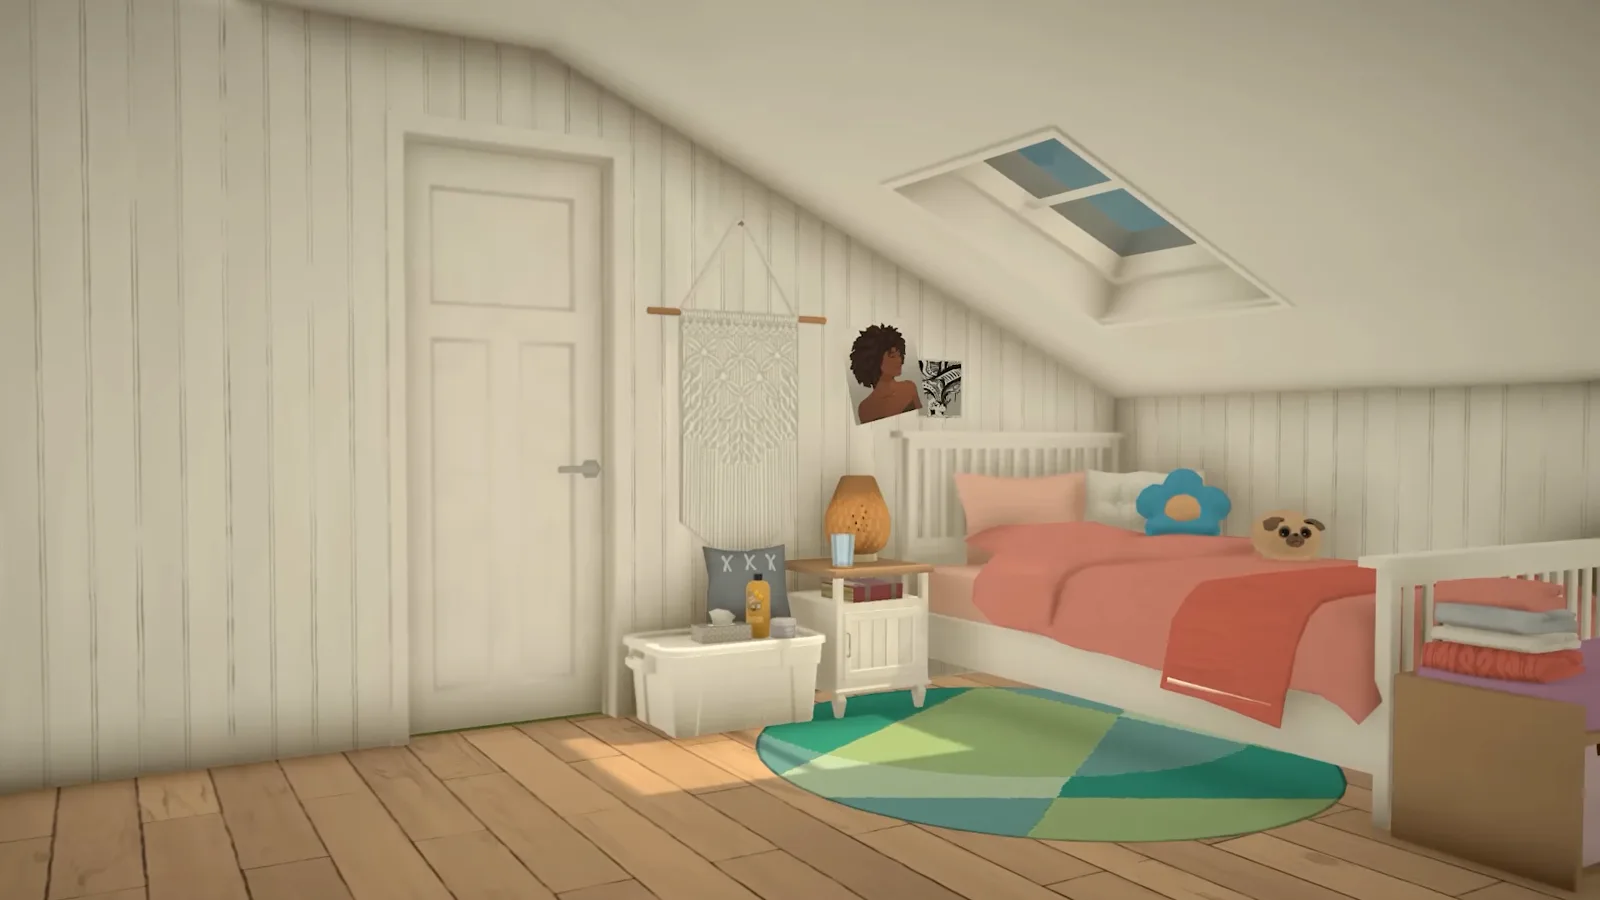
A room the game has no tool for, assembled from half walls and panels.Watch at 15:20 - 13
Step half walls down to draw the slope
Build three sides of the room normally, then draw the sloped corner in half walls: start tall, click the height down, and let the next run snap to the last. The demo lands around six clicks — the height Geekism found where a bed still works against it and Paras can climb in and out. Then take the separator across at the highest point, go up a level and delete the ceiling above the slope.
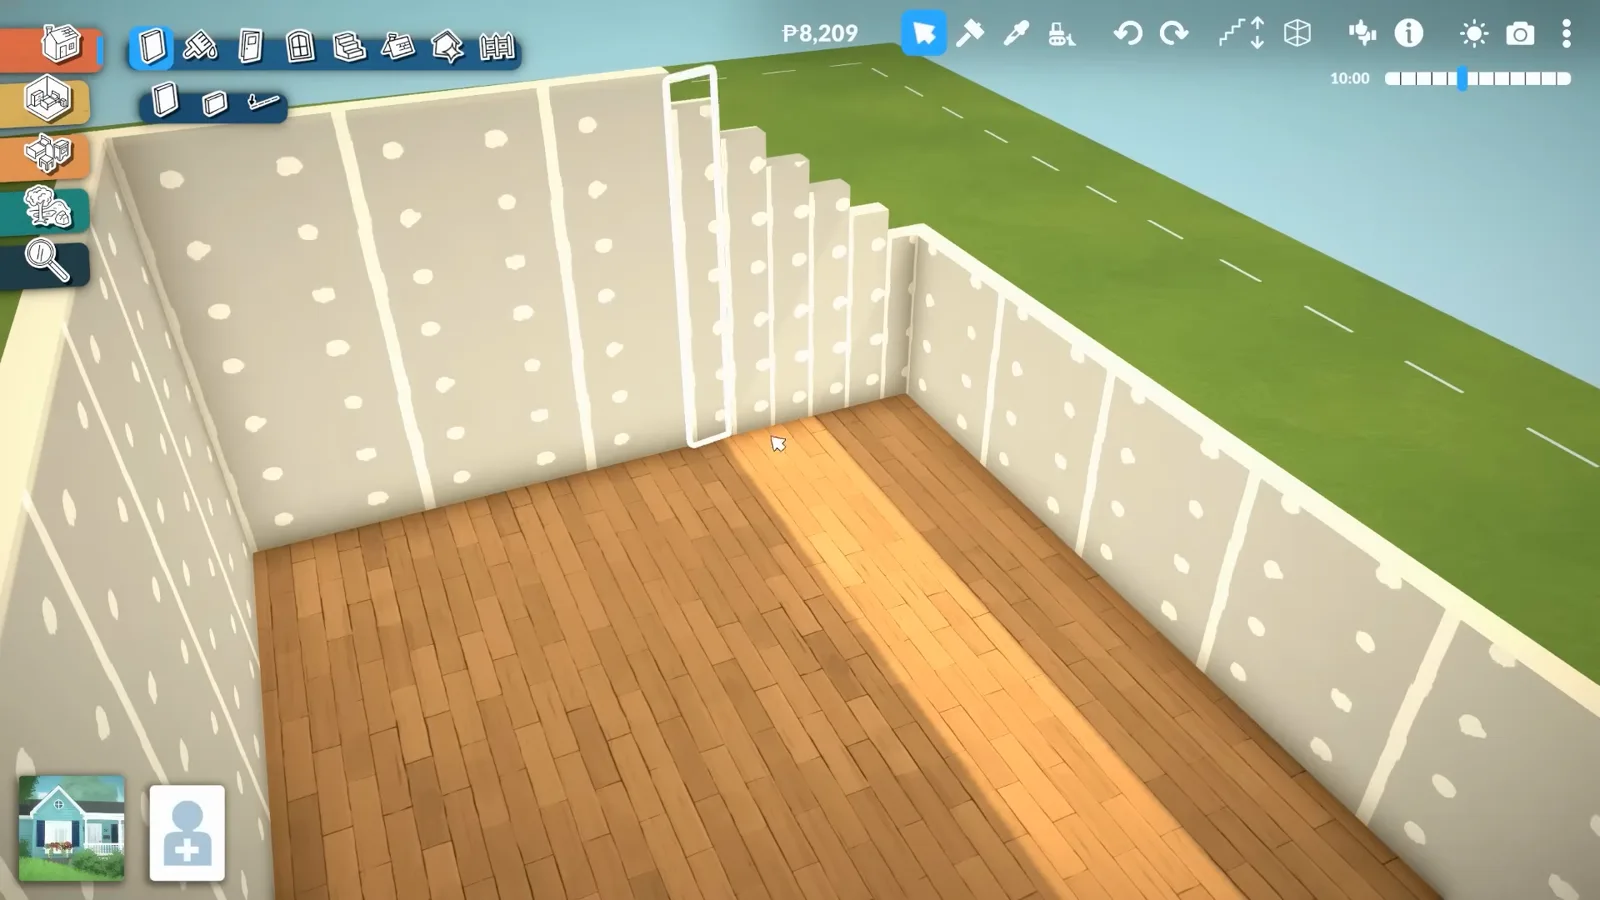
Half walls in descending clicks: the slope, drawn in plan.Watch at 17:12 - 14
Lean Kikaki panels into the slope
Kikaki panels become the sloped ceiling. Lean one against the stepped wall, clone a plain finish onto it in wall paint mode — busy patterns refuse to transfer, plain colours and stripes behave — then angle it with the advanced move tool, holding Shift (hold) for a clean reference line. Run it up and down the wall to check the angle before committing. The gizmo's arrows look wrong after rotating, Geekism notes, but they still work.
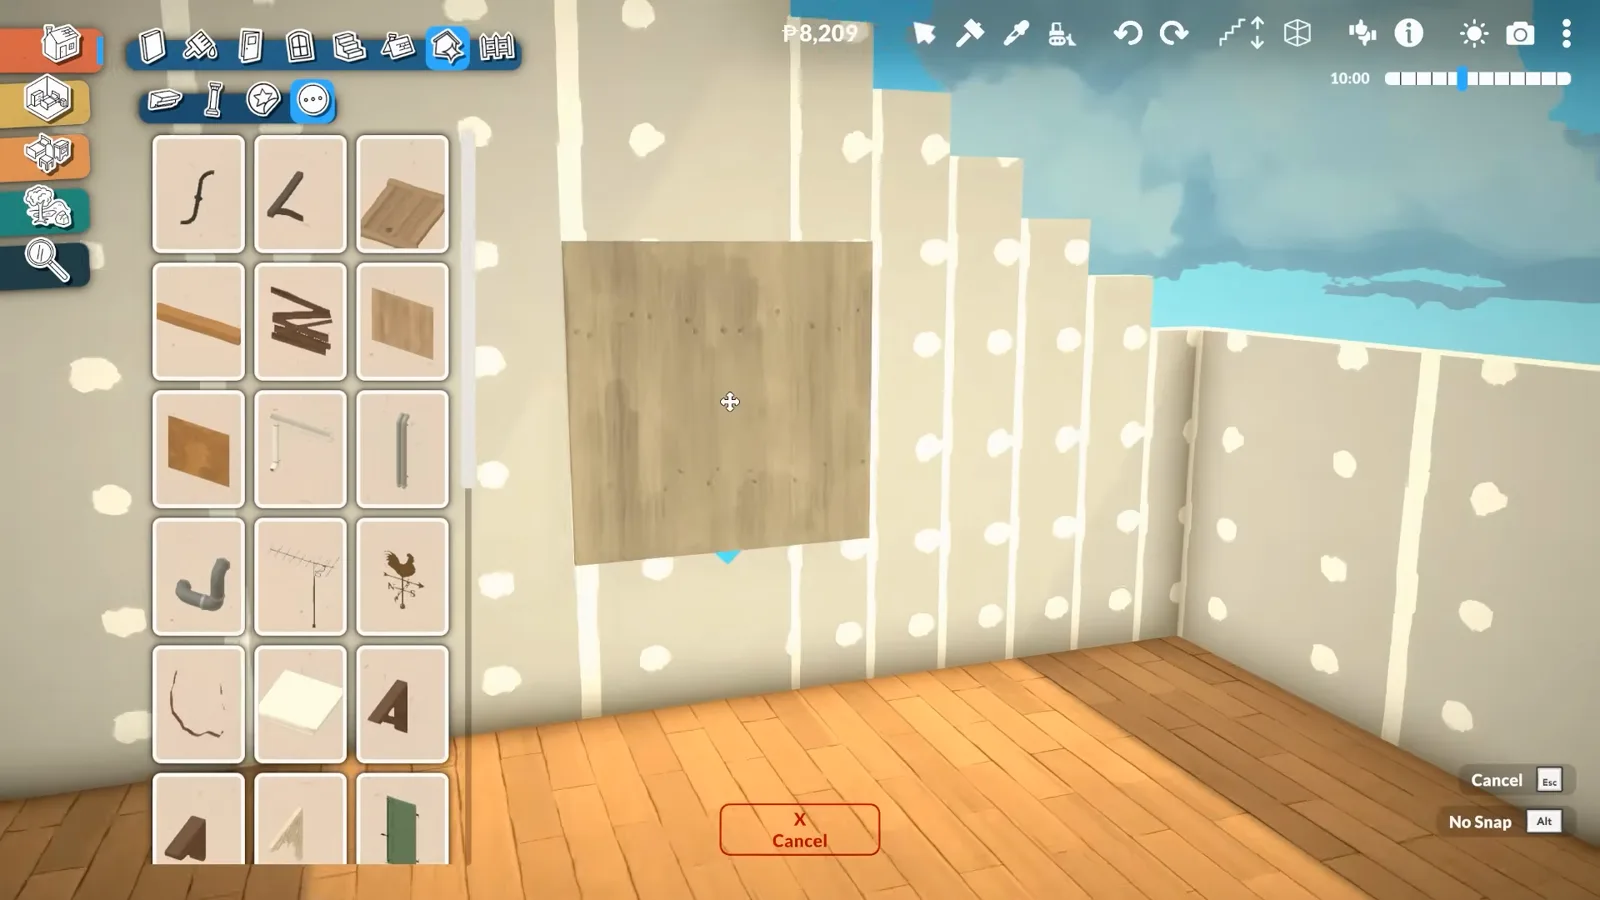
Lean, clone the finish, angle, re-check — one panel at a time.Watch at 18:02 - 15
Set a Chipu window into the slope
Only one window in the game reads as a skylight, says the demo: the cross-bar Chipu. Place it on a normal wall first — it leaves a permanent hole where it stood, so choose a wall you can hide behind a bookcase — then advanced-move it up into the slope and fatten it with the blue arrow until it bites into both ceiling and roof, alcove facing inward. Repeat the panel trick in flat roof pieces above, and build all of this last: later construction shoves advanced-moved pieces out of line.
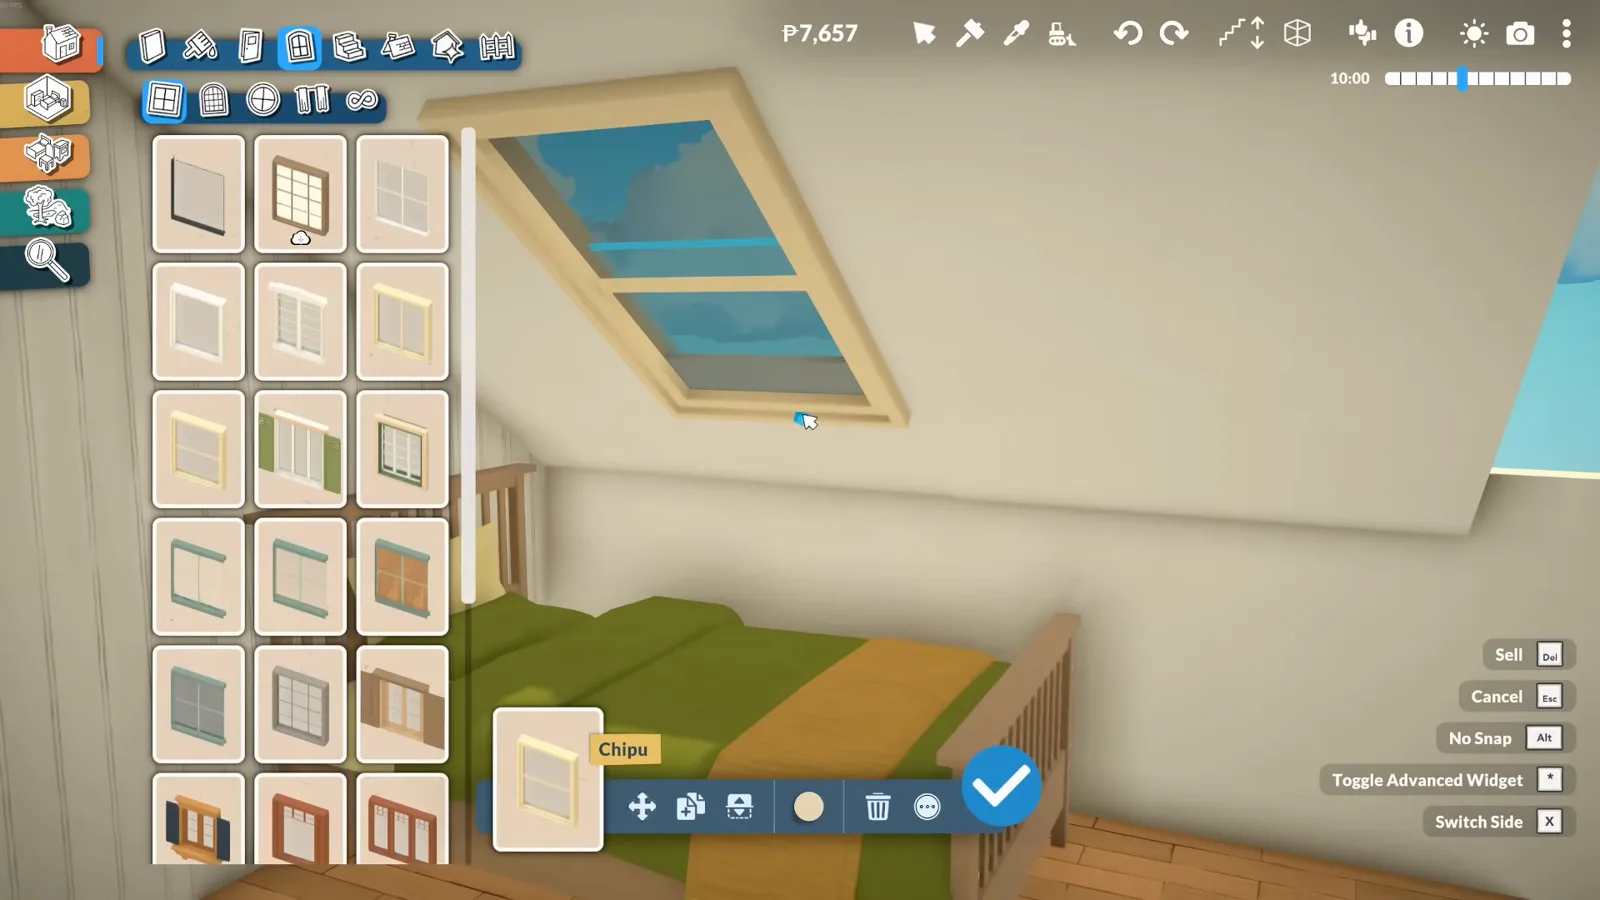
One window, one slope, done last — the skylight that makes the attic.Watch at 22:38
Before you build: how fragile are these hacks?
The advanced move tool is the load-bearing hack behind the shower niche, the skylights and the whole attic conversion — and it is the touchiest tool in the game. Geekism's demonstration: pieces shoved out of place by later construction, pieces that wander off on their own, and pieces that have drifted after reloading a save. The devs acknowledged the drift in patch notes without shipping a fix, and whether it still bites in 0.1.8b is unverified — test on a scratch save before you commit a house to it.
Hence the build-order rule: anything advanced-moved goes in last. Walls, floors, doors, windows, outside fencing — all finished before the panels and windows tilt into place. Geekism's second warning: duplicating an angled piece does not keep its angle. The clone snaps back to the nearest wall, so every sloped panel in the attic is angled by hand, one at a time.
His own verdict on who should bother: if you build for the process, or stage storytelling vignettes, the attic conversion is worth the head-banging. If you just play the game, the jank follows you into live mode — the sloped walls and their seams never quite disappear. The shower niche and the stained glass, by contrast, are furniture-adjacent and safe to try on any save.
Build hacks FAQ
- Are there cheat codes for Paralives build mode?
- No — build mode has no cheat console codes. What players call build cheats are techniques like the ones on this page: advanced placement, separator walls, imported images. The console commands the game does ship are catalogued in our cheats hub, with what each one actually does.
- What is the difference between build hacks and build tips?
- Tips are workflow habits that stop small builds turning into rebuilds — our tips page collects fifteen. Hacks are construction tricks that fake something the catalogue does not sell: a shower niche, stained glass, a skylight, an attic. You can follow every tip and never touch a hack, and vice versa.
- Can you import your own pictures into Paralives?
- Yes. Since the 0.1.5 patch, objects with picture slots — cushions, mugs, rugs, skateboards, curtains and flags — accept custom images added from your computer. Transparency survives the import: a PNG with clear pixels on the flat poster frame is exactly how the stained glass in step 6 works.
- Which window works as a skylight?
- The cross-bar window — the catalogue card labelled Chipu in Geekism's footage. In his words it is pretty much the only window in the game that currently reads as a skylight. It has to be placed on a normal wall first, which leaves a permanent hole where it stood, so start it on a wall whose hole you can hide behind furniture before advancing it into the roof.
- Do these hacks break after a Paralives update?
- The catalogue-level tricks — three-dot variants, separators, floor rotation — are shipped features and behave like any other tool. The imported-image and advanced-move tricks depend on systems the studio is still changing; the devs have already acknowledged that advanced-moved pieces can drift. Re-check each hack after a notable patch, and keep hack-heavy lots on a separate save so your main house never carries the risk.
Keep going
Build mode tips that save a rebuild
The workflow advice this page deliberately is not: fifteen habits for everyday building, from measuring first to choosing the right tool once.
The beginner build tutorial
Brand new to build mode? Walls, floors, roofs and the catalogue from zero, one verified step at a time.
Paralives cheats and console codes
The actual cheat console: every working code and what it does — and why build mode is not in it.
Advanced object placement
The gizmo behind half of these hacks, documented in depth: moving, sinking and rotating anything off the grid.
Three more ways to build a skylight
The separator-and-deleted-ceiling school of skylights, step by step with two more builders.
How to build an attic room
A roof-space room without the expert-tier jank — stairs first, roof dropped on last.